Download

1 / 105
1.05k likes | 1.27k Views
Dissolved Oxygen and Biochemical Oxygen Demand Analyses. Prepared By Michigan Department of Environmental Quality Operator Training and Certification Unit. Note: These Procedures are available in the OTCU Laboratory manual which is available on the OTCU website. Dissolved Oxygen. D.O.

E N D
Dissolved Oxygen and Biochemical Oxygen Demand Analyses Prepared By Michigan Department of Environmental Quality Operator Training and Certification Unit Note: These Procedures are available in the OTCU Laboratory manual which is available on the OTCU website.
Dissolved Oxygen D.O. Amount of “FREE” Oxygen O2 In the Water Required By : FISH MICROORGANISMS ( Bacteria)
CH2O + O2 CO2 + H2O RESPIRATION Organic Matter Converted to: Carbon Dioxide and Water
CH2O + O2 CO2 + H2O RESPIRATION Reason for Treatment Basis of Secondary Treatment Basis of BOD Analysis
+ O2 NO3 NH3 + O2 NO2 Nitrification BIOLOGICAL Oxidation of Nitrogen From AMMONIA (NH3) to NITRATE (NO3) to NITRITE ( NO2)
+ O2 NO3 NH3 + O2 NO2 NITRIFICATION May be Required: Oxygen Demand Reduction Ammonia Removal (toxic)
Reason for D.O.Analysis Used in BOD Analysis Treatment Processes Treatment Plant Effluents Receiving Stream
Maximum D.O. Concentrations in Water (Saturation) Temperature 0C Max. Concentration mg/L 0 14.6 4 13.1 8 11.9 12 10.8 16 10.0 20 9.2 24 8.5 28 7.9 30 7.6
SAMPLE COLLECTION Sample Atmosphere 21 % 0 to 10 mg/L 210,000 mg/L
Do Not AERATE Sample YES NO Do Not Splash Sample in Air or Let Air Circulate in Sample
WINKLER DISSOLVEDOXYGEN DETERMINATION
WINKLERDissolved OxygenPROCEDURE with the ALSTERBERG AZIDE MODIFICATION AZIDE Destroys NITRITE
Winkler Method + + Mn(OH)2 K2SO4 Mn SO4 2 KOH + 2 MnO(OH)2 O2 2 Mn(OH)2 + + 2 H2SO4 Mn(SO4)2 3 H2O MnO(OH)2 + + + Mn SO4 K2SO4 I2 Mn(SO4)2 2 KI Iodometric Method 1. Takes Mixing 2. Takes Time 3. Free IODINE released in relation to D.O. in Sample
Winkler Procedure 1 mL Alkaline Azide Solution 1 mL Manganous Sulfate
Stopper Mix Well Allow Floc to Settle
Settle Again Repeat Mixing Contact and Time
White - No Dissolved Oxygen
Sulfamic Acid 1 mL Sulfuric Acid Mix
Measure 100 mL Iodine Solution
Titration Sodium Thiosulfate (Thio) Phenylarsene Oxide (PAO) OR
End Point Indicator Starch
Clear Blue
Mg/L D.O. = mL of Titrant X Normality of Titrant X 8 X 1000 mL of Sample = 1 0.0125 N X 8 X 1000 100
Mg/L D.O. = X 1 mL of Titrant When 100 ml of Sample is Titrated with 0.0125 Normal Titrant Each mL used Equals 1 mg/L of D.O. If 4.6 mL is Used Then the D.O. in the Sample is 4.6 mg/L
1 mL of Titrant = 1 mg/L D.O. With Any of the Following Combinations of Sample Volumes and Normalities Sample VolumeNormality 100 mL 0.0125 N 200 mL 0.0250 N 300 mL 0.0375 N
Outline Of Winkler Dissolved Oxygen Procedure 3.1 3.13 Add 1 mL MnSO4 Soln. and 1 mL Alkali-iodide-azide Reagent Yellow To Brown Floc, D.O. Present 3.11 Add 1 mL H2SO4 and Mix Carefully Collect Sample In 300 mL BOD Bottle 3.12 Mix By Inverting and Allow To Settle Repeat Mixing and Settling White Floc, No D.O.
Titration of Iodine Solution 3.22 3.24 Titrate With THIO Titrate to Clear 3.21 3.23 Pour 100 mL Into Flask Add Starch Indicator Pale Yellow Clear Blue Reddish- Brown
Winkler Method + + Mn(OH)2 K2SO4 Mn SO4 2 KOH + 2 MnO(OH)2 O2 2 Mn(OH)2 + + 2 H2SO4 Mn(SO4)2 3 H2O MnO(OH)2 + + + Mn SO4 K2SO4 I2 Mn(SO4)2 2 KI Iodometric Method 1. Takes Mixing 2. Takes Time 3. Free IODINE released in relation to D.O. in Sample
D.O. Procedure Electrode Methods
MEMBRANE ELECTRODE METHOD The membrane electrode is composed of two solid metal electrodes in contact with supporting electrolyte separated from the test solution by a gas permeable membrane. Oxygen dissolved in the sample diffuses through the membrane on the DO probe and is chemically reduced (accepts electrons), producing an electrical current between the anode and cathode in the probe. The amount of current is proportional to the concentration of DO. Following proper calibration, the meter relates this current to the concentration of DO.
O2 + 4H+ + 4e- 2H2O CLARK ELECTRODE Meter e- Internal Solution Cathode Anode Gas Permeable Membrane O2 O2 O2 O2 O2 Sample O2 O2 O2 O2 O2 O2 O2 O2
MEMBRANE ELECTRODE METHOD Calibration Comparison with Winkler Titration 1. Fill two BOD bottles completely full of BOD dilution water, being very careful not to introduce air into either bottle. 2. Analyze one bottle for D.O. using the Winkler titration. 3. Insert the electrode into the second bottle, turn on the stirring mechanism, and wait for the reading to stabilize. 4. Calibrate the meter to the D.O. value obtained in the titration. 5. The meter is now ready for sample analysis
MEMBRANE ELECTRODE METHOD “AIR” Calibration This procedure varies considerably among the various instrument models available. Therefore, the procedure must be obtained from the instrument manual, but the following points should be noted. 1. Where possible with the specific equipment being used, compensation should be made during calibration for both ambient temperature and local atmospheric pressure. This pressure should be determined using a reliable onsite barometer. The oxygen solubility table following this procedure may be used. 2. Carefully blot any water droplets from the membrane using a soft tissue. 3. During calibration, be sure the membrane is exposed to fresh air. Laying the electrode on the bench for calibration is usually adequate. 4. Complete the calibration as soon as possible before the electrode membrane begins to dry. 5. The temperature registered on the meter should be checked against a trusted thermometer often. 6. Daily calibration of the D.O. meter is required. Calibration should also be verified after every five or six sample measurements. 7. Assure sufficient sample flow across membrane surface during analysis to overcome erratic response.
CLARK ELECTRODE NOT REQUIRED Calibration NO Temperature Atmospheric Pressure (Use a Reliable Barometer)
How Does LDO Work? • A sensor is coated with a luminescent material. • Blue light from an LED strikes the luminescent chemical on the sensor. • The luminescent chemical instantly becomes excited. Probe Sensor Photo Diode LED LED
How Does LDO Work? • As the excited chemical relaxes, it releases red light. Probe Sensor • The red light is detected by a photo diode. • The time it takes for the chemical to return to a relaxed state is measured Photo Diode LED LED
Probe Sensor Photo Diode LED LED Clear, Gas Impermeable Substrate Luminescent Indicator Molecules Gas Permeable Polymer Matrix Oxygen How Does LDO Work? • When oxygen contacts the luminescent chemical, the intensity of the red light decreases • The amount of time it takes for the material to relax is reduced
How Does LDO Work? • The intensity of the red light is not what’s being measured. • What’s being measured is the time it takes after excitation for red light to be given off. • Lifetime of luminescence Probe Sensor Photo Diode LED LED
How Does LDO Work? • A red LED is also present in the probe. • Between flashes of the blue LED, a red LED of known intensity, is flashed on the sensor. Probe Sensor Photo Diode LED LED • The red LED acts as an internal standard (or reference) for a comparison to the red light given off by the luminescent chemical.
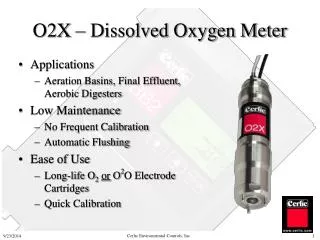
Why is this a Big Deal? Reduced Maintenance No membrane to replace No more stretching of Teflon and worrying about air bubbles No more punctured membranes No electrolyte to foul or poison No H2S poisoning of the electrolyte No anode or cathode No cleaning of anodes No more coating of electrodes
Why is this a Big Deal? Reduced Maintenance No membrane to replace No more stretching of Teflon and worrying about air bubbles No more punctured membranes No electrolyte to foul or poison No H2S poisoning of the electrolyte No anode or cathode No cleaning of anodes No more coating of electrodes
Why is this a Big Deal? Reduced Maintenance No membrane to replace No more stretching of Teflon and worrying about air bubbles No more punctured membranes No electrolyte to foul or poison No H2S poisoning of the electrolyte No anode or cathode No cleaning of anodes No more coating of electrodes