Download
1 / 11
110 likes | 172 Views
Easily customize maps in PowerPoint with symbols, labels, and legends. Step-by-step guide included for map creation and editing.

E N D
Introduction The aim of this PowerPoint pack to provide you with some simple maps so that you can add your own data and information to them and use in presentations or reports. The maps are saved to the background so that your write or draw over them without touching the map itself. The PowerPoint pack provides all the tools that you would need to produce including symbols, callout boxes, legends and labels. All you need to do is copy and paste. How to guide Select the map you want to use. Add your data In the Labels and Symbology section there are ready made symbols, labels and callout boxes that can be cut and pasted onto your map. With the callout boxes, double click on them and begin typing your information. MapAction PowerPoint MapSierra Leone
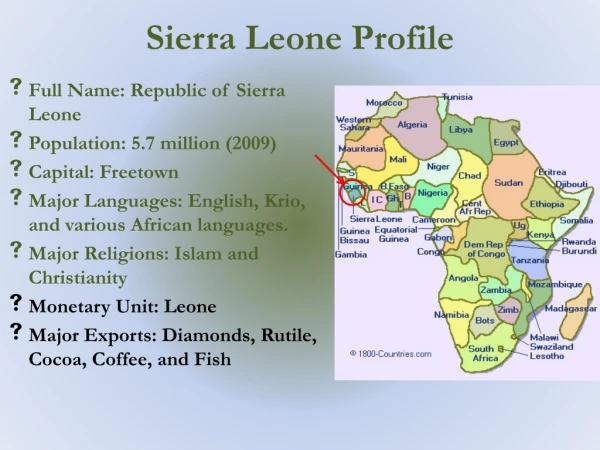
Click on a district polygon or a label to select it – you can then change its colour etc using (right click) >Format Shape. Tip: use the Format Painter to copy style changes to other items on the map. Koinadugu Kambia Bombali Port Loko Tonkolili Kono Western Area Urban Western Area Rural Kailahun Moyamba Bo Kenema Bonthe Pujehun Base map prepared by MapAction District boundaries data: OCHA COD
Major towns overlay You can cut and paste the object on this page onto the main map slide. However, you must ensure that you don’t change the size or position, or the towns will be in the wrong places! You can Ungroup this object in the normal way – follow steps in the Ungroup dialogue box to convert it to a MS drawing object.
Labels and Symbology General Symbols OCHA Symbols Callout Boxes Contents
Labelling Label Callout 1 Callout 2 Label in Italics Label in Bold Callout 3 Callout 4 LABEL IN CAPITALS Transparent Label Callout 5 Callout 6 Transparent Label in Italics Transparent Label in Bold Callout 7 Callout 8 TRANSPARENT LABEL IN CAPITALS Creation Date/ Time: Map Reference Number: Glide Number:
Legend details Map Title Map Title Example Location: Subject Date Haiti: Department Reference Map Map Summary Map Summary Example The map summary (also Termed the abstract) is a block of descriptive text that provides a useful guide to a user whether or not they are looking at the map itself, a thumbnail or a non-graphical list of map products. The map summary (also termed the abstract) is a block of descriptive text that provides a useful guide to a user whether or not they are looking at the map itself, a thumbnail or a non-graphical list of map products. For example: The map background shows major settlements and Department boundaries. Additional Metadata Tags Additional Metadata Tags Examples Creation Date/ Time: Creation Date/ Time: 2010-10-10/ 1200 Map Reference Number: Map Reference Number: ABC123 Glide Number: Glide Number: Data Sources: Data Sources:
Specific Legends Physical Map Population Map Transport Map Settlements Map
PowerPoint Map Creation Basic Maps 1. Create base map in ArcGIS, using the PowerPoint_Map_Template found in - 2011-mm-dd-destination-BLANKv02\GIS\3_Mapping\37_PowerPoint_Maps_Basic.2. Ungroup metadata properties and edit the Scale.3. Regroup metadata properties. Set the frame properties as follows - Border - 1.0 point, Gap - X and Y - 5pt; Background - White, Gap - X and Y - 5pt.4. Export map as JPEG to - 2011-mm-dd-destination-BLANKv02\GIS\3_Mapping\37_PowerPoint_Maps.5. Open the PowerPoint Pack Template and locate the relevant slide. 6. Right click slide and select format background. 7. Select Fill>> Picture or texture fill>> Insert from>> File and select map jpeg. 8. Before applying check that the stretch options>> Offsets are all at 0%. 9. Click Close. 10. Save PowerPoint. Advance Maps 1. Create base map in ArcGIS, using the PowerPoint_Map_Template found in - 2011-mm-dd-destination-BLANKv02\GIS\3_Mapping\37_PowerPoint_Maps_Advance.2. Export map as EMF to - 2011-mm-dd-destination-BLANKv02\GIS\3_Mapping\37_PowerPoint_Maps. 3. Open the PowerPoint Pack Template and locate the relevant slide. 4. Select Insert>>Picture>>Select EMF File>>Insert.5. Resize map approximately.6. Right Click Image>>Group>>UngroupA dialog box with the following will show: "This is an imported picture, not a group. Do you want to convert it to a Microsoft Office drawing object?“7. Select Yes. 8. Make sure the whole map is selected and resize to fit slide.Each part of the map should now be clickable and editable.9. Save PowerPoint. Adding a border to the map.1. Click - Insert>>Shapes>>Rectangle. 2. Draw Rectangle around map3. Right click rectangle>> Format shape>>Fill>>No Fill4. In the Shape Format>> Select Line Color - Black or Grey5. In the Shape Format>> Select Line - Width 2pt6. Close Shape Format. User guide