Download
1 / 14
140 likes | 300 Views
CCEFP HANDS-ON PNEUMATICS WORKSHOP. Instructors Guide ver 0.4. Overview for Instructors.

E N D
CCEFP HANDS-ON PNEUMATICS WORKSHOP Instructors Guidever 0.4
Overview for Instructors The CCEFP hands-on pneumatics workshop demonstrates basic fluid power and basic pneumatics in a hands-on activity. The activity was created by the CCEFP with additional funding support from Donaldson, a CCEFP industry member, through The Donaldson Foundation. The workshop can be conducted in as little as 45 minutes, or can be expanded to one-half a day or more. The workshop is designed for a range of student audiences including undergraduate engineering, high school and middle school. The primary target audiences are high school FIRST Robotics teams and students in Project Lead The Way pre-engineering courses. All components in the kit are industrial grade and are what can be found in a typical industrial pneumatics application. Additional information about the pneumatics workshop is at www.me.umn.edu/~wkdurfee/projects/ccefp/pneumo-kits/ For questions or comments about the workshop, please contact Professor Will Durfee, University of Minnesota, wkdurfee@umn.edu, 612-625-0099 The Center for Compact and Efficient Fluid Power (CCEFP) is a network of researchers, educators, students and industry working together to transform the fluid power industry. The CCEFP mission is to create hydraulic and pneumatic technology that is compact, efficient and effective. The CCEFP education and outreach program is designed to transfer this knowledge to diverse audiences including students of all ages. The CCEFP is a National Science Foundation Engineering Research Center, established in June 2006. In addition to its grant from NSF, the CCEFP is supported by its seven participating universities and over 50 industrial partners. Complete information about the CCEFP is at www.ccefp.org.
Parts list K008 K010 K002 K011 K003 K012 K004 K013 K014 K009 K016
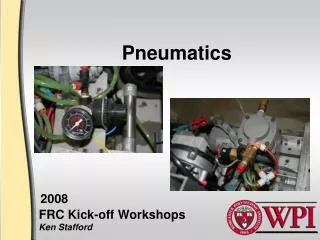
Push to Connect Tubing Fittings To disconnect, push this collet against body then tug on the tube until it releases To connect, push tube into fitting until it seats Use orange plug fitting to block open ports More tubing can be cut from the spare roll. Use scissors.
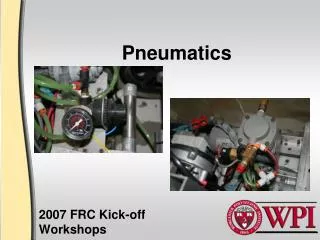
Ball Catch Activity Hint: Do not show this picture to the students because it is a better learning experience for them to figure it out on their own.
The Basics • The standard kit packaging is a set of five kits in a large, wheeled bag. • See the inventory of kit contents. Each station gets the parts that are in the 1 g zip-lock bag plus one of each part in the hockey bag. • If parts get lost, see the BOM spreadsheet on the project web site for where to order replacements • In advance, lay kits out on the table • Start by presenting a brief lecture on fluid power. CCEFP lecture notes are available • If time, then show first part of CCEFP/NFPA/TPT video, “Discovering Fluid Power” • Split into teams of three and start them building • Hints • Let teams discover how to put things together; only provide hints if absolutely needed; discovery is part of the learning process. • In advance, show them how the push to connect fittings work • It is almost impossible for anything to break, so no need to hover over the teams • Do make sure that when connected the bicycle pump is pumping directly into the air tank. The air tank relief valve is set at 60 psi, which means the entire circuit is safe. • Advise students to keep their faces away from the cylinder rod when manipulating the air switch as the rod can extend forcefully. • Structure in a 4-minute clean up time to insure that everything gets back into the 1 g zip lock and that stations do not cross-contaminate parts. There are many small parts!
Suggested Flow • "Can you find a way to generate compressed air?" • They will find the bike pump • "You'll need something to store the compressed air. Anything in the kit?" • They will find the tank/relief valve assembly • "Connect the bike pump to the tank and pump air through it" • It will take them a long time to discover the pump fitting, but resist the urge to help. Encourage them to use longest length of tubing between pump and tank so that the pump stays on the floor and the tank on the table. The open end of the tank can be closed with an orange plug. Teams will jump when the pressure relief valve spits; its fun. Keep an eye out for teams connecting the pump to anything other than directly the tank because otherwise you can pump without the relief valve in the circuit, which is bad. • “You need a way of measuring the pressure in the system. Can you find a part that will help? Good, connect it to the circuit • It will take them a while to figure out that it takes a tee fitting to connect up the pressure gauge, but eventually they will get it. Have them pump and read the pressure. Encourage use of short tubing for this, but on the other hand, they can just learn on their own. The more you stay out of their way the better, even if you don’t “like” the way they are completing the task. This is hands-off instruction!
Continuing on • Hold up a cylinder. "This can extend when compressed air flows into this port, and can retract because of a spring when the air is released." Hold up a toggle-lever valve. "Here is a hand-operated valve. Your challenge is to construct a circuit where the piston goes in and out when you flip the toggle on the valve back and forth." • It may take them a while to discover how to hook things up. Resist the urge to give them the answer. Eventually they will get it. • When the circuit is working, ask them to notice hat happens to the pressure with successive flips of the switch • Hold up the big coffee can with the cap on top. "There's another cylinder in here. Perhaps with this setup and a tennis ball you could make something interesting." • Eventually they will make a ball launcher
The challenge • Show them the small plastic tub, the lab stand, and the black right-angle lab clamp. "Are you ready for the really big challenge? A ball launcher is fine, but it would be even cooler if you could catch the ball. Perhaps you could attach that first cylinder to the lab stand with a clamp (don’t screw down too hard on the cylinder as it may kink), and perhaps you could attach this plastic tub to the cylinder rod (sandwich between the two large washers on the rod), then hook up the cylinder to the second switch. If you then adjust things just right and get the switch timing just right, you might be able to launch and then catch the ball." • It may take them a while to figure out the right way to fasten the cylinder to the support and the can to the rod, but eventually one team will get it and the other teams will copy. Encourage anchoring can and stand in place with your hands. • You can stop the activity here or go on • If this is the end, have teams disassemble and place everything back in their bag. Be sure the hardware (two washers, two wing nuts) stays on the cylinder rod. The two tees and two plugs go into the small zip-lock. The big items go into the large duffle bag. Consult kit list for what goes where.
Stage 1 Circuit (A later version of the instructors guide will have proper schematic symbols in the drawings) RELIEFVALVE PUMP TANK Plug the end with an orange plug
Stage 2 Circuit RELIEFVALVE PGAUGE PUMP TANK Plug the end
Full Circuit CYLINDER CYLINDER RELIEFVALVE PGAUGE PUMP TANK VALVE VALVE
Extra Stuff • Activity: Using the yardstick, create a plot of ball launch height versus tank pressure • When labeling axes, point out the importance of including units, e.g. "height (in.)“ • Activity: Determine lift capacity versus pressure • Need way to measure weight of books or other objects • Balance weight on launch cap and pump until it just lifts. Record the pressure. Or, pump to known pressure, extend the launch cylinder, then gradually add objects of known value to the cap until the cylinder just retracts. • Advanced students can predict the force by knowing the pressure and the piston area. Piston is 7/16” bore (diameter). • Activity: Launch height versus tube length • For same pressure, first measure launch height with short tubes connecting tank to switch and switch to tank. Repeat for very long tubes. • This experiment demonstrates there is air drag in the tube. • Activity: Launch height versus load weight • Launch things other than tennis ball and measure height • Activity (advanced): Efficiency • Calculate stored energy in tank (tank volume is 8.7 cu. in.). Calculate potential energy change for ball at peak height. From these two numbers, calculate the efficiency of the launch system. • Activity: Pressure loss per operation • Pump up tank, then record pressure versus operation cycle for successive operation of the cylinder with the switch. Where does the pressure go? (Volume of system increases when cylinder extends dropping the pressure. When cylinder retracts, that extra volume of air is exhausted to atmosphere through the switch. • For FIRST Robotics teams, make the connections between the workshop and the pneumatics components in their FIRST kit. Brainstorm on how pneumatics can be used in the competition robot. • Discuss computer controlled valves. (Note that computer controlled kit parts are under development by CCEFP)
Nothing is sacred. Be inventive and report your results and ideas to Will Durfee, wkdurfee@umn.edu