Assemblies in Solidworks Simple Assembly
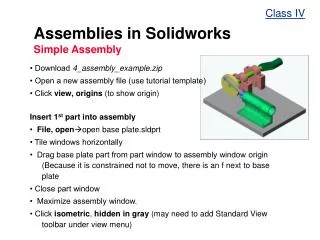
Class IV. Assemblies in Solidworks Simple Assembly. • Download 4_assembly_example.zip • Open a new assembly file (use tutorial template) • Click view, origins (to show origin) Insert 1 st part into assembly • File, open open base plate.sldprt • Tile windows horizontally

Assemblies in Solidworks Simple Assembly
E N D
Presentation Transcript
Class IV Assemblies in Solidworks Simple Assembly • • Download 4_assembly_example.zip • • Open a new assembly file (use tutorial template) • • Click view, origins (to show origin) • Insert 1st part into assembly • • File, openopen base plate.sldprt • • Tile windows horizontally • • Drag base plate part from part window to assembly window origin (Because it is constrained not to move, there is an f next to base plate • • Close part window • • Maximize assembly window. • • Click isometric, hidden in gray (may need to add Standard View toolbar under view menu)
Assemblies in Solidworks Simple Assembly • Bring more components into assembly • • Launch windows explorer • • Navigate to the simple assembly folder • • Click on the parts in windows explorer and drag into assembly window (bearing block, housing, piston). Notice the (-) in the feature manager next to unconstrained parts (these parts can be moved and rotated. • • Practice moving and rotating • • Make copy of bearing blockedit, copy, paste • • Save the assembly as simple assembly
Assemblies in Solidworks Simple Assembly • Mate bearing blocks to base plate • • Mate (paper clip) keep visible (push pin) • • Select bottom hole (click near hole w/ right mouse select other (right=n, left=y) • • Select hole on base (preview before committing) • • Assign concentric mate between hole and corresponding hole on base plate. • • Repeat for the other hole on bearing block and base plate. • • Close mate tool. • • Select keep visible option • • Mate bottom surface of bearing block to top surface of base plate • • Repeat process for the second bearing block
Assemblies in Solidworks Simple Assembly • Housing to base plate • • Concentric mates between holes on base plate and housing • • Mate bottom surface of housing to top of base plate and enter a distance of 50mm. (If necessary click on flip direction). • • Now set distance to 0mm • Piston to housing • • Assign a concentric mate between • piston and housing.