Download

1 / 87
870 likes | 1.04k Views
Protecting and Sharing Documents. Lesson 13. Objectives. Software Orientation. When you click the File tab, Backstage view provides commands to grant permission, secure documents, share documents, and manage versions as shown below. Use this figure as a reference for this lesson.

E N D
Protecting and Sharing Documents Lesson 13
Software Orientation • When you click the File tab, Backstage view provides commands to grant permission, secure documents, share documents, and manage versions as shown below. • Use this figure as a reference for this lesson.
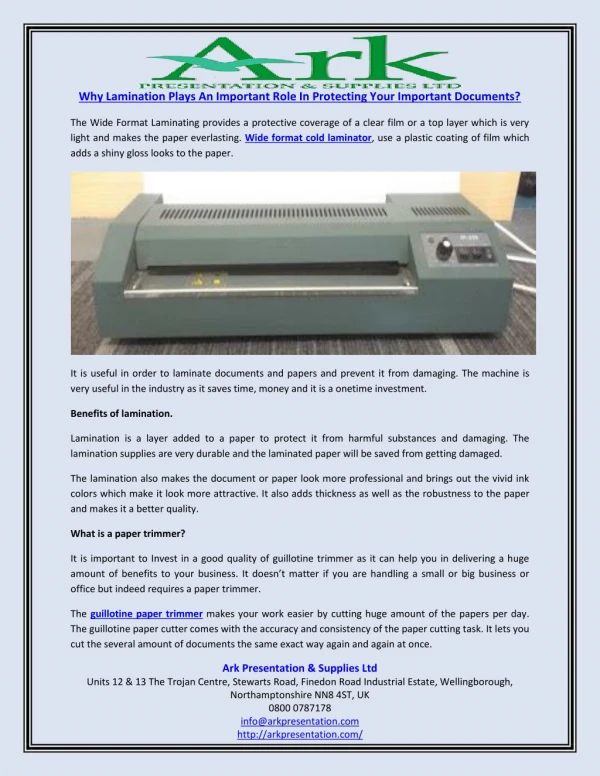
Protecting a Document • When you are working in a business setting, there will be times when you are asked to create or review sensitive documents, such as budgets, employee evaluations, or hiring correspondence, that others may be unauthorized to access. To help you manage these tasks and maintain security, Word has commands you can use to restrict access to a document. • You can set an access password for a document, protect a document, and mark a document as final. • The Restrict Permissions command makes it possible to limit another user’s ability to read or make changes to a document.
Setting an Access Password for a Document • You can protect a document with a password so that only people with access to the password can open or modify the document.
Step-by-Step: Set an Access Password for a Document • OPENthe peerreview document from the lesson folder. • Click the File tab and then click the SaveAsbutton. The Save Asdialog box appears. • Click the Tools button as shown at right. Select GeneralOptionsfrom the menu. The General Optionsdialog box appears.
Step-by-Step: Set an Access Password for a Document • Key HR%form$# in the Password to open box (see right). Word enables you to specify two differ-ent passwords—one to open a document and one to modify a document—both are optional. You can specify passwords for both actions—just specify a different password for each action. Passwords are case-sensitive, which means you can specify upper and/or lowercase letters. For the following exercise, use the same password to open and modify. Click in the Password to modify box and Key HR%form$#. Click OK.
Step-by-Step: Set an Access Password for a Document • The Confirm Password dialog box appears. Reenter the password to open the document. • Key HR%form$# in the Reenter password to open box and click OK. The Confirm Password dialog box opens, reenter the same password to modify the document. When entering passwords, it is recommended that you enter a strong password that is mixed with characters and symbols. • Click Save in the Save As dialog box and CLOSE the file. • OPENthe document and a Password dialog box appears to open the document, as shown at right.
Step-by-Step: Set an Access Password for a Document • Key HR%form$# in the box and click OK. • The Password dialog box opens again because it is reserved by the original user. Reenter the same password—the password will allow you to modify, or open read only (see below). • LEAVEthe document open to use in the next exercise.
Step-by-Step: Remove a Password • Click the File tab and notice that Permissions is highlighted in a light orange color. Under Permissions it states, “A password is required to open this document.” Click Save As. • In the Save As dialog box, click the Tools button and then select General Options from the menu. • Remove the password protection by selecting the hidden Passwords in both boxes and clicking Delete. Click OK. • SAVEthe document as peerreview_1 in your USB flash drive in the lesson folder. • LEAVE the document open to use in the next exercise.
Protecting a Document as Read Only • You can safeguard document from formatting changes and restrict editing by protecting it. • A document can be set as to read only, comments only, and limited formatting styles. • In the following exercise, you will learn set a document as read only, limit the document to comments only, and restrict formatting in the document.
Step-by-Step: Protect a Document as Read Only • USEthe document open from previous exercise. • In the File tab, in the Permissionscategory, click the Protect Documentbutton to display the menu. Click RestrictEditingas shown at right.
Step-by-Step: Protect a Document as Read Only • The Restrict Formatting and Editing pane displays on the right pane your screen as shown at right. • In the Editing restrictionssection, click the Allow only this type ofediting in the document box. By default, No changes(Read only) is selected in the drop-down menu below this option.
Step-by-Step: Protect a Document as Read Only • In the Start Enforcement section, click the Yes, Start EnforcingProtection button. The Start Enforcing Protection dialog box opens as shown below. The Start Enforcing Protection turns on the set restriction to begin restricting the document as a Read only type of document.
Step-by-Step: Protect a Document as Read Only • Key BYA$%HRDept in the Enter new password box and Reenter password to confirm box and click OK. The document is now protected from any editing and you may only view this region. A region is the location in the document that you are allowed to edit. The Restrict Formatting and Editing pane display Your permissions. There are two buttons available, Find Next Region I Can Edit and Show All Regions I Can Edit. This will display the areas in your document that you have been granted permission to edit. • Click the Stop Protection button in the Restrict Formatting and Editing pane. The Unprotect Document dialog is displayed. Enter the password BYA$%HRDept and click OK.
Step-by-Step: Protect a Document as Read Only • Click the Allow only this type of editing in the document box to remove the check mark. • CLOSE the Restrict Formatting and Editing Pane. • SAVEthe document with the same file name as peerreview_1 in your USB flash drive in the lesson folder • LEAVE the document open to use in the next exercise.
Step-by-Step: Restrict a Document with Comments Only • USEthe document open from the previous exercise. • On the Review tab in the Protect group, click the RestrictEditing button. • The Restrict Formatting and Editing pane displays. • In the Editing Restrictions section, click the Allow only this type ofediting in this document box. Click the drop-down arrow and select Comments. • In the Start Enforcement section, click the Yes, Start EnforcingProtection button. The Start Enforcing Protection dialog box opens, which turns on the set restriction for comments only.
Step-by-Step: Restrict a Document with Comments Only • Key BYA$%HRDept in the Enter new password box and in the Reenter password to confirm box and click OK. Only comments can be added to the region. A region is the area in the document where you are allowed to make changes (see right). • Click the Stop Protection button at the bottom of the Restrict Formatting and Editing pane. The Unprotect Document dialog is displayed. Key BYA$%HRDept and click OK.
Step-by-Step: Restrict a Document with Comments Only • Click the Allow only this type of editing in the document box to remove the check mark. • SAVEthe document with the same file name as peerreview_1 in your USB flash drive in the lesson folder. • LEAVE the document open to use in the next exercise.
Step-by-Step: Limit Formatting Styles in a Document • USEthe document open from the previous exercise. • In the Formatting Restrictions section, click the check box at Limit formatting to a selection of styles. Selecting this option enables you to set formatting restrictions for this document. • Click the Settingslink. The Formatting Restrictionsdialog box as shown at right. The check mark indicates that styles are allowed.
Step-by-Step: Limit Formatting Styles in a Document • Under the Formatting section, click the check box at Block Theme or Scheme switching and then click OK. Selecting this option will block the user from making any changes to the structure, pattern, or theme of the document. A prompt will appear on your screen stating that This document may contain formatting or styles that aren’t allowed. Do you want to remove them? Click Yes. • On the Page Layout tab, in the Themes group, notice all commands are shaded gray making it unavailable. • Click Settings again and in the Formatting Restrictions dialog box, turn off the check mark by Block Theme or Scheme switching. Click OK.
Step-by-Step: Limit Formatting Styles in a Document • Click Yes to the prompt to remove. Notice the Themes group is now available. You can now use the Themes commands in the group. • In the Formatting restrictions section, click the check box at Limit formatting to a selection of styles to remove the check mark. Close the Restrict Formatting and Editing pane. • SAVEthe document with the same file name as peerreview_1 in your USB flash drive in the lesson folder.
Step-by-Step: Limit Formatting Styles in a Document • In the Styles group, of the Home tab, click the Change Styles button, then Style Set to change the style to Fancy. • Click the PageLayout tab, in the Themes group, click to select Foundry. • Keep the document open for ten minutes—later in this lesson, you will learn about managing versions. Minimize the document to place it on the taskbar. You will be using this document later in this lesson. • LEAVE the program open for the next exercise.
Step-by-Step: Mark a Document as Final • OPENthe reviewform document from the lesson folder. • Click the File tab, then Permissions. Click the drop-down arrow by the Protect Document button then Mark as Final. A dialog box appears indicating this document will be marked as final and saved. Click OK. • A Microsoft Word dialog box displays as shown below, the Mark as Final prevents recipients from making changes—the document becomes read only and is displayed on the title bar. When a document is marked as final, the status property is set to “Final” and typing, editing commands, and proofing marks are turned off..
Step-by-Step: Mark a Document as Final • The Don’t show this message again check box message is off by default. If you do not want to see this message again when marking a document as final, click the check box to add a check mark. Click OK. The document is Marked as Final and displays in the Permissions section highlighted in a light orange color to discourage editing. • Click the Home tab and notice the yellow bar below the Ribbon indicating that An author has marked this document as final to discourage editing. If you needed to edit the document, you would click the Edit Anyway button. Click the tabs on the Ribbon and the commands are not available. Continue to click the other tabs to view how the commands are not activated.
Step-by-Step: Mark a Document as Final • Select the title of the document and try to delete it. When a document is marked as final, typing, editing commands, and proofing marks are disabled or turned off, because it becomes a read-only document. The title bar also shows the document as a (Read-Only) document. • On the File tab, click the Protect Document button and then select Markas Final to return the document to its original status. Click the Home tab to return to the document screen.
Step-by-Step: Mark a Document as Final • Select the B in Blue Yonder Airlines and press the Delete key. You can now make changes to the document. • Click the Undo button on the Quick Access Toolbar. • SAVEthe document as reviewform_1 in your USB flash drive in the lesson folder. • LEAVE the document open to use in the next exercise.
Applying Protection Using the Ribbon • Encryption protects a document and cannot be opened without a password.
Step-by-Step: Apply Protection Using the Ribbon • USE the document open from the previous exercise. • On the File tab, click the Protect Document button in the Permissions section, then select Encrypt with Password. Encrypting protects the document by making it unreadable. • The Encrypt Document dialog box opens (see below). In the Encrypt the contents of this file box, key HRDept&%3. • Retype the password and click OK. Notice that Permissions is highlighted and indicates that a password is required to open this document.
Step-by-Step: Apply Protection Using the Ribbon • Close the document and when prompted with Do you want to save the changes you made to reviewform_1? Click Save. Reopen the document and key HRDept&%3 to open the document. • Click the File tab, then click the Protect Document button in the Permissions section, then select Encrypt with Password. In the Encrypt Document dialog box select the password and delete it to remove the password. Click OK. The password is removed allowing you to open the document without entering a password. • SAVEthe document as with the same file name as reviewform_1 in your USB flash drive in the lesson folder and CLOSE the file. • LEAVE Word open to use in the next exercise.
Opening Documents in Protected View • Protecting your document from an unsafe location is necessary to avoid viruses, worms, or other kinds of malware that may harm your computer. • Documents received by email as attachments could possibly harm your computer. • In the following exercise, you will open a document in protected view and enable editing.
Step-by-Step: Open a Document in Protected View • OPENthe proposal document from the lesson folder. • The document opens in Protected View. The yellow prompt states This file originated from an Internet location and might be unsafe as shown below.
Step-by-Step-by-Step: Open a Document in Protected View • Click the File tab; notice that the Enable Editingbutton by the Protected Viewcategory is high-lighted in a light orange color informing you that This file originated from an Internet location and might be unsafe as shown at right. • When you are ready to edit the document, click the EnableEditing button on the yellow prompt or click the Protected View button in Backstage view. • CLOSEthe document without saving. • LEAVE Word open for the next exercise.
Managing Document Versions • Document versions can be managed in Backstage using the Info command and selecting which version to save. • In the Recent command in Backstage, there is an option to Recover Unsaved Document and your work is saved in intervals. • You will be able to recover versions of your document as long as you haven’t closed your document or program. • Also, if Word stops working for some reason, then it will be recovered, but you will not be able to see your previous versions until the document is saved. • Under Manage Versions, you can also browse for unsaved files. • In the following exercise, you will manage a document’s version with an existing file, a new file, and recover an unsaved version.
Step-by-Step: Manage Document Versions • On the taskbar, click the peerreview_1document and click the File tab, then Exit without saving. Keep Word open and keep a document open before exiting. Closing the Word program will lose your versions of the peerreview_1 document. • Open the peerreview_1 document from your USB flash drive in the lesson folder. • Before beginning, you will be changing the default for the Save AutoRecover minutes. You are completing this process so that you can see how document versions are managed and how Autosave saves your work when a document is closed without saving it. • In the File tab, under Help, click Options, and then click Save.
Step-by-Step: Manage Document Versions • Under the Save document section, select the default 10 and key 3 minutes by Save AutoRecover information as shown below. • Create a new blank document and key Working with unsaved documents can be found in Backstage view in the Recent command. Keep this document open for the next step. • Click the peerreview_1 document from the taskbar.
Step-by-Step: Manage Document Versions • Click the File tab and under Versions, you should see at least one or two versions of the document saved as shown below. Note your screen may not resemble this. As shown below, one version of the document was saved while the other version was closed without saving. • SAVEthe document with the same filename peerreview_1 in your USB flash drive in the lesson folder. • LEAVE the document open for the next exercise.
Restoring an Earlier Version of Your Document • The Save AutoRecover saves documents automatically by time and it will indicate Today for the current day. • As you modify your document, AutoRecover will autosave changes. These updates to different versions can be located in Backstage view under Manage Versions. • In the following exercise, you will restore an earlier version of your document.
Step-by-Step: Restore an Earlier Version of Your Document • USEthe document open from the earlier exercise—the peerreview_1 document. • Click the File tab and under Versions, click the version where it indicates autosave. A new window opens showing a yellow bar below the Ribbon displaying, Autosave Version—a new version is available with two options available. One is Compare and the other is Restore. If your document only contains one autosave version, you should be able to see the two available options, Compare and Restore, but you will not be able to complete step 2 (see below).
Step-by-Step: Restore an Earlier Version of Your Document • When you click on Compare a summary that compares the original document and the revised document displays. The Restore button will prompt you to overwrite your previous document. Click Restore to overwrite your previous document. Compare versions is one of Word’s advanced features; for more information use Help. • You will be prompted to overwrite the last saved version with the selected version. Click OK. • CLOSEthe document. • LEAVE Word open for the next exercise.
Recovering Unsaved Documents • As you work on documents, you can browse or recover unsaved files through Manage Versions in Backstage. • You can also open a document based on the time or the last version within that session. • In the following exercise, you will recover an unsaved document.
Step-by-Step: Recover Unsaved Documents • Earlier you keyed, Working with unsaved documents can be found in Backstage view in the Recent command. And in a previous step, you changed the Save AutoRecover information from the default to 3 minutes. • Click the File tab, then Exit. A prompt appears to save changes. The prompt states, If you click “Don’t Save,” a recent copy of this file will be temporarily available. It will also indicate that a temporary file will be saved. (see below). Click Don’t Save.
Step-by-Step: Recover Unsaved Documents • Click the File tab, then Recent. At the bottom right of the screen, click Recover Unsaved Documents as shown below.
Step-by-Step: Recover Unsaved Documents • At the Open dialog box, locate your file based on the date and time you closed the document or program (see below). The document was closed without saving it with a file name; therefore, the Name will show the text that you keyed. Unsaved documents are in a temporary location on your hard drive and identified by the ASD extension. Select the unsaved document and click Open.
Step-by-Step: Recover Unsaved Documents • The document opens with the Recovered Unsaved File yellow prompt appearing above the document stating, This is a recovered file that is temporarily stored on your computer. Click Save As (see below). • SAVEthe document as unsaved_document in your USB flash drive in the lesson folder. • LEAVE the document open to use in the next exercise.
Step-by-Step: Delete All Draft Versions • USEthe document open from the previous exercise. • Click the File tab, then click the Manage Versions button, then Recover Unsaved Documents. The Open dialog box for Unsaved Files opens. You should see the first few words of the document in the Open dialog box. • Click the Working with unsaved documents can be . . . then right-click, and then select Delete This Version. • Click Yes to the prompt, Are you sure you want to move this file to the Recycle Bin? • CLOSEthe unsaved_document. • LEAVE Word open to use in the next exercise.
Sharing Documents • Word contains a feature that will remove unwanted information from your document. • The Document Inspector is used to find and remove hidden data and personal information in Word 2010 documents as well as earlier versions. • It is a good idea to practice inspecting the document before sharing a copy such as an email attachment. • In the following exercise, you will inspect the document and remove personal information.
Step-by-Step: Use the Document Inspector • OPENthe emploffer document from your lesson folder. • Click the File tab and by Prepare for Sharing click the Check forIssues button, then click Inspect Document. • The Document Inspector dialog box appears. Click the Inspect button (see below).
Step-by-Step: Use the Document Inspector • In the Document Properties and Personal Information section, click Remove All. Personal information from the properties is removed and the document is ready to be shared. The items are removed and the dialog box is updated. • Leave the Headers, Footers, and Watermarks as is. Click Close. • In the Prepare for Sharing section, click the link to Allow this information to be saved in your file. • Click the Save As button to open the Save As dialog box. Save the document as emploffer_1 in your USB flash drive in your lesson folder. • LEAVE the document open to use in the next exercise.
Checking Accessibility • The Accessibility Checker determines if there are potential errors in your document and will alert you that the content may be difficult for an individual with a disability to read. Accessibility is defined as being accessible to those with disabilities. • Before sharing your document, it is important to inspect your document in case someone with a disability will be opening the document. • In the following exercise, you learn to check if there are errors in your document.