Ellipse - Pin & String Method
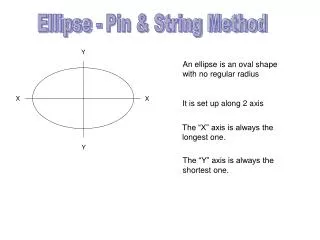
Ellipse - Pin & String Method. Y. An ellipse is an oval shape with no regular radius. X. X. It is set up along 2 axis. The “X” axis is always the longest one. Y. The “Y” axis is always the shortest one. Ellipse - Pin & String Method. Y. Step 1. Mark out the “X” axis.

Ellipse - Pin & String Method
E N D
Presentation Transcript
Ellipse - Pin & String Method Y An ellipse is an oval shape with no regular radius X X It is set up along 2 axis The “X” axis is always the longest one. Y The “Y” axis is always the shortest one.
Ellipse - Pin & String Method Y Step 1. Mark out the “X” axis. Step 2. Find the centre of the X axis. X X Step 3. Mark in the “Y” axis. Y
Ellipse - Pin & String Method Y Step 4. Set the compass to ½ the “X” axis X X Step 5. Move the compass to the Y point and mark of the distance along the X axis Y
Ellipse - Pin & String Method Step 6. Place small nails or pins at points F1, F2 and C Y C Step 7. Tie a piece of string, (builders line is best) to the nail at F1. X X F2 F1 Y
Ellipse - Pin & String Method Step 8. Take the string around C and to F2 and tie off making sure it is stretched reasonably tight. Y C X X Too tight and it will pull the nails out F2 F1 Too loose and the ellipse will be the too big Y
Ellipse - Pin & String Method Step 9. Insert pencil in place of nail at point C Y X X Y
Ellipse - Pin & String Method Step 9. Insert pencil in place of nail at point C Y Step 10. Describe the arc by keeping the string tight with the pencil and moving it to the left or right. In this example we have gone left. X X Y
Ellipse - Pin & String Method Step 9. Insert pencil in place of nail at point C Y Step 10. Describe the arc by keeping the string tight with the pencil and moving it to the left and right X X Y
Ellipse - Pin & String Method Step 9. Insert pencil in place of nail at point C Y Step 10. Describe the arc by keeping the string tight with the pencil and moving it to the left and right X X Y
Ellipse - Pin & String Method Step 9. Insert pencil in place of nail at point C Y Step 10. Describe the arc by keeping the string tight with the pencil and moving it to the left and right X X Y
Ellipse - Pin & String Method Step 9. Insert pencil in place of nail at point C Y Step 10. Describe the arc by keeping the string tight with the pencil and moving it to the left and right X X Y
Ellipse - Pin & String Method Step 9. Insert pencil in place of nail at point C Step 10. Describe the arc by keeping the string tight with the pencil and moving it to the left and right
Ellipse - Pin & String Method Step 9. Insert pencil in place of nail at point C Step 10. Describe the arc by keeping the string tight with the pencil and moving it to the left and right
Ellipse - Pin & String Method Step 9. Insert pencil in place of nail at point C Step 10. Describe the arc by keeping the string tight with the pencil and moving it to the left and right
Ellipse - Pin & String Method Step 9. Insert pencil in place of nail at point C Step 10. Describe the arc by keeping the string tight with the pencil and moving it to the left and right
Ellipse - Pin & String Method Step 9. Insert pencil in place of nail at point C Step 10. Describe the arc by keeping the string tight with the pencil and moving it to the left and right
Ellipse - Pin & String Method Step 9. Insert pencil in place of nail at point C Step 10. Describe the arc by keeping the string tight with the pencil and moving it to the left and right
Ellipse - Pin & String Method Step 9. Insert pencil in place of nail at point C Step 10. Describe the arc by keeping the string tight with the pencil and moving it to the left and right
Ellipse - Pin & String Method Step 9. Insert pencil in place of nail at point C Step 10. Describe the arc by keeping the string tight with the pencil and moving it to the left and right
Ellipse - Pin & String Method Step 9. Insert pencil in place of nail at point C Step 10. Describe the arc by keeping the string tight with the pencil and moving it to the left and right
Ellipse - Pin & String Method Step 9. Insert pencil in place of nail at point C Step 10. Describe the arc by keeping the string tight with the pencil and moving it to the left and right
Ellipse - Pin & String Method Step 9. Insert pencil in place of nail at point C Step 10. Describe the arc by keeping the string tight with the pencil and moving it to the left and right
Ellipse - Pin & String Method Step 9. Insert pencil in place of nail at point C Step 10. Describe the arc by keeping the string tight with the pencil and moving it to the left and right
Ellipse - Pin & String Method Step 9. Insert pencil in place of nail at point C Step 10. Describe the arc by keeping the string tight with the pencil and moving it to the left and right
Ellipse - Pin & String Method Step 9. Insert pencil in place of nail at point C Step 10. Describe the arc by keeping the string tight with the pencil and moving it to the left and right
Ellipse - Pin & String Method Step 9. Insert pencil in place of nail at point C Step 10. Describe the arc by keeping the string tight with the pencil and moving it to the left and right
Ellipse - Pin & String Method Now you have created the perfect ellipse. You can use a band saw or jig saw to cut the shape clean up the edges with a spoke shave, compass plane or disc sander and make a router template.