Ankle Sprains
Ankle Sprains. By Michael LaBella. Anatomy of the ankle. The ankle is a joint that serves much like a hinge on a door or a cabinet. In order to function correctly in terms of walking, it is important that the ankle is working properly.

Ankle Sprains
E N D
Presentation Transcript
Ankle Sprains By Michael LaBella
Anatomy of the ankle • The ankle is a joint that serves much like a hinge on a door or a cabinet. • In order to function correctly in terms of walking, it is important that the ankle is working properly.
Despite being quite narrow, the ankle is an extremely stable joint? In fact, the ankle can withstand…. 1.5 times your body weight while walking 8 times your body weight while running!
The ankle joint itself is connected by three separate bones. • The talusworks as the hinge that allows the ankle to move up and down (dorsi and plantar flexion). • The tibiaalso known as the “shinbone” forms the medial part of the ankle. • The fibulaforms the lateral part of the ankle. • Both the tibia and the fibula connect into the top of the talus. • The whole three-boned structure is connected to the top of our heel bone called the Calcaneus
There are three ligaments that are part of the ankle. • The anterior inferior tibiofibular ligament is the one that connects with the tibia and the fibula and goes above the front of the ankle. • The posterior tibiofibular ligament goes to the back of the tibia and fibula. • The final ligament, the interosseous ligament is the one that goes between the tibia and the fibula.
Muscles of the ankle. • Peroneus Longus • Peroneus Brevis • Anterior Tibialis • Posterior Tibialis • Extensors Hallucis Longus • Flexor Hallucis Longus • Extensor Digitorum Longus • Flexor Hallucis • Gastrocnemius • Soleus
The main muscles in the ankle • Peroneals are located on the lateral edge of the ankle. Their purpose is to bend the ankle down and out. • Gastrocnemius and Soleus are the calf muscles and also bend the ankle down. • Tibialis aids the foot in turning inward and upward.
anterior talofibular ligament is the ligament that has the greatest impact on the lateral part of the ankle. Unfortunately, the anterior talofibular ligament is both the weakest and the smallest out of all three of the ligaments in the ankle.
Mechanism of the injury continued... • Almost all of the ankle sprains occur at the moment of termination from running or jumping and landing on the foot • When the foot strikes the ground, the ankle will be in plantar flexion and the foot will be supinated (sole facing upwards)
What happens next? • The peroneal muscle become over-forced and fall upon the anterior talofibular ligament. • This creates a rolling ball effect… after the ATF is completely torn, the stress is conoverted to the Calcaneo fibular ligament and eventually to the Posterior Talofibular ligament.
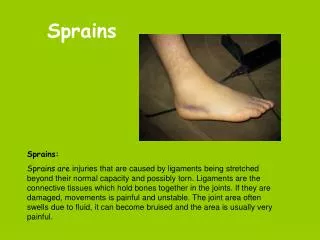
How are we able to recognize a sprained ankle? • Initial recognition of a sprained ankle can be examined in many ways. • Some of the reactions that will come in the event of a sprained ankle are : high level of pain, rapid onset of swelling, coldness or numbness in the injured foot, inability to bear weight, or a complicating condition.
The initial sign to look out for is difficulty bearing weight on the injured ankle with a fairly high level of pain. After this, swelling will certainly come into play. Checking for the swelling is paramount in telling if the ankle is sprained or not.
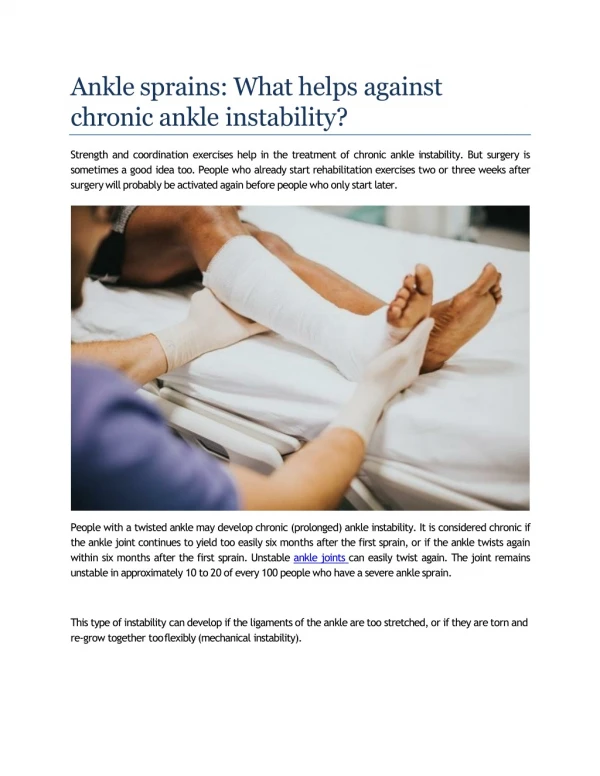
There are different grades of ankle sprains to determine the severity.
The grades of ankle sprain are on a scale of 1-3 • Grade I (first degree)- Most common type of sprain which the ligaments are over-stretched but not torn completely. The ankle should have most of it’s stability. • Grade II (second degree)- Injury is significantly worse then the first degree. Usually the ligament is partially torn. • Grade III (Third degree)- Implies that one or more ligaments is fully torn. Instability while occur indefinitely.
Questions for evaluators to consider. • Etiology of the injury (how did it happen). • Has the ankle been previously injured? The more that the ankle has been injured, the more susceptible it is to getting sprained again.
Evaluating a sprained ankle • The first signs for severity of the sprain are for (bruising), tenderness, and swelling. • Anterior Drawer Test- A test that uses loads of weight to determine the integrity and stability of the ankle. • Knee is flexed 900 and gastrocnemius is relaxed. One hand holds the lower tibia and exerts a slight posterior force, and the other hand is around the posterior aspect of the calcaneus and attempts to bring the calcaneus and talus forward on the tibia. Also done by stabilization of foot and talus on table and pushing tibia and fibula posteriorly.
Another way to test is the stress test. Knee is flexed 900 and gastrocnemius is relaxed. The heel is held from below by one hand while the other hand holds the lower leg. The hand on the heel is placed somewhat inferior lateral and is used to push the calcaneus and talus into inversion while the other hand grips the lower leg medially and pushes laterally. Note an end point.
Price • Protection- The injured ankle should be kept out of further harm or injuries, especially during the crucial first 24-48 hours. • Rest-For about 24-48 hours after the injury, as much activity involving the ankle should be ceased as possible. • Ice- especially within the first 48 hours, the sooner the better, ice should be applied “20 minutes at a time every 3-4 hours” (Dr. Cluett). • Compression- A bandage can be used compress the injury ankle, do not wrap too tight however! • Elevation- Ankle should be elevated higher then your heart as often as possible.
Proper ice techniques • 1) Get the ice on quickly-icing effects diminish after 48 hours • 2)Ice massage- the ice should not be stagnant, it should be moved around frequently. • 3)Elevate!- to reduce the swelling. • 4) Watch the clock- no longer then 20 minutes should ice be applied. • 5) Time to warm- allow adequate time for the ankle to warm again before another treatment. • 6) Repeat- as often as desired
The stages of rehabilitation • Acute Stage (1-3 days)- Use PRICE, ankle can not support any weight. • Sub-Acute Stage (3-14 days)- Some weight can be put on the ankle, compression and ice therapy is still suggested. • Early Rehab (week 3)- Specific light exercise are used to prevent stiffness and reduce swelling. • Late Rehab (week 4)- Progressive strengthening of the muscles, intensity of exercise is increased. Use of ankle braces and casts are highly suggested. • Functional Rehab (week 5+)- Increase intensity gently to return to game-ready conditions.
When to start rehabilitation. • It is suggested to start rehab as soon as you can apply pressure to the ball of your foot. • The purpose is to return balance and strength to the ankle . • This is done through various exercises specifically designed for different stages of recovery.
Earliest stages of rehabilitation . 1. Ankle Pump: Point toe, then pull back toward you as hard as possible. 2. Towel Gather: Spread out towel on floor. Pull toward you with toes until towel is fully gathered around foot. Repeat 10-15 times. 3. Ball Pick-up: Grasp ball between 1st and 2nd toes; pick up and transfer. Repeat 15 times.
Continued... • 4. Towel Stretches: Sit on a hard surface with your injured leg stretched out in front of you. • (a). Loop towel around foot and pull to get a good stretch for 20 seconds and relax for 20seconds • (b). Pull the towel so that foot turns to other side; hold for 20 seconds, then pull to the other side; hold for 20seconds. • (c). Bend leg at 90 degree angle and loop towel around forefoot. With leg bent pull foot back for 20 seconds and relax for 20 seconds.
Exercises for later stages of ankle rehabilitation. • 5. Slantboard Stretch: • (a). Stand with your heels on A board and lean forward • (b). Turn your toes in with heels on the board and lean forward • (c). Stand with knees bent and heels down • (d). Stand with your knees bent, point toes inward and keeping heels down on the board. • 6. Wall Stretch: Facing a wall, put your hands against the wall at about eye level. Keep the injured leg back, the uninjured leg forward, and the heel of your injured leg on the floor. Lean into wall and hold for 15-20 seconds. Repeat 3 times. • (a). Knee straight; toes straight ahead • (b). Knee straight; toes pointed in
Continued... • 7. Soleus Stretch: Stand facing a wall with your hands at about chest level. With both knees slightly bent and the injured foot back, gently lean into the wall until you feel a stretch in your lower calf. Once again, angle the toes of your injured foot slightly inward and keep your heel down on the floor. Lean into wall and hold for 15-20 seconds. Repeat 3 times. • (a). Knees bent; toes straight ahead • (b). Knees bent; toes pointed in • 8. Ankle range of motion: You can do this exercise sitting or lying down. Pretend you are writing each of the letters of the alphabet with your foot. This will move your ankle in all directions. Do this twice.
9. Theraband: • (a). Dorsiflexion - Sitting with your leg out straight and your foot near a door, wrap the tubing around the ball of your foot. Anchor the other end of the tubing to the door by tying a knot in the tubing, slipping it between the door and the frame, and closing the door. Pull your toes toward your face. Return slowly to the starting position. Repeat 10 times. Do 3 sets of 10. • (b). Plantarflexion - Sitting with your leg outstretched, loop the middle section of the tubing around the ball of your foot. Hold the ends of the tubing in both hands. Gently press the ball of your own foot down and point your toes, stretching the Thera-Band. Return to the starting position. Repeat 10 times. Do 3 sets of 10. • (c). Inversion - Sit with your legs out straight and cross your uninjured leg over your injured ankle. Wrap the tubing around the ball of your injured foot and then loop it around your uninjured foot so that the Thera-Band is anchored at one end. Hold the other end of the Thera-Band in your hand. Turn you injured foot inward and upward. This will stretch the tubing. Return to the starting position. Repeat 10 times. Do 3 set of 10. • (d). Eversion - Sitting with both legs outstretched and the tubing looped around both feet, slowly turn your injured foot upward and outward. Hold this position for 5 seconds. Repeat 10 times. Do 3 sets of 10.
After these specific exercises, weight-bearing exercises can be used. • Such as…. • Walking on your tippy toes • Heel raises • Toe raises • Single leg balancing.
Precautions: what to watch out for • Athletes should take extreme precaution and be aware of the risks of re-injury of the sprained ankle. • Athletes should also be aware that overcompensation of the healthy ankle can cause injury as well.
What tests will the doctor use? • Lateral hop test. Patients stand on the “uninjured” leg and hop as far as possible in a lateral direction with three continuous hops. They then stand on the “injured” leg and hop back to where they started, using three continuous hops. Patients must make it back to where they started, showing that their injured leg is of equal strength and stability as the uninjured leg. • Single leg stance (Modified Rhomberg Test). The patient stands and balances on the good leg with his or her arms crossed over the chest. Compare the duration that the patient stands on the single leg, without touching the other foot to the ground, to the duration that he or she stands on the injured leg. • Heel rocker test. The patient leans backward against a wall and pulls the toes and forefoot areas of both feet off the ground while rocking backward on his or her heels. The patient raises the toes repeatedly off the ground until full exhaustion. Check for any asymmetry in fatigue between the two ankles.
What now? • After carefully examining the results of the aforementioned tests, the doctor will suggest what type of activities you will be able to resume.
Or maybe a checklist like this • Name: ______________________________________________ Date of Injury: • Phase 1: Ready to Start Rehabilitation • A. I am wearing the protective tape, brace, or wrap that my doctor prescribed. • B. I can stand on the injured leg without pain. • C. Pain and swelling have gone down. • Phase 1 complete. Date __________________________ Days after injury ________________________ • Phase 2: Beginning Level • A. My ankle does not feel too stiff to draw the letters of the alphabet with my toes. • B. Strength in my calf and ankle muscles is back to normal. • C. I know when I need to wear an ankle brace or taping and how to apply it. • D. Neither low-impact aerobic exercise nor weight lifting causes pain or swelling. • Phase 2 complete. Date __________________________ Days after injury ________________________ • Phase 3: Intermediate Level • A. Balance when standing on the injured leg is as good as the uninjured leg. • B. Increasing my aerobic exercise or weight lifting does not cause pain or swelling. • C. My general strength is back to preinjury level. • Phase 3 complete. Date __________________________ Days after injury ________________________ • Phase 4. Advanced Level • A. My return-to-running program has been completed without pain or limitation. • B. I can do sport-specific movements and skills without pain or limitation. • C. My coach or physical education teacher knows about my special needs for gradual return to play • and my long-term needs to prevent future injury. • Phase 4 complete. Date __________________________ Days after injury ________________________ • Cleared for full participation. Date ____________________ by Dr ______________________________________ • (signature)
Initial protection of ankle sprains can be done through proper exercises. Balancing exercises can help greatly increase the ankles strength therefore preventing injury.
Balancing exercises Stand on one foot. Now reach with the opposite leg outward in all directions, forward, sideways, backwards, etc. Reach out as far as possible and hold for three to five seconds. Each direction offers a different challenge to your balance and trains the receptors of the ankle, knee, and hip. The farther you reach the harder the balance leg is working. Start small and work your way up. You can also reach with your arms, as this challenges your balance differently.
Proper sneakers for the sport being played. • High-top sneakers for sports that require lateral moving and jumping are essential.
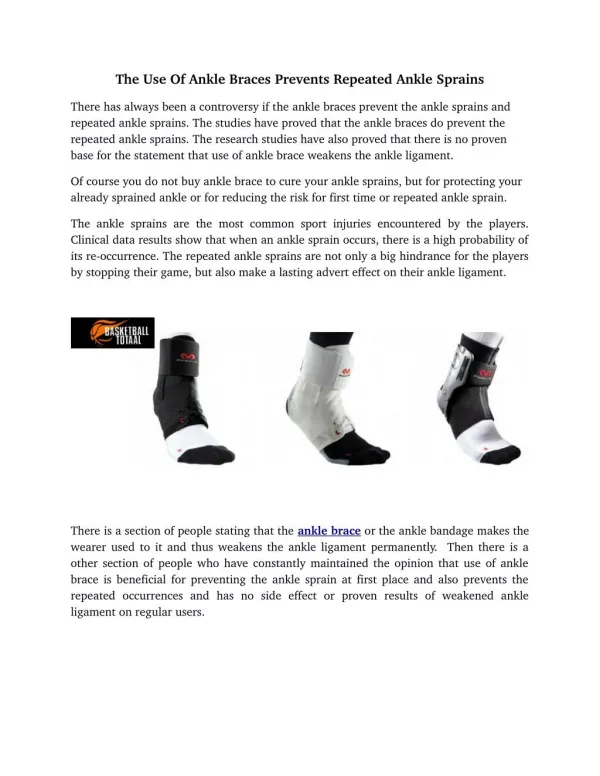
Sometimes well-fitting sneakers are not enough, additional ankle support is needed. Ankles can be further supported by: Adhesive straps Braces Air stirrups
These, • Help in the healing process of the sprained ankle • Further prevent injury to already hurt ankle. • Aid in stability and walking.