Download
1 / 27
270 likes | 451 Views
Learn how to model a DC motor with Simscape for control system development. This tutorial covers building the model, setting parameters, configuring solver parameters, and analyzing simulation results effectively.

E N D
DC Motor Model Using Simscape Engr. SalimLashari
Introduction to Simscape • Simscape™ provides an environment for modeling and simulating physical systems spanning mechanical, electrical, hydraulic, and other physical domains. It provides fundamental building blocks from these domains that you can assemble into models of physical components, such as electric motors, inverting op-amps, hydraulic valves. Because Simscape components use physical connections, your models match the structure of the system you are developing. • Simscape models can be used to develop control systems and test system-level performance. • You can parameterize your models using MATLAB variables and expressions, and design control systems for your physical system in Simulink®.
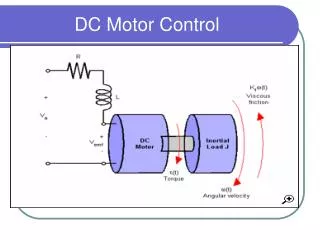
Overview of DC Motor Example • In this example, you model a DC motor driven by a constant input signal that approximates a pulse-width modulated signal and look at the current and rotational motion at the motor output.
Selecting Blocks to Represent System Components • Select the blocks to represent the input signal, the DC motor, and the motor output displays. • The following table describes the role of the blocks that represent the system components.
Building the Model • Create a Simulink model, add blocks to the model, and connect the blocks. • Create a new model. • Add to the model the blocks listed in the following table. The Library column of the table specifies the hierarchical path to each block.
Building the Model • Connect the blocks as shown in the following figure.
Specifying Model Parameters Specify the following parameters to represent the behavior of the system components: • Motor Input Signal Parameters • Motor Parameters • Current Display Parameters • Torque Display Parameters
Motor Input Signal Parameters 1. Set the DC Voltage Source block parameters as follows: Constant voltage = 2.5
Motor Input Signal Parameters • Set the Controlled PWM Voltage block parameters as follows: • PWM frequency = 4000 • Simulation mode = Averaged • This value tells the block to generate an output signal whose value is the average value of the PWM signal. Simulating the motor with an averaged signal estimates the motor behavior in the presence of a PWM signal. To validate this approximation, use value of PWM for this parameter.
Motor Input Signal Parameters • Set the H-Bridge block parameters as follows: • Simulation mode = Averaged • This value tells the block to generate an output signal whose value is the average value of the PWM signal. Simulating the motor with an averaged signal estimates the motor behavior in the presence of a PWM signal. To validate this approximation, use value of PWM for this parameter.
Motor Parameters • Configure the block that models the motor. • Set the Motor block parameters as follows, leaving the unit settings at their default values where applicable: • Electrical Torque tab: • Model parameterization = By rated power, rated speed & no-load speed • Armature inductance = 0.01 • No-load speed = 4000 • Rated speed (at rated load) = 2500 • Rated load (mechanical power) = 10 • Rated DC supply voltage = 12 • Mechanical tab: • Rotor inertia = 2000 • Rotor damping = 1e-06
Current Display Parameters • Specify the parameters of the blocks that create the motor current display: • Current Sensor block • PS-Simulink Converter1 block • Scope1 block • Of the three blocks, only the PS-Simulink Converter1 block has parameters. Set the PS-Simulink Converter1 block Output signal unit parameter to A to indicate that the block input signal has units of amperes.
Torque Display Parameters • Specify the parameters of the blocks that create the motor torque display: • Ideal Rotational Motion Sensor block • PS-Simulink Converter block • Scope block • Of the three blocks, only the PS-Simulink Converter block has parameters you need to configure for this example. Set the PS-Simulink Converter block Output signal unit parameter to rpm to indicate that the block input signal has units of revolutions per minute. • Note: You must type this parameter value. It is not available in the drop-down list.
Configuring the Solver Parameters • Configure the solver parameters to use a continuous-time solver because SimElectronics models only run with a continuous-time solver. Increase the maximum step size the solver can take so the simulation runs faster. • In the model window, select Simulation > Model Configuration Parameters to open the Configuration Parameters dialog box. • Select ode15s (Stiff/NDF) from the Solver list. • Enter 1 for the Max step size parameter value. • Click OK.
Running the Simulation and Analyzing the Results • In this part of the example, you run the simulation and plot the results. • In the model window, select Simulation > Run to run the simulation. • To view the motor current and torque in the Scope windows, double-click the Scope blocks. You can do this before or after you run the simulation. • The following plot shows the motor current.
Conclusion As expected, the motor runs at about 2000 rpm when the applied DC voltage is 2.5 V.