Download
1 / 17
180 likes | 239 Views
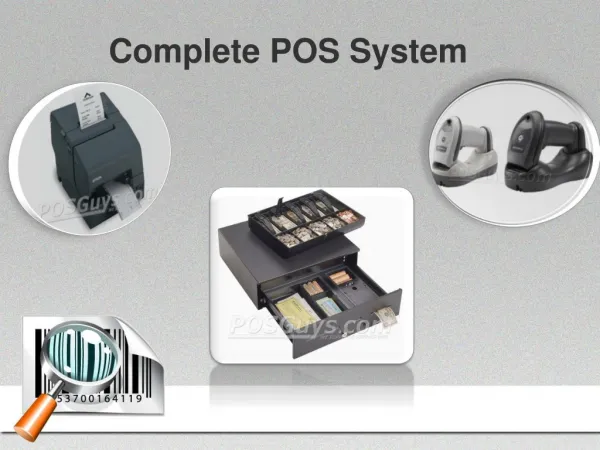
Harbortouch POS Systems Manual

E N D
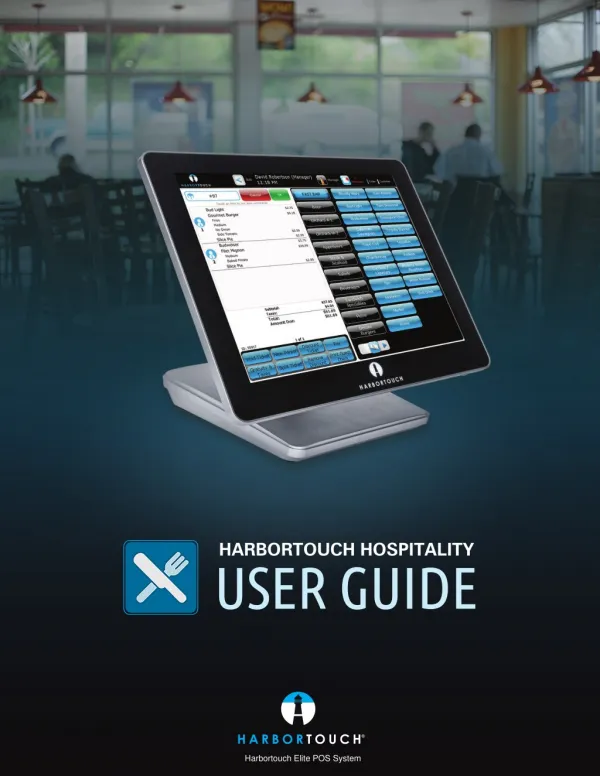
HARBORTOUCH HOSPITALITY USER GUIDE Harbortouch Technical Support: 800.632.1888 or possupport@harbortouch.com Harbortouch Elite POS System
INDEX EMPLOYEE FUNCTIONS: Page 1 Clocking In/Logging In Page 2 Clocking Out Page 3 Beginning a Transaction Page 5 Payment Options Page 7 Host Mode Page 8 Customer Database Page 9 List View Page 10 Ticket Functions Page 11 Item Functions MANAGER FUNCTIONS: Page 12 Accessing the Manager Screen Page 12 Using the Daily Report Page 13 End of Day Process Page 14 Reopening Tickets & Refunding Items Page 16 Accessing Advanced Reports Page 17 Creating/Editing Jobs Creating/Editing Employees Page 18 Page 19 Creating/Editing Discounts Page 20 Creating/Editing Void Reasons Page 21 Creating/Editing Menu Page 23 Creating/Editing Sections Page 24 Modifying Labor Page 25 Updating Fresh Sheet Page 26 Enabling Credit Card Pre-Authorization Harbortouch Technical Support: 800.632.1888 or possupport@harbortouch.com
EMPLOYEE FUNCTIONS CLOCKING IN/LOGGING IN PLEASE NOTE: Users will be automatically clocked in for their shift when they log in for the first time. From the main log in screen, type your four digit PIN. After entering the PIN, a dialog box appears with a list of jobs. Touch the appropriate job for the employee logging in. A dialog box may ask the user to select a cash drawer (if the terminal has a cash drawer). There is an option called ‘I am not using a cash drawer’ for employees that doesn’t need access to a cash drawer for employees to perform their job. Select the appropriate cash drawer option. This completes the clock in process. PAGE 1 Harbortouch Technical Support: 800.632.1888 or possupport@harbortouch.com
EMPLOYEE FUNCTIONS EMPLOYEE FUNCTIONS CLOCKING OUT BEGINNING A TRANSACTION There are alternate methods to begin a transaction intuitively following each transaction type. The simplest method is selecting an item on the right side of the ticket screen. This will automatically create a new ticket and you can continue adding items to it. For counter-based and other fast-paced environments: If Fast Pay is enabled, the most common cash totals will be displayed at the bottom of the ticket. You can simply click on one of these options to quickly close out the ticket. Select ‘Personal Page’ in the top right corner of the ticket screen. Press the green ‘OK’ button to confirm the order, or if you would like to assign this ticket to a table or section, select the section screen located in the top left of the ticket. Select ‘Clock Out’. From the section screen, a table or section (such as delivery) may be selected. If you would like to assign a custom name to the call when the order is ready or associate with a customer for easier memory, select ‘Custom Name’. Declare tips if necessary. Select ‘Clock Out’ or ‘Clock Out and Print’. PAGE 2 PAGE 3 Harbortouch Technical Support: 800.632.1888 or possupport@harbortouch.com
EMPLOYEE FUNCTIONS EMPLOYEE FUNCTIONS PAYMENT OPTIONS BEGINNING A TRANSACTION (CONTINUED) If Fast Pay is enabled (enabling Fast Pay is covered later in this guide), the most common cash totals will be displayed at the bottom of the ticket. The Fast Pay options will always display exact change, then the lowest total if paid in singles, fives, tens, or twenties. You can simply click on one of these options if appropriate. This method is used commonly for counter-based transactions. Enter a custom name of your choice and select ‘OK’. You may select ‘OK’ on the section screen to return to the ticket. This method is commonly used in counter service and bar environ- ments. Alternatively, you can select ‘New Ticket’ in the bottom left of the ticket screen. The section screen will appear and you will be prompted to select the table and number of customers seated. This method is commonly used in dining environments. Alternatively, you can select ‘Pay’ on the bottom of the screen. If credit card pre-authorization is enabled, you can also swipe a card at any given time (no need for a ticket to be open). You will be prompted whether you would like to pre-authorize the credit card for the standard authorization amount. Once you select ‘Yes’, a ticket will be created. On the Pay screen, shortcuts are available on the left and right sides of the number pad. The shortcuts or the number pad can be used to enter an amount if using multiple tender types. Other- wise, selecting the tender type without an amount will enter the exact amount. PAGE 4 PAGE 5 Harbortouch Technical Support: 800.632.1888 or possupport@harbortouch.com
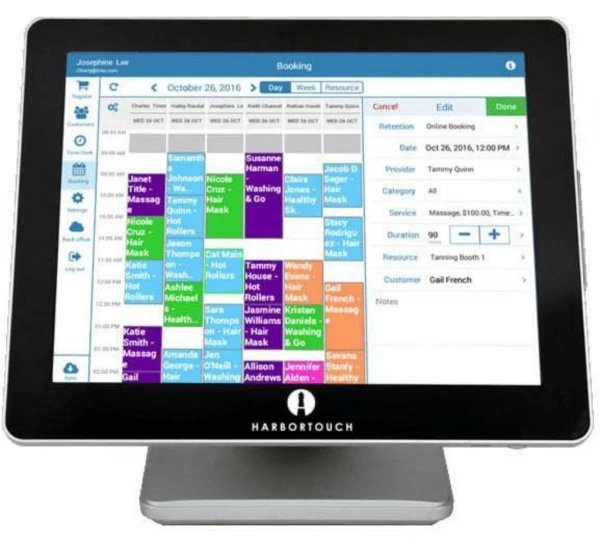
EMPLOYEE FUNCTIONS EMPLOYEE FUNCTIONS HOST MODE PAYMENT OPTIONS (CONTINUED) Host mode allows the host or hostess to manage the available tables in the restaurant. To access this functionality, select ‘Host’ in the top right of the ticket screen. If credit is selected, the system will prompt to enter a credit card number. This can be accomplished using the on screen number pad or by swiping a credit card. By default, ‘Create/Open Tickets’ is selected. In this mode, a new ticket will automatically be created when you touch an open table. If you touch an active/seated table, that table’s ticket will automatically open. To enter tip at the time of sale, re-open the ticket and select ‘Pay’. You may select ‘Enter Tip’ on the left side to modify the tip amount. Then select ‘Finalize’ to complete the transaction. By choosing ‘Select One’ or ‘Select Multiple’ or ‘Select All’, you can access additional options for each table. If you select a clean table in this mode, you can then press ‘New’ on the right side to create a ticket for that table. If you select an active/seated table, you can select ‘Open’, ‘Print’ or ‘Pay’ to view the ticket, print the ticket or complete payment. If you select a dirty table, you can mark it as clean. For tickets that were pre-authorized, the credit card authorization will list the total amount of the ticket as the payment amount. You may add the tip and finalize the transaction without need- ing to retrieve the customer’s credit card. However, if the total amount is higher than the pre-authorized amount, you will be at an increased risk for charge backs. In this case, you should void the original pre-authorization and swipe the card again to re-authorize. PAGE 7 PAGE 6 Harbortouch Technical Support: 800.632.1888 or possupport@harbortouch.com
EMPLOYEE FUNCTIONS EMPLOYEE FUNCTIONS CUSTOMER DATABASE LIST VIEW Introduction List View provides higher level control over multiple tickets at once. The functions available in List View are primarily used to transfer control in delivery or dining operations and to handle payments. Open Ticket This function will open the selected ticket. Pay with Cash This function will close all selected tickets tendered with cash for the exact amount. Selecting ‘Customer’ in the top right corner of the ticket screen will open your customer database. You may select a customer or search for a customer using any information you have stored (name, phone number, address, membership ID). The customer will be selected automatically if scanning or swiping a membership card, or if receiving a call from the phone number associated with the customer (if caller ID is installed). Assign Tips This function allows tips to be quickly added at the end of the night. Transfer to Me This function is used to take control of a ticket. This is commonly used by servers taking over a shift or seating a customer from the bar. Transfer to... This function is used to transfer control of a ticket to another staff member. This is commonly used to assign orders to drivers. Print Delivery Info This function will print all information tracked on the customer on the kitchen ticket. This is useful in very low volume delivery environments that do not have a specified driver. If the environment uses drivers, this function would be set up to trigger automatically when the ticket is assigned. Print Guest Checks This function will print guest checks for all selected tickets. Combine Tickets This function is used to combine tickets in cases where they were mistakenly separated or a tab is being paid for by another customer. To create a new customer and track purchase history and loyalty rewards, the only information needed is a name. The mem- bership ID can be used to assign a membership card using a barcode or magnetic strip data. After the customer is selected, their most commonly ordered items will be available at the bottom of their customer record. The POS will automatically sort the items by quantity ordered and track all common modifications of the items. You can simply select one of these items to begin a new order and make any modifications needed. PAGE 8 PAGE 9 Harbortouch Technical Support: 800.632.1888 or possupport@harbortouch.com
EMPLOYEE FUNCTIONS EMPLOYEE FUNCTIONS ITEM FUNCTIONS TICKET FUNCTIONS (CONTINUED) By selecting an item on the ticket, the item management functions will appear. Repeat This function will duplicate all selected items. This can be used to repeat a round of drinks for all customers on the ticket, or repeat a complicated pizza or sandwich order. Remove Item This function will remove the selected item from the ticket. If the item has been committed to the kitchen, the system will prompt for a void reason for reporting purposes. Quantity & Price This function will modify the quantity or price of the selected item. Discount Item This function will list all available discounts in the POS that apply to the selected items. You may remove a discount if selected by mistake using ‘Remove Discount’. Move Item This function allows an item to be transferred from one customer to another. This is commonly used if an item was mistakenly placed on the wrong tab, or the customers decided to change how they plan on splitting tickets. Share Item This function will prompt to choose the fraction of ownership between customers and automatically update the price. This allows for items such as an appetizer sampler to be easily split between multiple customers on their ticket. Special Request This function allows you to enter any uncommon requests for the kitchen using the on-screen keyboard. Kitchen Hold This function allows a server to prevent an item from printing in the kitchen. This gives the server control of the timing of items in the kitchen. When you first create a ticket, the most common cash totals will be displayed at the bottom of the ticket (If Fast Pay is en- abled). Upon re-opening a ticket or beginning a transaction using the new ticket function for dining transactions, the follow- ing ticket functions will be displayed at the bottom of the ticket replacing the Fast Pay options. Void Ticket This function displays all available void reasons in the POS for reporting purposes. Gratuity & Taxes This function allows the standard gratuity or taxes to be manually added or removed from transactions. New Person This function adds an additional seat position to the table. This can be used to assist an expediter or to separate owner- ship of items on the ticket. Split Ticket This function will prompt to split the ticket based on the customers selected. Tickets may be split in one of three ways: 1. Split selected people to one new ticket This can be used to place two people at a table of 12 on their own ticket and leave the remaining 10 together. 2. Split selected people to new tickets This can be used to separate 2 people onto 2 separate tickets at a table of 12 and leave the remaining 10 together. 3. Split all people to new tickets This can be used to separate all 12 people to their own tickets regardless of who is selected. Discount Ticket This function will prompt to select a discount that applies to the entire ticket. ‘Remove Discount’ may be used if the wrong discount is accidentally applied. Print Guest Check This function will manually print a guest check from the receipt printer. PAGE 10 PAGE 11 Harbortouch Technical Support: 800.632.1888 or possupport@harbortouch.com
MANAGER FUNCTIONS MANAGER FUNCTIONS ACCESSING THE MANAGER SCREEN END OF DAY PROCESS Select ‘Cash Drawer’ from the bottom of the ticket screen (when a ticket is not selected), then select ‘Remove Cash Drawer’. Select ‘Manager’ in the top function bar on the ticket screen. If tips are accepted, ensure your staff is trained to finalize all credit card transactions when the transaction is completed. If you have any checks that have not been finalized, it is recom- mended to add tips and finalize them at this point. Credit card transactions will not batch out until they are finalized in the system. You can view whether any transactions are still pending final- ization either in the default ticket view or list view. Select “All Tickets” in list view to see all employees’ tickets. Please note: All finalized transactions will automatically batch out at 3:00 am daily. If any checks are not finalized at this point, they will not be on the day’s credit card batch. If you would like to change the settlement time, please contact Harbortouch Technical Support at 800-632-1888 or possupport@harbortouch.com. Each option on the manager screen includes each manager section includes an explanation of the functionality available. USING THE DAILY REPORT To access the Daily Report, select ‘Daily’ from the manager screen. By default, the daily report will display all of your busi- ness’ sales and operations information from the start of your business day to the current time. The start and end time or date can be changed in the top left corner of the daily report screen. This report can also be used to spot check an employee at any time. By selecting a driver or server in the bottom left, then selecting ‘Selected Users’, the report will update to display their sales information. If you scroll down a short distance to ‘Cash Due Restaurant’, you can view how much the employee has in their pocket for their driver/server bank at any time. Once all tickets are finalized, review the ‘Tender Detail (All)’ report to ensure tip amounts are accurate. To display this report, go to ‘Reports’ from the manager screen and then select ‘Auditing’, and then ‘Tender Detail (All)’. Once on this screen, select ‘Show’ in the top right corner. This report will display all transactions and tips sorted by tender type. Review all transactions under credit, and if any are inaccurate, record the ticket ID number from the column on the left. Using the ticket ID number, recall the ticket under Manager > Tickets. Once the ticket is reopened, the tip can be adjusted from the payment screen. PAGE 13 PAGE 12 Harbortouch Technical Support: 800.632.1888 or possupport@harbortouch.com
MANAGER FUNCTIONS MANAGER FUNCTIONS END OF DAY PROCESS (CONTINUED) REOPENING TICKETS & REFUNDING ITEMS (CONTINUED) To refund a transaction that has not yet been settled, reopen the ticket from the ticket screen and remove the items being refunded. Select ‘Pay’ and the amount to refund will be displayed at the top. Once the amount has been refunded, select the payment on the left and select ‘Yes’ to remove. Select cash or credit to finalize the ticket for the updated amount. Next, return to the manager screen and select ‘Daily’. You may print your daily report by pressing the ‘Print’ button at the bottom of the screen. Select ‘Adjust Over/Short’ on the right side. You will see the record of the ‘Remove Cash Drawer’ function you performed. Select this record and select ‘Record’ to track cash over or short. PAGE 10 PAGE 11 REOPENING TICKETS & REFUNDING ITEMS To refund a transaction that has already been settled, select ‘Credit Refund’ from the manager screen. A message is displayed stating that the transaction will not be attached to a ticket. This is because the transaction has already been processed. Select ‘OK’. Enter the dollar amount that will be refunded and select ‘OK’. Swipe or enter the credit card information and select ‘OK’. A receipt for the transaction will print and the refund will be com- plete. If a completed ticket must be reopened at a future date or time, select ‘Tickets’ from the manager screen. Filtering options are available at the bottom of the screen to simplify your search. Once the ticket that should be reopened is found, select ‘Reopen’. The system will state that the ticket was reopened under the person who closed the ticket. The ticket can be accessed by this user or a user with access to ‘All Tickets’. PAGE 14 PAGE 15 Harbortouch Technical Support: 800.632.1888 or possupport@harbortouch.com
MANAGER FUNCTIONS MANAGER FUNCTIONS ACCESSING ADVANCED REPORTS CREATING/EDITING JOBS Select ‘Report’ from the manager screen to access the 100+ base reports in the POS. To edit an existing job, select it and then press ‘Edit’. To create a new job, select ‘New’. The dropdown can be used to filter the reports available. Once a report is selected you may further modify the date ranges using the options on the right. ‘Save Favorite’ can be used to rename reports and add them to the favorites category. Select ‘Show Report’ to populate the data. Jobs allow for the interface of the POS to be customized based on the job role being performed during a shift. To create or edit a job, select ‘Jobs’ from the manager screen. Each job requires a name and a pay rate (0 can be used if this job is not tracked for labor purposes). Along the left side are many customization options based on job. Fast Pay is commonly enabled for cashiers, bartenders, and other users handling fast cash transactions. PAGE 12 All reports can be printed or exported to .xls, .pdf, .rtf, or .csv format. Most third-party accounting software will require a .csv file for import. PAGE 17 PAGE 16 Harbortouch Technical Support: 800.632.1888 or possupport@harbortouch.com
MANAGER FUNCTIONS MANAGER FUNCTIONS CREATING/EDITING EMPLOYEES CREATING/EDITING DISCOUNTS To create a new employee or edit an existing employee, select ‘Employees’ from the manager screen. To create a new discount or edit an existing discount, select ‘Discounts’ from the manager screen. To edit an existing discount, select the discount and then press ‘Edit’. To create a new discount, select ‘New’. To edit an existing employee, select the employee and then press ‘Edit’. To create a new employee, select ‘New’. To create a discount, enter a name and an amount (the amount can be a percentage, dollar amount, or a forced price). All other functionality on the page is optional for further custom- ization. Other available functions include the following: • The dropdown menus in the top right allow you to restrict the items or groups to which a discount applies. • The filters at the bottom of the screen allow you to limit the discount to certain days/times. This is commonly used for happy hours. If you want the discount to automatically apply during the selected time periods, you must also check ‘Apply this discount automatically’. • Require employees to enter a reason when applying this discount. • Select whether the discount can apply to an entire ticket, individual items, or both. To add an employee, enter a user name (this name appears on re- ceipts), a PIN code for logging in, a job, and a first and last name (this name appears on reports). On the right side you may select the employee’s POS permis- sions. At the bottom right you may use the security template dropdown to select ‘All’ or ‘All Non-Management’ to simplify your selections. Each button on the POS can be turned on or off per each individual employee. PAGE 19 PAGE 18 Harbortouch Technical Support: 800.632.1888 or possupport@harbortouch.com
MANAGER FUNCTIONS MANAGER FUNCTIONS CREATING/EDITING THE MENU CREATING/EDITING VOID REASONS To create a new void reason or edit an existing void reason, select ‘Voids’ from the manager screen. To edit the menu, select ‘Menu’ from the manager screen. By selecting the appropriate option from the navigation buttons on the left of the screen, you can create or edit Screen Catego- ries, Item Groups, Menu Items, Choice Sets, Choices, Revenue Classes and Taxes. The first option is Screen Categories. Select an existing category and press ‘Edit’ or press ‘New’ to create a new screen category. To create a screen category, the only information required is name. Make sure ‘Manually Selected Contents’ is selected. The next option is Item Groups. Select an existing group and press ‘Edit’ or press ‘New’ to create a new item group. The only information necessary is a name. Prices should not be added to Item Groups. Screen Categories are the groups in which menu items are displayed on the POS. Item groups are used to organize items for reporting and printing purposes. It is very common for item groups to be the same as screen categories. If this is how you want to set up your system, you should create an item group to match every screen category you create. To edit an existing void reason, select the reason and then press ‘Edit’. To create a new void reason, select ‘New’. The only information required is a name. A report detailing which void reasons were used when a void was performed by each employee can be found under the audit category in the report section. From the Menu Items section, you can edit an existing menu item by selecting it and pressing ‘Edit’ or create a new item by pressing ‘New’. Menu Items require a name, revenue class for tax purposes, item group and screen category to define where the item is displayed on reports and the ticket screen, and a price. Choice sets can be assigned in the top right if available. Additional options are available at the bottom for further custom- ization. PAGE 21 PAGE 20 Harbortouch Technical Support: 800.632.1888 or possupport@harbortouch.com
MANAGER FUNCTIONS MANAGER FUNCTIONS CREATING/EDITING SECTIONS CREATING/EDITING THE MENU (CONTINUED) From the Choice Sets section, you can edit an existing choice set by selecting it and pressing ‘Edit’ or create a new choice set by pressing ‘New’. Choice Sets only require a name. Prepend (the checkbox in the bottom right corner) and Override Choice Pricing (to set an upcharge on each of the choices) are the most common options used. After saving a new choice set, selecting ‘Edit’ will offer a new op- tion for attaching the choice set to multiple items at the bottom of the screen. To edit the restaurant sections, select ‘Sections’ from the manager screen. From the choices section, you can edit an existing choice by selecting it and pressing ‘Edit’ or create a new item by pressing ‘New’. Choices require a name and can be attached to multiple choice sets using the ‘Is Part of These Choice Sets’ dropdown. If the choice is in a choice set where all choices are a different price you may place an upcharged price in the top right. If the choice is a different price from a choice set that sets the price, you may select to override the choice set price. To create a new section, select ‘Add New Section’ on the left. The ‘Edit Sections’ screen allows you to customize how the interface responds when a ticket is opened or assigned to this section. Select ‘Layout’ on the right to create and arrange tables for your dining sections. You can select from a variety of table shapes and sizes to reflect your restaurant layout. PAGE 23 PAGE 22 Harbortouch Technical Support: 800.632.1888 or possupport@harbortouch.com
MANAGER FUNCTIONS MANAGER FUNCTIONS UPDATING THE FRESH SHEET MODIFYING LABOR Select ‘Fresh Sheet’ on the manager screen to view the items on the fresh sheet. Items can be double tapped or you can use the blue arrow but- tons in the center of the screen to move items on or off the fresh sheet. You can set the quantity threshold that must be reached before a particular item is visible on the fresh sheet by selecting ‘Edit’. Select ‘Labor’ from the manager screen. Use the filters at the bottom and right of the screen to review your shifts. The shift can be deleted, clocked out, or edited to change the amount of break time tracked or the start and end time. The quantity remaining can be found on the main login screen to conveniently update cashiers and servers throughout the day. The quantity can also be found in the bottom right corner of the menu item button. If an item is no longer available, the button will be displayed in black with a large red X and a quantity of zero. When selected, it will explain that the item cannot be ordered until the fresh sheet is updated. © 2015 Harbortouch Payments, LLC. All rights reserved. PAGE 25 PAGE 24 Harbortouch Technical Support: 800.632.1888 or possupport@harbortouch.com
ENABLING CREDIT CARD PRE-AUTHORIZATION Select ‘System’ from the Manager Screen. Then select ‘Credit’, then ‘Advanced Setup’. Check the box next to ‘Allow credit cards to be authorized ahead of time’. In the ‘Standard Authorization Amount’ field, enter the dollar amount you will pre-authorize on the credit card. This amount should be high enough that your customers will not commonly exceed the amount but low enough that it will not seem unnecessary and upset your customers. $20 - $30 is common in many environments while $50 - $75+ is common in higher priced establishments or night clubs. Click ‘OK’ when finished. Note: When a credit card payment is finalized for 20% or more over the pre-authorized amount, the transaction is flagged and has a high risk of becoming a charge back. If your transactions are commonly more than 20% higher than the pre- authorized amount, you should increase your pre-authorization amount to reduce this risk. It is highly recommended to void the original pre-authorization and run the credit card again for any transactions that exceed the pre-authorized amount. PAGE 26 Harbortouch Technical Support: 800.632.1888 or possupport@harbortouch.com
TECHNICAL SUPPORT 800.632.1888 possupport@harbortouch.com HT1805_01052015