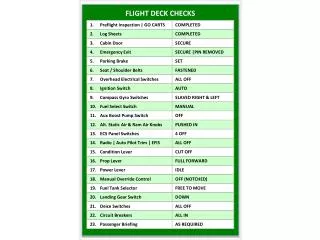
Pre Flight Checks
Pre Flight Checks. Before Getting In the Glider:. Assess the conditions and your landing options in case of a launch failure. Make sure you meet the Ballast requirements. If you are not familiar with the aircraft, read the placard. Placard. CBSIFTCBE. Controls Ballast Straps Instruments

Pre Flight Checks
E N D
Presentation Transcript
Before Getting In the Glider: • Assess the conditions and your landing options in case of a launch failure. • Make sure you meet the Ballast requirements. • If you are not familiar with the aircraft, read the placard.
CBSIFTCBE • Controls • Ballast • Straps • Instruments • Flaps • Trim • Canopy • Brakes • Eventualities
Controls • Controls are full and free: • Move the stick fully forward, fully aft, full right, full left. • With full left rudder move the stick around the extremities of the controls • With full Right rudder move the stick around the extremities of the controls
Ballast • I am over the minimum solo weight for the glider (Taking into account the proportion of the weight of the instructor in the rear seat that counts towards the minimum solo weight) • The combined weight of myself and the instructor is below the max weight.
Straps • Straps are tight. • Lap strap is tightened first, then shoulder straps
Instruments • Instruments are zeroed, no broken glass. • Altimeter is set to either: • QFE – Field Elevation • QNH – Height above sea level
ASI • ASI is at zero, often a white dot at the bottom of the dial. Yellow triangle is min approach speed. Green line is normal operating range, yellow line is above Va. (Max Rough Air).Red line is VNE.
Flaps • If flaps are fitted, check full and free movement, and configure for launch.
Trim • Move fully forward, fully aft. • Set for the approach speed for the conditions
Canopy • Canopy is closed and locked, and resists upward pressure
Eventualities • Check that conditions have not changed since you considered this before getting in the glider • Check conditions have not deteriorated or canopy is misting to the extent that launching is unwise
Accept the Cable • ‘Brakes Closed and Locked, Cable on Please’ • Check you have the correct colour weak link. • Left hand on the yellow knob • Prepare for launch failure