Download
1 / 19
190 likes | 268 Views
Explore effective classroom setup ideas from a former teacher to enhance learning for kids with disabilities. Ensure safety, organization, and positive reinforcement. Find helpful visuals and strategies to create a conducive learning environment.

E N D
Darren Tagliarini MS Ed. www.thebehaviorguy.com
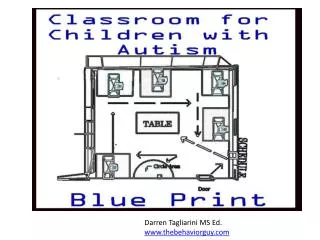
The goal of this page is to share how the materials from my site can be used and show the structure necessary for a classroom for children with disabilities. It is based on my previous experience as a classroom teacher for a pre- Kindergarten classroom. The essential component that I am not able to put a link to or draw a diagram of is this: ”the child needs to like you and your classroom environment. If they do not, then most likely.... they are not going to work for you.” To assist in making that happen I suggest: be organized, be energetic, have fun, laugh, recognize the positive often and give the child a safe environment to learn and play everyday. I hope this presentation gives you some ideas to make that happen for you and the students in your classroom.
Before Students Enter The first step in developing an effective classroom is to survey the room that you are given and identify any potentially dangerous areas where a child can potentially endanger themselves . For example: rear classroom doors, outdoor exits, closets with stacked materials or areas within the classroom where a student can climb on top or underneath as well as items such as electrical outlets. Also , be sure to check the room for any dangers or items that may have been move every day before you begin the day. In addition, look for areas that could be unintentionally reinforcing to a child. For examples: drawers, windows, cupboards or closets with materials in them. If the child can access/explore these areas freely and find something reinforcing such as a treat or a toy, then the child will be less likely to work during work times. Our goal is to develop a classroom environment that is reinforcing and that will provide the highest probability for on task behavior and create the most opportunities for language development. I have created clear warning labels and posted them clearly at student’s eye level to designate any danger areas. Click here to make yours
Assistant and teacher carry a clipboard • each day which contains the following information: • Assistant schedule and what the plan for the day is right • Click here for yours . • Here is another example of a teacher schedule. daily-schedule • 2. (4) students data sheets that she will keep data on for the day on Click here for the IEPdata collection document • 3. A copy of 7 ways to prompt is laminated and taped to the back of the clipboard. For a copy click here • 4. An Antecedent Behavior Consequence (ABC) data form if any behavioral events occur. For a copy click here • On occasion I have also used a frequency data collection form like this The routine is important and communication amongst all team members is essential.
Additional visuals For some children I may use a 1st then board to let them know that there is a reinforcer clearly available to them after our short bit of work is done. Click the picture and take a blank one. Lining up can be difficult for some students, so I suggest using these easy feet to label, laminate and tape to the floor for each student to stand on as they transition out to the playground. Click here: Lining up feet
Above you will see that the classroom is broken into 2 zones for staff coverage. She is responsible for 1 half and I am responsible for the other. Whatever students enter her zone she is to assist and work with and whatever students are in my zone I am expected to work with.
Location is important in deciding what activities get performed where. Low distraction area for individual work with teacher.... more distraction in an area of free play as an example. When you have finished the physical structure of the furniture of your room you should see Separate areas that are well defined for work and play/leisure activities with possible areas as follows: 1· (1:1 )work area with teacher: 2· An independent work area 3· Book area 4· Computer area 5· Home/ Dress up play area 6 · Circle area: our area for circle time/ story time 7 · Group Table area
Areas set around the classroom utilizing the cupboards or shelves for storage of materials. A center table area for group activities and circle area for group time. Areas defined with full-page colorful visual sign, which matches the pictures that are on their individual schedules as well as with carpets. You can download the complete collection of visuals that you will see used throughout this presentation here and watch the video here.
The students enter the room and their schedule is by the door telling them where to go first. All students have the same first picture card and that is "GROUP TABLE TIME" 8- 8:30 am Students Enter to Group Time: We are all starting together at the center table with a fun light activity that the children will want to do. Examples: puzzles, coloring, leggos, small manipulatives. The essential piece is that the children see the room and me as reinforcing and fun. We are starting the day off with a preferred activity using the concept of behavioral momentum. Read about that here
2· An independent work area: Individualized activities in labeled bins that the child could do independently. 3· Book area: Books of various levels/ hand writing sheets • 1:1 Work Time with Teacher 5· Home/ Dress up play area: Buttoning clothes, trying on shirts, untying knots in shoes, lacing boards 4· Computer area: Computer activities for website/activity ideas click here Next the first transition of the day will be made with my voice command of "check your schedules " Each child will go to their schedule take the visual and find the area of the classroom that the card matches. Some will share an area and some will not. Knowing my students and sending the right students to the right sections at the right time is an integral part of the class success. The assistant and I will guide students and get them started in each of the work areas. The next visual cue will be IN the center and will send the student to the center to their right. http://www.vimeo.com/8742752
8:30-9:30 Work Rotation Time Every 15 minutes we will transition to our right. In each work area there is a picture that corresponds to the center on the student schedule. They will take that picture and go to the next center and insert the card into an envelope at that center. If transitioning independently is a goal of the student then my assistant will look for the cards in the envelopes as she walks around to see who transitioned with their schedule and placed the cards in the right spots.
9:30 -10 Circle Time: The amount of circle time can vary based on the general behavior of the kids. Early in the year I have a max of 10 minute sessions and build to 30 minutes by the half way point of the year. That is a good goal for early learners. Sit in a small group for 30 minutes and attend. If the activities are planned, organized and exciting I generally have reached this goal. ACTIVITIES CAN INCLUDE: Identifying feelings "HOW ARE YOU FEELING TODAY?" BOARD AS SEEN HERE Every student has a place on the board. Go around the circle and have the student’s pick how they feel today and place it under their name. Then you can assist in helping say the feeling, making a choice and even have them share that feeling with a neighbor next to them. Put a spinner on this wheel and see who can identify what feeling the spinner lands on: FileE FeelingWheel The outline that I use for the week is on the next slide.
Each week I have a theme for the week and the activities in circle time are based on the theme. Here is my Planning Page it looks like this. For activity ideas go here
10-10:30 Outside Play Students go out to play and socialize. Look for opportunities to encourage requesting, such as help on the swing or opening doors to get into playgrounds or when assistance is needed to get down or up playgroup items. These are teachable moments for social skills and requesting from others. 10:30- 11:30: Work Rotation 2 Students re-enter the room and check their schedules again, which sends them to the second round of class activities that they didn't get to complete in the first round. Some students may be working on using sign language so I use this site to help me
11:30- 12 Lunch Time This is the time where the importance of ( read more about mandingt here: (requesting items)) is at it's peak of the day. The students are going to be more verbal during the lunch/ snack time due to thee motivation of the students to want to eat. We are in the natural environment and can teach many lessons in during the lunchtime. 12-12:15 Story Time After lunch we settle in for a short story and/or a simple activity to settle in and calm and give the assistant time to eat her lunch and then return to set up the next art activity.
12:15- 12:45 Group/ Art Activity 12:15- 12:45 Art Look through your students IEP goals and develop activities that work on those goals. Cutting, pasting, folding, handwriting, correct pencil grasping just to name a few.. 12:45- 1:30 Bathroom/ Cleanup Rest time Students get their mats and take a well deserved and earned half hour rest. After all of the language development through the morning most students had no problem laying down and going right to sleep.
1:30- Pack up Closing Group We always got together at the end of the day to review the vocabulary words of the day and any activities that we completed to assist the students with sharing those words at home with parents. Now, click the video to see one of my favorite classroom teachers and look around her classroom for many of these structural ideas/ strategies.
References For questions, comments or more support go to: • Lentini, R., Vaughn, B. J., & Fox, L. (2005). Teaching Tools for Young Children with Challenging Behavior. Tampa, Florida: University of South Florida, Early Intervention Positive Behavior Support. www.thebehaviorguy.com