Download
1 / 9
90 likes | 238 Views
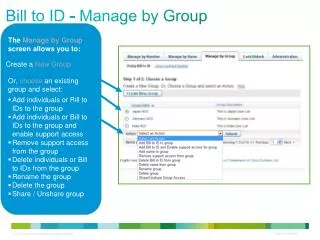
The Manage by Group screen allows you to create and manage groups effectively. You can add or delete individuals and contract numbers, rename groups, and delete groups. To create a new group, simply enter a name and description, select contract numbers to include, and add individuals. Actions such as adding names, deleting contracts, and sharing or unsharing group access are straightforward, with confirmation messages and email notifications sent to administrators. Streamline your contract management process with ease.

E N D
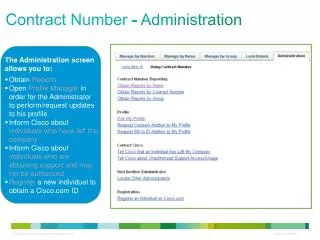
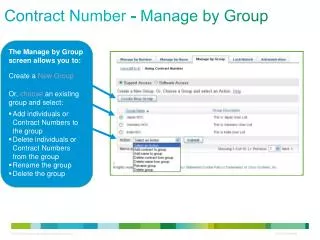
Contract Number - Manage by Group The Manage by Groupscreen allows you to: Create a New Group Or, choose an existing group and select: • Add individuals or Contract Numbers to the group • Delete individuals or Contract Numbers from the group • Rename the group • Delete the group
Contract Number - Manage by Group: Create New Group To Create a New Group using the Manage by Group screen: 1 2 • Screen 1 of 3: • Enter a group name and description. 3 • Click on the Next button. • Screen 2 of 3: • Select the Contract Number(s) to add to the group. 4 • Click on Nextbutton. • Screen 3 of 3: • Select the individuals to add to the group. 5 • Click on the Submit button. 6
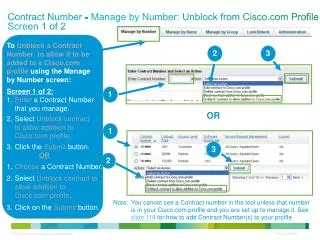
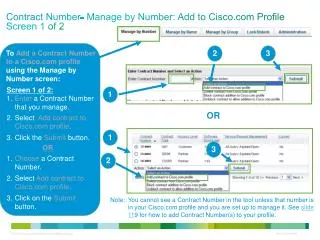
Contract Number- Manage by Group: Add Contract to Group To Add Contract Number(s) to a Group using the Manage by Group screen: 1 • Screen 1 of 2: • Choose a group. • Select Add contract to group. 3 2 • Click on the Submit button. • Screen 2 of 2: • Select the Contract Number(s) to add to the group. 4 • Click on the Submit button. A success message will be displayed. An email confirmationwill be sent to all Administrators for the Contract Number(s) as well as each individual in the group. 5 Note: You cannot see a Contract Number in the tool unless that number is in your Cisco.com profile and you are set up to manage it. See slide 118 for how to add Contract Number(s) to your profile.
Contract Number - Manage by Group: Add Name to a Group To Add Name(s) to a Group using the Manage by Group screen: 1 • Screen 1 of 2: • Choose a group. 3 • Select Add name to group. 2 • Click on the Submit button. • Screen 2 of 2: • Select the Name(s) to add to the group (or click Add Name and enter the Cisco.com ID). • Click on the Submit button. A success message will be displayed. An email confirmationwill be sent to all Administrators for the Contract Number(s) as well as each individual in the group. 4 5
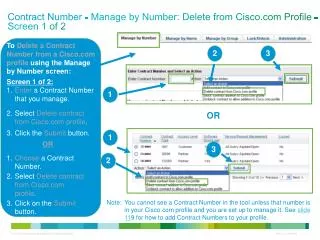
Contract Number - Manage by Group: Delete Contract from Group To Delete Contract Number(s) from a Group using the Manage by Group screen: 1 • Screen 1 of 2: • Choose a group. 3 • Select Delete contract from group. 2 • Click on the Submit button. • Screen 2 of 2: • Select the Contract Number(s) to delete from group. 4 • Click on the Submit button. A success message will be displayed. An email confirmationwill be sent to all Administrators for the Contract Number(s) as well as each individual in the group. 5 Note: You cannot see a Contract Number in the tool unless that number is in your Cisco.com profile and you are set up to manage it. See slide 119 for how to add Contract Numbers to your profile.
Contract number - Manage by Group: Delete Name from a Group To Delete Name(s) from a Group using the Manage by Group screen: 1 • Screen 1 of 2: • Choose a group. 3 • Select Delete name from group. 2 • Click on the Submit button. • Screen 2 of 2: • Select the Name(s) to delete from the group. • Click on the Submit button. A success message will be displayed. An email confirmationwill be sent to all Administrators for the Contract Number(s) as well as each individual in the group. 4 5
Contract Number - Manage by Group: Rename Group To Rename a Group using the Manage by Group screen: 1 3 • Screen 1 of 2: • Choose a group. 2 • Select Rename group. • Click on the Submit button. • Screen 2 of 2: • Enter the new group name and description. • Click on the Submit button. 4 5
Contract Number - Manage by Group: Delete Group To Delete a Group using the Manage by Group screen: 1 3 • Screen 1 of 2: • Choose a group. 2 • Select Delete group (Note: deleting a group does not delete the Contracts from the Cisco.com profiles of the individuals in the group). • Click on the Submit button. • Screen 2 of 2: • Click on the Yes button. 4
Contract Number - Manage by Group: Share/Unshare Group To Share/Unshare a Group using the Manage by Group screen: 1 3 • Screen 1 of 2: • Choose a group. 2 • Select Share/Unshare Group Access. • Click on the Submit button. • Screen 2 of 2: • Click on the Share Group Access button to share the group with Administrators • . Click on the Unshare Group Access button to unshare the group from Administrators 4 5