Running hours
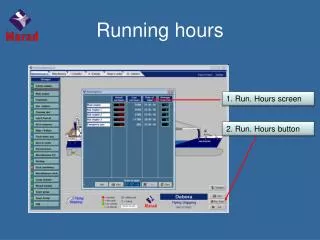
Running hours. 1. Run. Hours screen. 2. Run. Hours button. Running hours. MARAD asks WEEKLY for the actual number of running hours. Last time running hours are entered. Last number of running hours. Actual number of running hours (calculated!!!). RED = overdue

Running hours
E N D
Presentation Transcript
Running hours 1. Run. Hours screen 2. Run. Hours button
Running hours MARAD asks WEEKLY for the actual number of running hours Last time running hours are entered Last number of running hours Actual number of running hours (calculated!!!) RED = overdue YELLOW = you just changed but did not save yet GREEN = OK
Add a device 1. Press “Add”
Add a device 1. Press “Add” 2. Type text
Add a device 1. Press “Add” 2. Type text 3. Press <ENTER> (a pop-up appears)
Add a device 1. Press “Add” 2. Type text 3. Press <ENTER> (a pop-up appears) 4. Press <ENTER> or click “OK”
Add a device 1. Press “Add” 2. Type text 3. Press <ENTER> (a pop-up appears) 4. Press <ENTER> or click “OK” 5. Type actual running hours and press <Save>
Add a device 1. Press “Add” 2. Type text 3. Press <ENTER> (a pop-up appears) 4. Press <ENTER> or click “OK” 5. Type actual running hours and press <Save> 6. A check pop-up appears. If correct, press <ENTER> or click “YES”
Add a device 1. Press “Add” 2. Type text 3. Press <ENTER> (a pop-up appears) 4. Press <ENTER> or click “OK” 5. Type actual running hours and press <Save> 6. A check pop-up appears. If correct, press <ENTER> or click “YES” 7. Device successfully added
Add a device When an device is added in the hour screen it can be used in the maintenance module. Maintenance points can now run on running hours. When ‘’running hours’’ is selected the right device can be attached on the maintenance point. See chapter ‘Maintenance’
Change the name of a device 1. Left- or Right-click at the device
Change name of a device 1. Left- or Right-click at the device 2. Change name
Change name of a device 1. Left- or Right-click at the device 2. Change name 3. Press <ENTER>
Delete a device 1. Be sure the device is not used anymore and not linked to any maintenance point. 2. Left- or Right-click at the device
Delete a device 1. Be sure the device is not used anymore and not linked to any maintenance point. 2. Left- or Right-click at the device 3. Click at the red cross
Delete a device 1. Be sure the device is not used anymore and not linked to any maintenance point. 2. Left- or Right-click at the device 3. Click at the red cross 4. If you are sure, press <ENTER> or click “Yes”