Download
1 / 8
80 likes | 103 Views
Connect Canon MG3650 Printer to WiFi. Dial 1-888-633-7151 for Canon PIXMA MG3650 Wireless Printer Setup and Fix Canon mg3650 won't connect to wifi.

E N D
Connect Canon MG3650 Printer to Wi-Fi Call us Toll-Free : USA/CA: +1-888-788-1719 UK: +44-808-164-5280
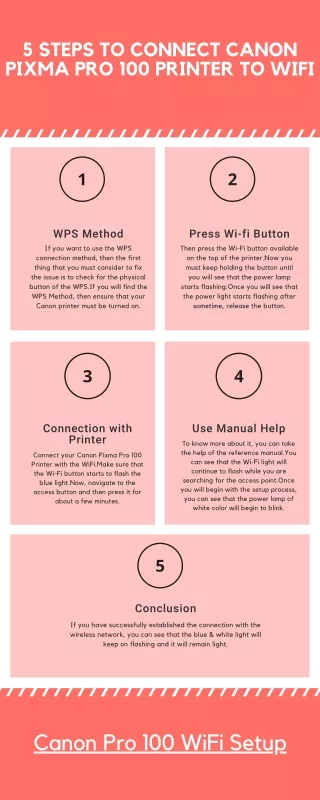
Connect Canon MG3650 Printer to WiFi • Some routers have a WPS button to automatically connect. If a device has a WPS button, the device can be connected to the network readily without entering the password. WPS technique is therefore an easy way to connect an access point to the network. • There are two additional methods to connect the device to the wireless network under the WPS technique. These two techniques are the technique of PIN and the technique of push buttons. The pushbutton technique is the simplest way of connecting the equipment so far. Now, using this technique, we will connect the device. You can use an alternative technique to link your printer to the network if there is no WPS button on your access point. • WPS Connection Method: There are certain conditions that must be met before beginning the process to use the push button method. • A physical push button is required for the router. Look at your device’s user guide to check out the information. • You should have WPA2 or WPA safety on your network. You will not be prepared to use the WPS technique if WEP safety is activated. Look at your PC’s wireless link settings to find out which technique of safety you can use on your Wi-Fi.
Step by Step Canon PIXMA MG3650 Wireless Printer Setup Guide Step 1: First of all, check that your printer is switched on and your router has a physical WPS button that you can press whenever required. Step 2: Press and hold on your printer the Wi-Fi button. Press the button until the B lamp begins to flash. Step 3: Press the button black and the button Wi-Fi. Check whether or not your Wi-Fi light is blinking fast. Make sure the blue light is lit right next to the Wi-Fi button. Step 4: When you search, the blue light will flash continuously. When you try to connect it to the router, both the power and the Wi-Fi light will flash. Once your printer is successfully connected to the network, Wi-Fi and power lights will stop flashing and stabilize. Step 5: Carefully check for both on and stable blue and green light. Network Settings Conformation: You can bring a print out of the network settings if you want to verify that the printer is linked to the Wi-Fi effectively.
Make sure your printer is switched on. • Load two sheets ofA-4 size into your printer’s input cabinet. • Press and hold the Wi-Fi button until the light begins to flash and then the button is released. • Press the Wi-Fi button and then print the network settings. • Check if the connection is active when you are about to print out. It also displays the name of the wireless network as the right one. • Standard Windows Computer Connection Method: Follow these measures to connect your printer to the wireless network if your router does not have a physical WPS button. Insert the disk that came with your printer for windows users. You should download the software if you don’t have a CD that arrived with your printer. • The steps to Connect Canon MG3650 Printer to WiFi are as follows: • Step 1: Click on start configuration when the setup screen opens in front of you. • Step 2: The software will collect and begin downloading the recent driver data. This will take a couple of minutes. • Step 3: Choose your region and country, then choose Next.
Step 4: Now you will see the license agreement section on the screen. If you would like to acknowledge the conditions of the license agreement, select yes. Step 5: To participate in the expanded study program, select Agree. If not, click the Do not agree button. Step 6: Click Next to activate the process of installing the wizard. Step 7: Select Wireless LAN, then select Next. Step 8: Choose wireless network connection and then choose Next. Step 9: Make sure to turn on your printer and click Next. Step 10: The software will start detecting the network printers. It will take some time. So wait until you detect your device. Step 11: Choose it from the “printers on your network” list window after connecting your printing device to the network and pick Next. Step 12: Check that “setting printer on the list can not be discovered” is selected and pick Next. Step 13: The Printer Setup Guide will open and assist you connect your printer to the network using the “Connect via Cableless Setup” method. To connect your printer to the network, follow the directions on the screen. Then press Subsequently. Step 14: Searching for the printer will start the configuration. The web link will stay disabled while the printer unit is being discovered by the configuration. Step 15: When the configuration is complete, select Next.
Step 16: Install and download network instruments and MP drivers. Step 17: Wait for completion of the configuration now. Step 18: If you first install the printer, it is suggested to do the Printhead alignment. Click on Next. To get more data, take a look at the guide. Step 19: To perform a test print, click on execution or click Next. Step 20: Select the software from the list you would like to install and select Next. If you’re unsure about downloading the software, then there’s nothing to worry about as you can uninstall the software later. Step 21: To register the printer, select Next. If not, press the Skip button. Step 22: Upon completion of the setup, click Exit. These are steps to connect canon mg3650 printer to wifi using the technique of WPS connection and standard method of attachment. If you are unable to Connect Canon MG3650 Printer to WiFi, Dial +1-888-788-1719 for Canon PIXMA MG3650 Wireless Printer Setup and Fix Canon mg3650 won’t connect to wifi .
Get In Touch With US USA Toll-Free : +1-888-788-1719 UK Toll-Free : +44-808-164-5280 Mail us : support@canonprintersupport247.com