Context
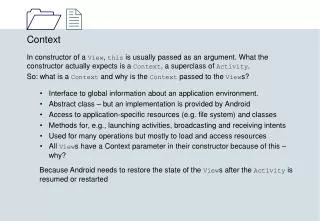
Context In constructor of a View , this is usually passed as an argument. What the constructor actually expects is a Context , a superclass of Activity . So: what is a Context a nd why is the Context passed to the View s?

Context
E N D
Presentation Transcript
Context In constructor of a View, this is usually passed as an argument. What the constructor actually expects is a Context, a superclass of Activity. So: what is a Contextand why is the Context passed to the Views? • Interface to global information about an application environment. • Abstract class – but an implementation is provided by Android • Access to application-specific resources (e.g. file system) and classes • Methods for, e.g., launching activities, broadcasting and receiving intents • Used for many operations but mostly to load and access resources • All Views have a Context parameter in their constructor because of this – why? Because Android needs to restore the state of the Views after the Activity is resumed or restarted
Context and Application • Important subclasses of Context: Activity and Application • Each app has single instance of Application • Application lives as long as the app is alive • When Activity is specified as Context for a resource (e.g. bitmap): • Activity is stopped: resource must be reloaded in onResume/onStart (can be too costly) • When Application is specified as Context: • resource survives until all activities of the app are destroyed • Application can also be used to share data among activities of app
File I/O • Android supports Java file I/O, so same classes can be used • No console input possible (? – Runtime configurations suggests that it is possible, but no documentation found; seems that for VMs there is a possibility) • Console output can be inspected in the LogCat window in the Debug environment • Files can be created for the sole use of the app (invisible in File manager) • Files can be created to be accessible (r, w) for other apps • Files can be on internal or external storage • Internal storage: • always available • private to app but can be made accessible to other apps (somewhat complicated; see comments in ReadFile app and code of TelephoneList for use of FileIn(Out)putStream) • not visible in File Manager • location: /data/data/<package name>/files • this.getFilesDir() returns File object for internal storage directory of app
File I/O (continued) • External storage: • not always available • easily accessible to other apps (needs r/w permissions to be set!) • visible in File Manager • location: /mnt/sdcard (but maybe dependent on device) • Environment.getExternalStorageDirectory() returns File object for root of external directory • writing requires a “Uses Permission” in the manifest on the Permissions tab page: • future: reading may also require a permission Demos: WriteFile/ReadFile
Multi-Language support • Very simple! • Create a folder values-nl in the res folder • Copy strings.xml from values to values-nl • Translate strings to Dutch (only the values, NOT the names) • Important: ALL strings must be present • During coding, only default strings “visible” (i.e. those in res/values) • If string is missing in non-default file: run-time error when accessing that string • No consistency checks done on strings.xml files! • So: use R consistently for all strings that you might want in several languages and you get multi-language practically for free
Code to get the Dutch strings instead of the English ones: // create Dutch locale Locale locale = new Locale("nl_NL"); // set as default Locale.setDefault(locale); // create new configuration Configuration config = new Configuration(); // set its locale config.locale = locale; // signal updated configuration this.getApplicationContext().getResources().updateConfiguration(config, null); // re-do layout (!) setContentView(R.layout.main); Demo: HelloHallo Language/country codes: https://developers.google.com/igoogle/docs/i18n Presumably: name of values directory for, e.g., en-UK: values-en-gb
Threads Sometimes needed to do things in parallel, e.g., drawing and background calculations • requires multiple control flows • control flow provided by special object of class Thread When app is started, Android creates single main thread in which all app components run Sometimes one wants to wait for user response and do something when it takes too long, so one can call Thread.sleep(<timeToSleepInMillis). While the sleep executes • UIF is not responsive (e.g., button clicks only handled after wake up) • Android may come up with the Application Not Responding (ANR) pop
Threads (continued) Extra threads can be created to allow several concurrent tasks or to implement timeouts Each thread runs as if it “owns” the processor Scheduler interleaves execution of the different threads Similar to interleaving of processes on a processor, but threads are “light-weight” Switching between threads requires far less overhead than switching between processes because threads all execute in the same memory space
Threads (continued) BUT: care needed, e.g., balance = balance + amount1; // thread 1 balance = balance + amount2; // thread 2 Outcome? • Thread 1, thread 2 execute sequentially: balance+amount1+amount2 • Thread 1 is interrupted after loading the original balance, thread2 then executes and finally thread 1 resumes, so outcome: balance + amount1 • Thread 2 is interrupted at same point by thread 1, so outcome: balance + amount2 • So synchronization can be needed; don’t think cases 2, 3 are unlikely (Murphy’s law!) • Methods can be declared synchronized, in which case different threads can execute these methods only strictly sequentially
Threads (continued) To create a thread: • Make a descendant of Thread: class MyThread extends Thread • Override the run() method of Thread • Create an instance: myThread = new MyThread(...); • Start it with myThread.start(); • Often, it is not possible to use extends because the class already extends another class, e.g. a View or a user-defined class • Common, so there is another way in Java to create a thread • Not possible to directly access UI components of main thread from other threads • Tricks: Button with handler in GUI thread to show results or use CountDownTimerand an attribute of the GUI thread to update the UI when the timer expires Demo: Threads: two threads that concurrently write a’s and b’s in a TextView using a Button to display results - Notice: no strict alternation!
Threads (continued) To create a thread when extends can not be used: • Create a class that implementsRunnable, e.g. MyRunnable • The Runnable interface specifies one method: run() • The thread is created by first instantiating a MyRunnable, e.g., myRunnable • Instantiate a thread: myThread = new Thread(myRunnable); • Start myThread with myThread.start(); Android provides a class CountDownTimer that can also be used to introduce timeouts Demo: Thread – results are made visible via a CountDownTimer that runs in the context of the main thread. Android also provides a class AsyncTask that is simple to use (see Android API site)
The Stroop effect (homework for extra points) Demonstrates interference in the reaction time of a task When the name of a color (e.g., "blue," "green," or "red") is printed in a color not denoted by the name (e.g., the word "red" printed in blue ink instead of red ink), naming the color of the word takes longer and is more prone to errors than when the color of the ink matches the name of the color. The effect is named after John Ridley Stroop (1935) The effect has been used to create a psychological test (Stroop Test) that is widely used in clinical practice and investigation Demo: http://faculty.washington.edu/chudler/java/ready.html (delay only)
Example complex interface: interface of the data display for the stress@work project outerLLayout navigationLLayout dataLL innerLL1 (necessary to get a ScrollView that displays only 3 bars at a time) scrollView1 (size of 3 indicator bars) indicatorView innerLL2 (necessary to get a ScrollView that displays only 3 graphs at a time) scrollView2 (size of 3 graphs) sensorView axisLL
Putting it all together: PersonList(example - not part of exam) Example of an activity that starts another activity with startActivityForResult: PersonList shows a list of people with their telephone numbers through a ListView object. ListView is a View that shows items in a vertically scrolling list. The items are stored in a ListAdapter associated with this View Access to the items in the ListView is only possible through a ListAdapter, i.e., the UI is provided by the ListView, the contents are provided through this adapter. A reference to the ListView is obtained from R.id via findViewById elv = (ListView)this.findViewById(R.id.listView1); The chosen adapter is the ArrayAdapter. The adapter can contain arbitrary objects, but expects these to be displayed in a single TextView, which imposes some restrictions or requires extra work (either name and telno. in separate lists or work to display in one list)
PersonList(continued) After creating a new project, first add a method to the PersonListActivity class, an empty method in which we will implement the onClick listener for a button public void onAddPerson(View v){ } Next, open the main.xml in the graphical view and add, first from the “FormWidgets” of the Palette, a button. Right-click the button and select “Edit Text”, change the text to “Add new person” Right-click angain and select from “Other Properties”, “Inherited from View”: “OnClick” and enter onAddPerson in the text box. Notice that Android generates code that makes it unnecessary to make the Activity implement the OnClickListener interface explicitly! From the “Composite” part of the Palette, add the ListView below the button. Now go back to the code
PersonList (continued) Now we can implement the onClick listener of the button // create intent to start the AddPersonActivity Intent i = new Intent(Intent.ACTION_INSERT_OR_EDIT); // next info not really used, but we can test if a) we want a person's name // and b) what aspect of the person's name we want (for more complex apps) // use the putExtra method to add some data to the intent: a key (Person) and // a value associated with the key (Name and tel#) i.putExtra("Person","Name and tel#"); // this next call causes a callback in which we add another name to the list // parameters: intent and the request code (the latter is an arbitrary number) StartActivityForResult(i,1);
PersonList (continued) Now we first create the AddPersonActivity. Right-click the package and choose “New” and “Class” Enter “AddPersonActivity” as the name and set the superclass to “android.app.Activity”, then click “Finish” To use the adapter, one needs to make a layout xml file. In this case, we use a layout with just one TextView. Make the layout file by right-clicking the res/layout folder, choose “Android XML File” and call it item.xml This creates a layout containing a single LinearLayout. Add a TextView to it. (Actually, one can get rid of the LinearLayout, but the Graphical designer doesn’t support this).
PersonList (continued) Declare a class attribute of type ArrayAdapter with ArrayAdapter<String> adapter; which says that the elements of the adapter are Strings Constructor : ArrayAdapter(Context context, int resource, int textViewResourceId) Instantiate the ArrayAdapter with adapter = new ArrayAdapter<String>(this,R.layout.item,R.id.textView1); This means that the adapter is created with a reference to a TextView that is present in the layout resource item.xml. Notice that Activity is a descendant of Context.
ArrayAdapter Constructors: ArrayAdapter(Context context, int resource, inttextViewResourceId) Several constructors that specify its contents, like ArrayAdapter(Context context, inttextViewResourceId, T[] objects) seem to prevent adding new objects to the list Methods like add(T object) clear() getCount() getItem(int position) getPosition(T item) insert(T object, int position) remove(T object)
PersonList (continued) Add the onCreate method: public void onCreate(Bundle savedInstanceState) { super.onCreate(savedInstanceState); setContentView(R.layout.newpersonitem); } And an empty body for two onClick listeners: public void onCancelClicked(View v){ } public void onOKClicked(View v){ }
PersonList (continued) Next create in the layout folder the file newpersonitem.xml (just like item.xml) , to make the user interface Add an EditText from the TextFields Palette to the LinearLayout, next add a Linearlayout below the EditText. Right-click the new LinearLayout and choose “Orientation” and “Horizontal” Add two buttons to this layout and change the texts of the buttons to “OK” resp. “Cancel”
PersonList (continued) Now we need to edit the Manifest, so open it. On the Application tab, select the AddPersonActivity, click Add, select IntentFilter and click OK Now select the IntentFilter just added, and click Add. Add an Action and click OK. The Action is now selected and the attributes for the Action can be entered on the right-hand side. Select “android.intent.action.INSERT_OR_EDIT” from the drop-down box. Add a Category to the Intent in the same way and set it to “android.intent.category.DEFAULT”
PersonList (continued) Now, we can add the body of the onOKClicked method: // get the text typed in by the user String s = ((EditText)this.findViewById(R.id.editText1)).getText().toString(); // get the intent that was used to start this activity; this is also returned to // the PersonListActivity Intent i = this.getIntent(); // we can check the intent we were started with: if( Intent.ACTION_INSERT_OR_EDIT.equals(i.getAction())){ // check that we were asked for a new Person's name String msg = i.getStringExtra("Person"); if(msg.contentEquals("Name and tel#")){ // add the name in the intent's extra i.putExtra("NameValue", s); // set result code to OK (constant of this class) and pass the (modified) intent this.setResult(RESULT_OK, i); // the finish call causes the callback to the PersonListActivity finish(); } }
PersonList (continued) And we can add the body of the onCancelClicked method: // get the intent that was used to start this activity Intent i = this.getIntent(); if( Intent.ACTION_INSERT_OR_EDIT.equals(i.getAction())){ // set result code to Canceled this.setResult(RESULT_CANCELED); // make sure we do the callback finish(); } Finally, we can add the onActivityResult method body, so reopen the PersonListActivity
PersonList (continued) the body of onActivityResult: // always call the same method on super super.onActivityResult(requestCode, resultCode, data); // check if the request code matches and the result is OK if(requestCode == 1 && resultCode == RESULT_OK){ // get the value that was typed if the user clicked OK and // add it to the adapter adapter.add(data.getStringExtra("NameValue")); // obviously, added data will get lost when Android kills the app... } This completes the app Notice that when the app stops, the data that we added will be lost forever. So we need permanent storage for that.