Engine Disassembly
Engine Disassembly. Cylinder Heads and Cylinder Block. Chapter Overview. This chapter instructs the student in engine removal and disassembly of the cylinder head and cylinder block. Identification and cleaning of engine parts and crack detection and repair are explained in depth.

Engine Disassembly
E N D
Presentation Transcript
Engine Disassembly Cylinder Heads and Cylinder Block
Chapter Overview • This chapter instructs the student in engine removal and disassembly of the cylinder head and cylinder block. Identification and cleaning of engine parts and crack detection and repair are explained in depth.
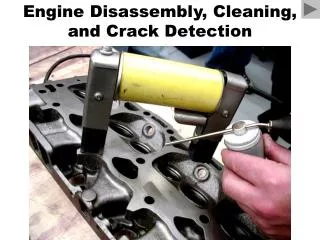
Chapter objectives. • Prepare engine for removal • Remove an engine from an FWD and an RWD Vehicle • Describe how to disassemble and inspect an engine. • Name the three basic cleaning processes. • Identify the types of cleaning equipment. • Describe the common ways to repair cylinder head cracks.
Removing an engine. • FWD vehicles • Removing the Engine Through the Hood Opening • Removing the Engine from Under the Vehicle
Removing an engine. • RWD Vehicles • Hint: Divide the students into several groups. Have them find the procedure for removing an e3ngine from several types of vehicles such as an FWD van and an RWD light truck in the service manuals. Compare and discuss the differences as a class
Cylinder Head Removal • First remove intake and exhaust manifolds (if not already removed) • Remove valve covers. • On an OHV engine, remove rocker arms and pushrods • Be sure to keep them in exact order to aid in troubleshooting. • Cylinder head bolts should be loosened one or two turns beginning in the center and working outward. Or: use the reverse order in the manual used for torquing the bolts
Cylinder Head Disassembly • Remove cam followers and/or lifters on OHC engines • Keep these in order to help in diagnosing valve related problems. • Remove Camshaft on OHC engines. • Follow manufacturers instructions being careful not to damage the camshaft. • Visually inspect cam lobes, followers and lifters. • Keep mated parts together.
Cylinder Head Disassembly • Measure valve spring height before removing valve springs. • Use valve spring remover to remove the valve spring keepers, and remove springs. • Measure valve stem height at before removing valves • Remove oil seals and valves. • Remove valves and inspect.
Cylinder Block Disassembly • Remove oil pan (if not previously removed) • Remove oil pump in accordance with service manual. • Remove timing components. • Pay attention to condition of belts, chains, pulleys, tensioners etc. • Replace belt, chain and/or gear timing components as sets. • Note: Timing belts should be replaced at overhaul. • In OHC engines, now may be the time to remove the water pump.
Cylinder Block Disassembly • Check cylinder for ridge • If ridge is present, remove with a ridge reaming tool. • Remove only enough metal to allow the piston to slip out of the bore without damaging the bore. • Be sure to remove all traces of metal shavings. • Check connecting rods for markings and mark if necessary. • Caps and rods must remain as a set.
Cylinder Block Disassembly • Remove rod caps • Press piston out of cylinder • Protect the bore and the rod bolts from damage. • Remove flywheel or flex-plate • Remove main bearing caps • Keep in order. • Inspect rod and main bearing journals for damage. • Remove core (freeze) plugs and gallery plugs. • Inspect Block for cracks or other damage.
Cleaning Engine Parts • Types of soil contaminants • Water soluble soils • Dirt, dust, mud etc. • Organic Soils • Petroleum By-Products • Tar, road oil, engine oil, gasoline, engine additives etc. • By-Products of Combustion • Carbon, varnish, gum and sludge
Cleaning Engine Parts • Types of soil contaminants (cont.) • Coatings • Rust proofing, gasket sealants, cement, paint, wax, sound deadeners • Rust • Ferrous Oxide • Destroys parts • Insulates and prevents heat transfer. • Scale • The buildup of minerals and deposits • Inhibits proper cooling • Promotes corrosion.
Cleaning with Chemicals • Uses chemical action to remove dirt, grease, scale, paint and/or rust • Chlorinated Hydrocarbons • May soak through skin or be breathed • May be flammable • Water based Chemicals • Hydrocarbon Solvents
Cleaning with Chemicals • Chemical Cleaning Machines • Parts Washers • Hydrocarbon solvents are both toxic and flammable. • For removing grease, oil and dirt from all kinds of metalic surfaces. • Soak Tanks • Cold Soak • Hot Soak • Hot Spray Tanks • Like a large dishwasher
Thermal Cleaning • Oven • 650 to 800 degrees • Dry and ready for blasting • Thermal reduction of oils etc.
Abrasive Cleaners • Abrasive Cleaning Methods • Abrasive Blaster • Shot is is smooth and used for surface peening • Glass beads are considered shot, and are blown through a nozzle with air. • Steel shot is hurled by a centrifuge. • Grit is angular and used for aggressive cleaning • Aluminum Oxide • Parts must be dry and grease free.
Abrasive Cleaners • Abrasive Cleaning Methods (con’t) • Parts Tumbler • A drum filled with abrasive material that’s rotated with the part to be cleaned inside. • Vibratory Cleaning • Sometimes called shakers • Filled with ceramic, steel, or aluminum oxide. • Cleaning by Hand • Brush, rag, abrasive cloth, scraper etc. • Includes using power tools with abrasive pads etc.
Alternative Cleaning Methods • Ultrasonic Cleaning • The use of high frequency sound waves to create microscopic bubbles to loosen dirt particles. • Uses minimal chemicals. • Citrus Chemicals • Replaces hazardous solvent and alkaline based chemicals. • Salt Bath • Uses high temperature molten salt to dissolve organic . • For ferrous metals 700 to 850 degrees F. • For aluminum parts 600 deg F.
Cracks in Castings • Cracks are caused by stress or strain in a section of the casting. Specific causes include: • Pressure or temperature changes during manufacture • Fatigue from fluctuating or repeated stress cycles. • Flexing • Impact damage • Single impact • Repeated impacts causing vibration (ie. Valve action) • Sudden temperature changes • Excessive overheating.
Crack Detection • Means of finding cracks • Visual inspection • Limited to very obvious faults.
Crack Detection • Magnetic Particle Inspection • Magnaflux • Magnetic field created in a component and the secondary field which occurs around a crack will cause iron filings to form a visible pattern. • A magnetic paste may also be used which will flow into a crack and be visible under ultraviolet light. • Works only with ferrous parts
Crack Detection • Dye penetrant inspection. • Uses a penetrating dye which fills the crack and a developer to draw the dye out of the crack creating a line which may be visible either under natural light or with an ultraviolet lamp
Crack Repair • Furnace Welding Crack Repairs • Used for cast iron parts • Preheat the entire casting prior to welding • Usually done by a specialist.
Crack Repair • Typical Aluminum Cylinder Head Damages • Cracks between valve seat rings • Small cracks may require no repair at all or only light peening. • Bottom side cracks from cooling passage. • Relieve crack and weld with aluminum rod. • Topside Cracks across main oil galleries • Usually not cost effective to repair • Detonation damage in combustion chamber. • Weld and freehand machine. • Meltdown damage • Weld and freehand machine • Coolant damage. • Depending on extent of damage may be welded and resurfaced.
Crack Repair • Welding of Aluminum Castings • TIG welding • Use a special arc welding tool which shields the welding arc with an envelope of inert gas to keep oxygen from the molten material.