Download
1 / 3
30 likes | 39 Views
Find and download the free branding mockup templates for commercial purposes at DealFuel. Top-notch quality mockups are required for designers to represent their companyu2019s brand. You can also edit the free mockup templates with smart layers. Download stationery mockup free in just one click and enjoy your work. Read More: https://www.dealfuel.com/

E N D
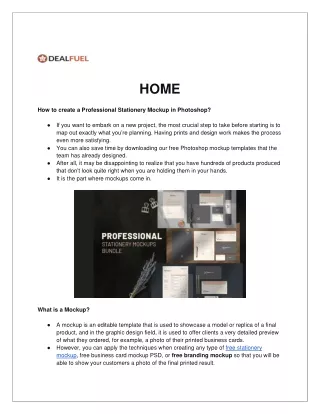
HOME How to create a Professional Stationery Mockup in Photoshop? ● If you want to embark on a new project, the most crucial step to take before starting is to map out exactly what you’re planning. Having prints and design work makes the process even more satisfying. ● You can also save time by downloading our free Photoshop mockup templates that the team has already designed. ● After all, it may be disappointing to realize that you have hundreds of products produced that don’t look quite right when you are holding them in your hands. ● It is the part where mockups come in. What is a Mockup? ● A mockup is an editable template that is used to showcase a model or replica of a final product, and in the graphic design field, it is used to offer clients a very detailed preview of what they ordered, for example, a photo of their printed business cards. ● However, you can apply the techniques when creating any type of free stationery mockup, free business card mockup PSD, or free branding mockup so that you will be able to show your customers a photo of the final printed result.
●Most people don’t have access to professional photo shooting tools, but I will show you how to have a professional-looking mockup. ● For this exercise, you will need Adobe Photoshop CS5 (or superior). How to select and retouch Photographs? STEP-1 ●When you are creating a mockup, you don’t need to consider the cut size and bleeds because you can just place your design in the correct position. ● However, when designing a business card mockup, make sure youdesign it with print- ready colors in a vector format and consider the necessary bleed amount. ● Once you have done the photography phase, transfer the photos from the camera to the computer and open Photoshop. ● You can also use Light room to adjust contrast and lightning. It is also a good alternative, but you will need Photoshop to create the Smart Objects for the mockup design. ● You have to crop your photo to enhance the subject. ● Make use of the cropping tool (C), or you can make a selection with the Rectangular Marquee Tool (M) and then go to the Image > Crop. STEP-2 ● When you are moving on to adjusting the color, lighting, contrast, and removing eventual spots and unwanted details. Before going any further step, you should remove dust and spots that sometimes are visible on the surface that you used, more likely if it’s dark. STEP-3 ● You have to select the Clone Step Tool (S), Alt-Click on a clean spot in that portion of your image, and then click on the spot that you would like to cover. ● Also, the Healing Brush Tool (J) can be used more efficiently. STEP-4 ●To reduce the reddish tone of the photo, apply the “Black & White” adjustment settings, and to create a new adjustment layer, go to the Layer > New Adjustment Layer > Black & White. STEP-5 ● To create a soft light effect in the center to brighten the scene more, pick a large brush (B) with the hardness set to 10% and then paint a white color on a new layer. Also, change the blend mode of this particular layer to Soft Light. STEP-6 ● Add the smart objects that contain the designs of your mockup. ● You need a template of the same size as the mockup, so create a selection using the Rectangular Marquee Tool (M) in Fixed Ratio mode, and enter the proportions of your mockup.
STEP-7 ● Now fill the selection with any color on a New Layer and name the Layer Front Card. The named layer will become your front item design. STEP-8 ● So right-click on it in the Layers panel and convert it to a smart object. STEP-9 ● Set the front item layer to Multiply Blending Mode so you can see what will happen, and transform that layer using the Free Transform Tool (Control-T). Look at the corners of your layers. There are anchor points that are indicated by small anchors. Hold Control and click on each of them to position that particular layer and match the mockup perspective. STEP-10 ● Do the same process with the mockup back, thus creating a new object (use a different color). ● Right-click on the layer of the front item, and choose the option “New Smart Object via Copy.” It will create a new editable copy of that object. STEP-11 ● Enter the newly created Smart Object (Right Click > Edit Contents) and fill it with a different color so that you can distinguish them better. Visit Us For More Information: https://www.dealfuel.com/ THANKS


![Stand Pouch Mockup Free 08I9~II44~2624[wa]](https://cdn5.slideserve.com/9796281/stand-pouch-mockup-free-o8i9-ii44-2624-wa-dt.jpg)
![Stand Up Pouch Packaging Mockup Free 0819–1144–2624[wa]](https://cdn5.slideserve.com/9820437/stand-up-pouch-packaging-mockup-free-0819-1144-dt.jpg)