
Woodworking Small Group
E N D
Presentation Transcript
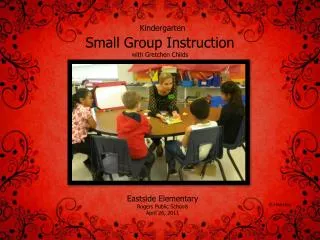
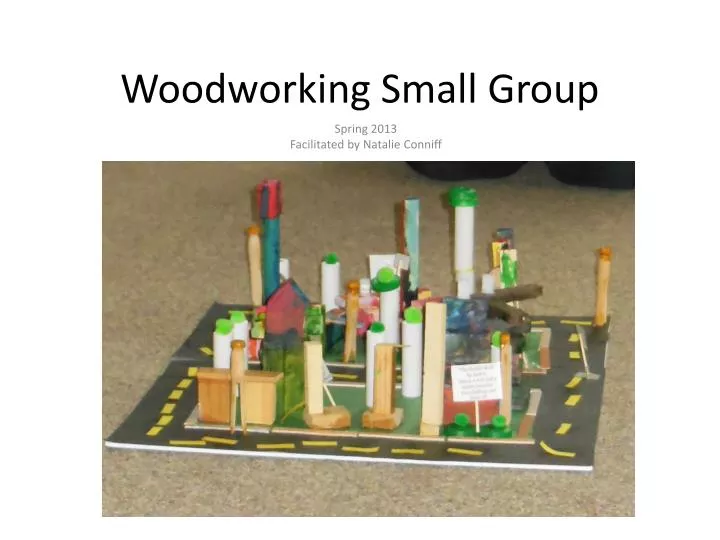
Woodworking Small Group Spring 2013 Facilitated by Natalie Conniff
Woodworking • Goal: Provide an opportunity for the children to work together to create physical representations of their ideas using woodworking materials. • Context: This group was developed based on a common interest in turning ideas into tangible products and their enjoyment of working with their hands. • Objectives: The children will be given the opportunity to successfully participate and communicate in a group. We will be exploring a new material (wood) and tools specific to working with wood to express the ideas and imagination of the children in the group and the group as a collective whole.
Exploring WoodNatalie’s Group-Amy’s ClassApril 26 AD: “I’m making a building that will stand forever.” The Teacher’s Experience: I wanted to start our small group with some hands-on experience with scrap wood pieces. As we worked with the wood the conversation quickly became about what wood can be used for and what is used to put it together. I decided to take the children on a walk through the school to look for objects made of wood and to see if we could tell how it was made just by looking at it. SK: “Look! This table is made of wood.” AD: “I don’t see any nails so it must be glued together.”
Exploring Wood (Cont.)Natalie’s Group-Amy’s ClassApril 26 The Children’s Experience: As the children worked with the scrap wood pieces they quickly started to stack and build with them to create structures and told elaborate stories connected about them. As the children glued their structures together they began to wonder about what other materials could connect wood together. As we went through the school they took photographs of things made of wood such as benches, tables, blocks and even trees. We discovered that nails, screws, staples, and glue could all hold wood together. After our scavenger hunt the group decided that we should use more scrap would pieces to make one structure as a whole group at our next meeting. • Next Steps: • Draw plans for our group structure • Use scrap wood to complete group structure • MN Early Learning Standards: • Social Competence and Relationships: Begin to participate successfully as a group member • Curiosity: Shows eagerness and a sense of wonder as a learner • Reflection and Interpretation: Generate ideas, suggestions, and/or make predictions • Creating: Use a variety of media and materials for exploration and creative expression • Responding: Show others and/or talk about what they have made or done SK: “I made a jet flyer that goes SWOOSHH” EG: “Wow! I made a fire.”
Creating BuildingsNatalie’s Group-Amy’s ClassApril 30-May2 The Teacher’s Experience: I planned on having the children draw out their plans for our group structure and then combine those ideas into one drawing for us to work from. As they completed their drawings it became clear that everyone’s ideas were very different. One child suggested that everyone make a small structure and that we could put all of them on one board sort of like a town. The next day they started their structures, carefully planning which blocks they wanted to use and working with sand paper to sand down the rough parts. On Thursday, working from photos from the previous day, the children built and glued their structures. MH: “There should be a chimney” ZL: “And windows” AD: “I don’t want a roof” SK: “ What about a rocket?” BW: “What if we get a big piece of cardboard and we could make a whole town. So then everyone can make what they want.” EG: “That seems like a good idea”
Creating Buildings (Cont.)Natalie’s Group-Amy’s ClassApril 30-May2 The Children’s Experience: The children spent a lot of time working on their drawings of the structures they wanted to create. They talked about chimneys, windows, doors, and even creating a solid foundation. Everyone shared their drawings. Once the children decided that they wanted to make a town instead of one large structure they began to work with the wood scraps again to bring their drawings or “plans” to life. The children noticed that some of the pieces felt rough so we used sand paper to smooth out the pieces. The children photographed their structures. The next day the structures were re-created, although some were new ideas, and glued together. We decided that once they were dry our next step would be to paint them. Next Steps: • Paint the structures • Assemble the town MN Early Learning Standards: • Imagination and Invention: Approach tasks and experiences with flexibility, imagination, and inventiveness • Persistence: Work at a task despite distractions or interruptions • Responding: Show interest and respect for the creative work of self and others • Spatial Relationships/Geometry : Use words that show understanding of order and position of objects • Fine motor
Painting Our StructuresNatalie’s Group-Amy’s ClassMay 7th- 9th SK: “I made a new color with blue called launcher.” The Teacher’s Experience: I planned on having the children paint their wooden structures this week. We worked mainly with the primary colors with space to combine them to create new colors. The children were excited to paint and bring their structures to life. We talked about making choices about what colors to use depending on what their structures were, how to use the paint to create windows and doors, and how to layer paint to decorate the structures. MH: “ I made green! And if I add white it will be a lighter green.” ZL: “ My building is a wall building”
Painting Our Structures (Cont.)Natalie’s Group-Amy’s ClassMay 7th- 9th The Children’s Experience: The children spent a lot of time working on painting their structures. They talked about the colors they were creating and what aspects of their structures they were working on. As we worked the children expanded the stories that they had about their structures and the purpose they would serve in our town from fairy houses, to walls, and even rocket launchers! Next Steps: • Assemble the town • Create additional structures EG: “I want to paint the whole thing.” AD: “I want to make a flower but I need yellow for the pollen” • MN Early Learning Standards: • Imagination and Invention: Approach tasks and experiences with flexibility, imagination, and inventiveness • Creating: use a variety of media and materials for exploration and creative expression • Creating: Participate in art experiences • Responding: Show interest and respect for the creative work of self and others • Fine motor BW: “Can I use some of that pink? It would be great for my flower” AD: “Sure, but try not to mix it”
Creating the Base of the TownNatalie’s Group-Amy’s ClassMay 14th- 16th The Teacher’s Experience: I began this week by presenting the children with construction paper to create the street and grass area of our town. I also planned to present the children with a number of found objects that could be used to add detail to our town and allow the children to use their imaginations. The children had discussed adding things like street lines, sidewalks, benches and trees to the towns so I attempted to choose objects that would be conducive to those projects. The children worked together to tackle on idea at a time and thoughtfully planned where they wanted to place things before gluing. SK: “I’ll do the glue!” EG: “My house fits, and so do all the others.” BW: “ I think the road should go all the way around.” ZL: “And then we’ll add grass.
Creating the Base of our Town (Cont.)Natalie’s Group-Amy’s ClassMay 14th- 16th The Children’s Experience: The children began talking about each of the materials and what they could be used for, noting multiple uses for each of the found objects. They were able to compromise and combine their ideas. The group established some specific jobs for each of the tasks and then set to work completing them. Some were in charge of gluing, while others were placing down paper, and others manipulated the materials for future needs. Next Steps: • Attach structures • Add details to the town BW: “ The yellow pieces need to far apart and in a line.” AD: “ We need lots of glue,” ZL and EG: “More glue coming up!” • MN Early Learning Standards: • Imagination and Invention: Approach tasks and experiences with flexibility, imagination, and inventiveness • Creating: use a variety of media and materials for exploration and creative expression • Creating: Participate in art experiences • Responding: Show interest and respect for the creative work of self and others • Fine motor
Adding to the TownNatalie’s Group-Amy’s ClassMay 21sr- 23rd SK: “I glued two white things together to make a really tall tree.” The Teacher’s Experience: This week the plan was to attach our structures and make some other details to add to our town. As we went the children decided which details they thought were important in a town (trees, benches, lights, etc.). During this portion of the project it was fun to see that everyone was able to create something that was unique and their own to add to the town. AD: “ Look I made a bush” BW: “I turned the wood so that it would balance more. That makes a better bench.” EG: “We can glue the pompoms on to make trees.” AD: “I don’t want a bridge” ZL: “Yea, no bridge” BW: “Okay but how about street lights?” MH: “ They should be yellow.” EG: “And how about a crosswalk.”
Adding to the Town (Cont.)Natalie’s Group-Amy’s ClassMay 21st- 23rd The Children’s Experience: The children were very excited to begin making trees, bushes, benches, and sculptures for the town. When it came time to attach the buildings they thought about where they wanted their structures to be, how they should sit on the board and who they wanted to be neighbors with. They were able to explore a number of found objects that were chosen by the teacher to represent things in the town and we even took a field trip to the art closet to find materials that would look like street lights! Next Steps: • Write up descriptions of the town • Present to class • MN Early Learning Standards: • Imagination and Invention: Approach tasks and experiences with flexibility, imagination, and inventiveness • Creating: use a variety of media and materials for exploration and creative expression • Creating: Participate in art experiences • Responding: Show interest and respect for the creative work of self and others • Fine motor
Writing About The TownNatalie’s Group-Amy’s ClassMay 28th- 29th The Teacher’s Experience: This week the plan was to write down the stories behind our structures. In order to do this the children took turns explaining their structure, what happens there, and it’s role in the town. I dictated their stories and typed up their words to be added to the town as signs. The Children’s Experience: The children were very excited to share their thoughts with each other. The all had some idea as to what their structure was but as they shared around the circle they incorporated other’s ideas into their own. As we shared it became apparent that we had a space theme happening in our town. The children then combined their ideas to establish a name of the town. Next Steps: • Present to class • MN Early Learning Standards: • Social Competence and Relationships: Begin to participate successfully as a member of a group • Persistence: Stay engaged in an experience • Reflection and Interpretation: Generate ideas, suggestions, and/or make predictions • Responding: Show interest and respect for the creative work of self and others • Speaking: Communicate information
Presenting to the ClassNatalie’s Group-Amy’s ClassMay 28th- 29th The Teacher’s Experience: To celebrate our work together in small group I provided the opportunity for the children to share their part of the town with the class during morning meeting. The Children’s Experience: Each of the children was proud to share their structure and contributions to the town. They were excited to tell the stories of their buildings with their classmates. • MN Early Learning Standards: • Reflection and Interpretation: Generate ideas, suggestions, and/or make predictions • Responding: Show interest and respect for the creative work of self and others • Speaking: Communicate information
Summary What the Children Learned Throughout this small group the children learned about how to cooperate with other children in a group setting and work together to create something. They were able to help and encourage each other, but also express when they were upset by something that another group member was doing. The children were given the opportunity to successfully create a physical representation of a group idea. They learned how to share their ideas, compromise on a plan, and assist each other and creating a product that they are proud of. The children were able to explore a variety of new materials, and new ways to use familiar materials. They were very persistent and worked hard despite distractions. What I Learned, As the Teacher Leading this small group has taught me how to follow the children’s lead. Initially I had plans for a woodworking group to work with wood and a variety of tools. After the children made their first structures with the wood pieces the town idea really took off. It became clear that our focus would be on creating this town rather than further working with the wood. I also learned how to facilitate a group activity for multiple development levels. We had a wide range of ages in this group and it took time to figure out how to keep all of them engaged in the process. When I was able to be open to the children’s ideas and facilitate their plans in a way that was appropriate for everyone our small group really took off!