The Bookkeepers Solution...ing modern technology....
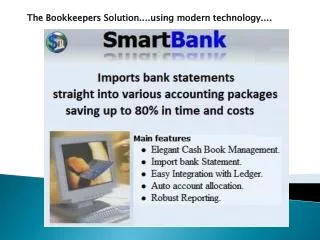
The Bookkeepers Solution....using modern technology. Writing up Cash Books the SmartBank way!. Step by Step – Summary. Step 1) Download Bank Statement files Step 2) Open SmartBank Step 3) Import Bank Statement file into SmartBank

The Bookkeepers Solution...ing modern technology....
E N D
Presentation Transcript
Step by Step – Summary • Step 1) Download Bank Statement files • Step 2) Open SmartBank • Step 3) Import Bank Statement file into SmartBank • Step 4) Allocate (Auto) & Edit ledger transactions • Step 5) Export the allocated transactions • Step 6) Import into Accounting package(e.g.Pastel) • -> Direct Import to Pastel coming soon...
Step 1) Download Bank Statement files SmartBank can import (NOT PDF): 1) OFX +. OFC Files - Secure files - Each line has unique number - Avoids duplication of transactions SmartBank can 1) View and 2) Print downloaded OFX and OFC bank statement files (Pastel cannot view and print OFX/OFC files until imported) • 2) CSV Files – to be updated soon • Only use as last resort (ABSA problem) • Cannot recognise duplicate transactions SmartBank will accommodate new bank formats as and when requested or required
Download Bank Statement files (.OFX/.OFC/.CSV) from Internet Bank Account Search for .OFX/.OFC Preferably (CSV as last resort) SmartBank can: - VIEW and PRINT OFX and OFX/OFC files- Recognises and avoids duplicate transactions
After downloading Click on the OFX or OFC file and view using SmartBank
Add Company (+Remove) Open Company Browse C drive or Server ANY Pastel version
SmartBank – Before Import of Bank Statement file SmartBank has 4 menus 1) Top menu 2) Tool Bar menu 3) Filter menu 4) Transaction menu
Top Menu The TOP MENU consists of the following helpful SmartBank tools: • Open Company - From inside SmartBank – Move from 1 company to another • Help - Help Menu • Change - Abbreviations • Maintenance - Global processes including: 1) Delete either the LAST Imported batch or 2) ALL the transactions for a specific bank Account
Open Company – Using TOP Menu Move from 1 company to another Help Menu
Change – Abbreviations • Maintenance - Global Processes – Delete Imported Bank Statement Batches Delete Last Imported Batch - will ONLY delete last imported batch VERY IMPORTANT!!Delete ALL transactions for Account 11234564, will delete ALL THE HSITORY for this bank account.
TOOL BAR MENU Statement In - Import Change – Edit / Process
View - Reports Tools – Settings Tools – Auto Allocation
BANK FILTER & DISPLAY OPTIONS Bank Account SmartBank can work with Multiple Bank Accounts being used at the same time. Displayed List • Best to work separately re • Deposits Only or • Withdrawals Only and then • View ALL Transactions • -> Final review+ Export
Batch Mode Default mode is - “Show Only the last batch”. The user can also select - “Show all batches imported” Date Range Note that SmartBank’s Export files are also controlled by the start date and end dates on the date Range
Transactions menu detail Imported from Bank Statement - Date - Bank Statement - Bank Description - Bank Statement - Amount - Bank Statement Manually / Auto Allocated by user • - Exp - - Export this Transaction – Ticked () by Default–> Unticked will NOT Export by default - GCS - G - General ledger - C - Customer - S - Supplier - Account - Allocated to GCS account - Tax (Vat) - If Applicable • Ledger Description - Edit if required • Account description - Generated by SmartBank after Account allocated - Reference - Generated by SmartBank - Cost code - Cost or Project Code – if required - Rec - - Record as Reconciled – Default is NOT Ticked as this field is not used in Pastel
1) Browse for bank file to import-> OFX/OFC Prefs (CSV files ok)
2) Select Cash Book account The bank account selected here stays as the default account for this account number.Thereafter, SmartBank will ONLY import Statements with this account number for this bank account.
Then “Accept” and SmartBank will import the Bank Statement as follows:
Edit & Allocate transactions • Deposits – BLUE • Withdrawals / Payments - BLACK • Editing includes • Allocating to: • Ledger, Customers & Suppliers accounts • Vat – if applicable • Editing Ledger Description • – if required (Pastel-> Max 40 characters • Cost centre & References if required
Edit and Processing Tools Snapshot EDIT MENU Right Click – Pop Up Transaction menu Process menu
Split Current Transaction Edit the transaction pop up window as follows using a) to e) below
Then the transaction split appears as follows: In a same manner, similar transactions can be grossed up & split as follows: R3000 is allocated to the Customer – 600 discount etc = R 2200 net
Remove Current Split Transaction • First click on the transaction line that needs to be Removed or Edited as follows: The same Split Transaction window pops up.
Then removed row is shown as follows: Then follow steps 4) to 7) as shown below:
Clear Screen CLEAR SCREEN option will clear the screen of previous batches imported but will NOT delete it.
Copy & Paste Edit menu - Copy (Ctrl C) and Paste (Ctrl V) or Using Mouse - Right Click, Copy and then Paste:
Save Whole or part of Bank Description for Auto Allocation See Auto Allocation below: