Download
1 / 43
430 likes | 445 Views
Join the JiggyBot mission to learn about electrical circuits and soldering. Build a JiggyBot that lights up and vibrates to win a race. Identify and describe the components, read circuit diagrams, and successfully solder them onto a printed circuit board.

E N D
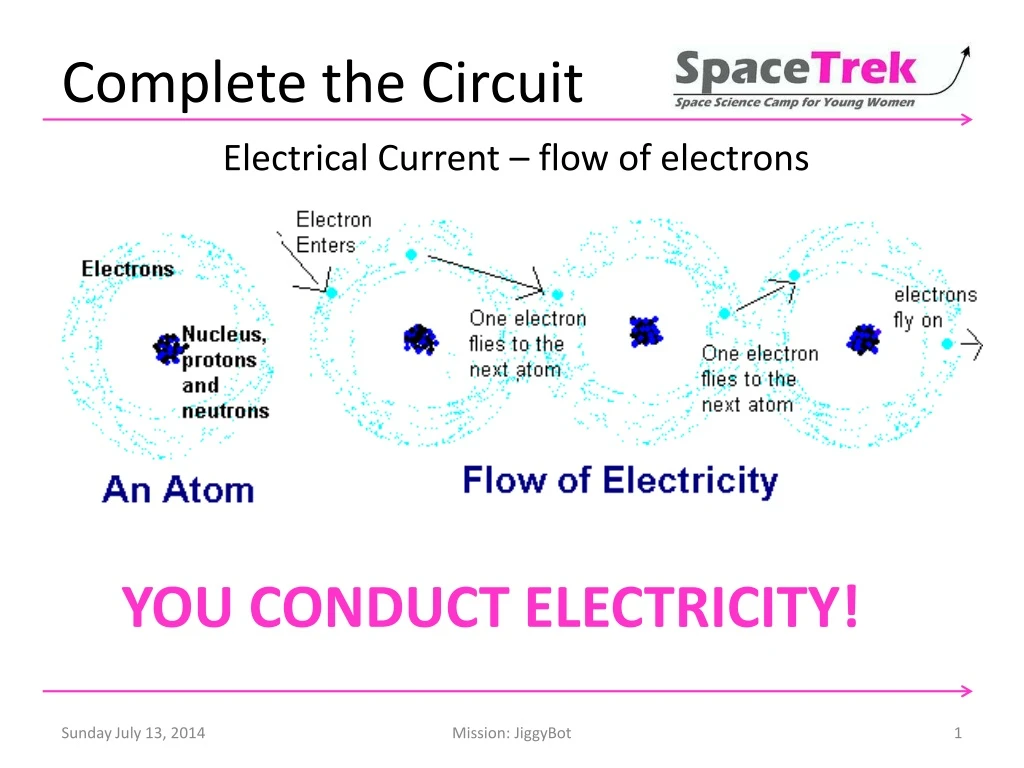
Complete the Circuit Electrical Current – flow of electrons YOU CONDUCT ELECTRICITY! Mission: JiggyBot
The JiggyBot Mission Mission: To build a JiggyBot that will win a race JiggyBots are electrical devices that light up and vibrate. Mission Targets: • I can identify and describe the function of the components used to light up and move the JiggyBot. • I can read and interpret an electronic circuit diagram (schematic). • I can describe the flow of electrical current through the JiggyBot components to explain how it works. • I can solder the components of the JiggyBot onto a printed circuit board (PCB) successfully to light up the light-emitting diode (LED) and vibrate. Mission: JiggyBot
Mission: JiggyBot JiggyBot Baggie Components Directions: Find this page in your lab manual Open the JiggyBot baggie and get out the electronic components. Match the components with the correct component name on the JiggyBot Component Inventory Sheet. Use the internet or reference sheet to determine the function of each component in the kit and record in the space provided. Mission: JiggyBot
Mission: JiggyBot Printed Circuit Board • Mechanically supports and Electrically connects electronic components using electrically conductive tracts etched from copper sheets and laminated on a non conductive substrate. • Note: Electrically conductive means that electricity can flow through the tracts and the into the components. Mission: JiggyBot
Mission: JiggyBot Battery Switch Device used to open and close an electrical circuit. Resistor Limits (resists) the flow of electrical current Device that converts chemical energy into electrical energy. Mission: JiggyBot
LED Diodes are polarized devices. Electricity can only flow in one direction through them. Light Emitting Diode Click here to learn more Mission: JiggyBot
The Motor Unbalanced load = vibration Click to find out more Mission: JiggyBot
Breadboarding Mission: JiggyBot
Challenge • Use the breadboard in your JiggyBot baggie to practice creating a circuit that will light the LED. • Draw the connections that worked on your worksheet by using the schematic symbols for the battery, LED and resistor. • When you get it working – take a picture of it!! Mission: JiggyBot
Challenge Build a Resistor-LED circuit Schematic PREDICT: Why do you think it is necessary to use a resistor with the LED? Mission: JiggyBot
JiggyBot Altium Mission: JiggyBot
JiggyBot Schematic Mission: JiggyBot
Next Challenge * Breadboard your JiggyBot components* Mission: JiggyBot
Now it’s time to learn to solder! Mission: JiggyBot
Soldering Establishes physical and electrical connections • Used by • Electricians • Electronics technicians • Electrical engineers • Jewelry makers • Stained glass manufacturers Mission: JiggyBot
Solder is a fusible metal alloy used to join together metal work pieces and having a melting point below that of the work piece. Composed primarily of Lead and Tin.(so we need to wash our hands when we’re finished) Take a piece and bend or stretch it – it’s ductile! Mission: JiggyBot
Soldering 101 • Soldering is dangerous if not respected. • Be mindful of where you are and where the soldering iron is around you. • If you get burned…LET US KNOW IMMEDIATELY! • Stay together, don’t work ahead for now(For your safety) Mission: JiggyBot
PCB – Printed Circuit Board Mission: JiggyBot
PCB – Printed Circuit Board Soldering Pads Top View Side View Circuit Board Component Mission: JiggyBot
Get your station Ready • Moisten your sponges with the water bottles at your tables. (You don’t need standing water) • Turn your soldering irons to 750° F. Would like to have a picture of our soldering iron on 750 Mission: JiggyBot
Preparing your Iron • Tin the tip of the soldering iron by melting an inch or so of solder on the tip. • The iron will now look shiny on the tip. • Then wipe any excess solder on the golden sponge. • Now place the iron back into the holder. Tinning your soldering iron in this manner will aid in future soldering. Mission: JiggyBot
Close up Mission: JiggyBot
Strategy Soldering Iron Mission: JiggyBot
Strategy Move soldering iron until tip is touching wire & solder pad Mission: JiggyBot
Strategy Move solder to touch edge of tip Solder Mission: JiggyBot
Strategy Hold until solder melts on tip by wire Solder Mission: JiggyBot
Strategy Move soldering iron tip up. This will drag solder up with it. Solder Mission: JiggyBot
Strategy Look for shinny fillets Mission: JiggyBot
Soldering Tips • Make sure the tip is hot! • Clean & tin the tip regularly Keep tip clean by using wet sponge and scour pad • Heat all parts until they are hot enough to melt solder • Hold the iron on the joint until the solderflashes around the pad • Do not use too much solder (Less is more here) Mission: JiggyBot
Tips • Use caution when clipping leads to avoid flinging metal across the room. • All soldering must achieve a good solder filet on the pad as shown for circuit reliability. • Bend resistors and diodes using needlenose pliers as shown. Mission: JiggyBot
Solder Joints Mission: JiggyBot
The tear drop of Joy Mission: JiggyBot
Congratulations you just soldered your first component at Time to tweet, instagram, or facebook! Mission: JiggyBot
JiggyBot Altium Mission: JiggyBot
JiggyBot Schematic Mission: JiggyBot
JiggyBot - Step 1 Insert the LED into D1, solder then clip leads. Be certain to insert the short (negative) lead into the square. Mission: JiggyBot
Steps 2 - 4 Insert, solder and clip leads • R1 • Sw • M1 Mission: JiggyBot
Step 5 If your JiggyBot vibrates and the LED is on, then you have successfully built (soldered) your first electronic device! Facebook, Tweet, Instagram, Vine, Whatever YOU do – tell the world how awesome you are Mission: JiggyBot
Prepare for Race You may strategically solder legs (stiff wires) onto your JiggyBot. All the JiggyBots will be placed in a Hula Hoop and turned on. The Hula Hoop will be removed and Your goal is to make it to the outer most ring (outlined in tape) first! Mission: JiggyBot
Jazz it Up Pimp out your JiggyBot – make her spectacularly fabulous! • Only one criteria: She MUST have your picture on her. Take lots of pictures of her and post Mission: JiggyBot
Resistor Battery simulation • https://phet.colorado.edu/en/simulation/battery-resistor-circuit Mission: JiggyBot