
Uploaded by
cullen
0 SLIDES
334 VIEWS
0LIKES
KSOM Sitecore Training Quick Reference Guide
DESCRIPTION
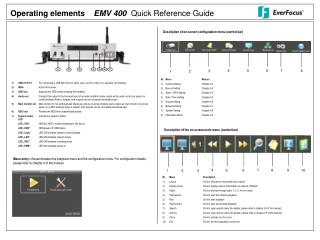
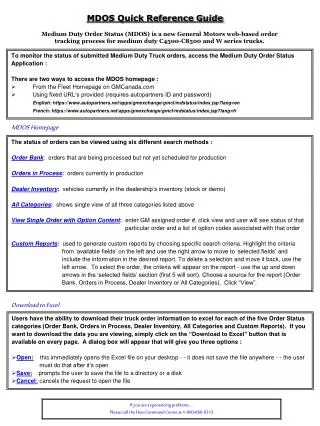
KSOM Sitecore Training Quick Reference Guide. Prepared exclusively for Swanson Russell and USC West Monroe Partners. Table of Contents. Accessing Sitecore Basic Page Editing Using the Rich Text Editor Uploading and Adding Images Adding Events Adding News Items Searching within Sitecore
Download

1 / 0
Download Presentation 
KSOM Sitecore Training Quick Reference Guide
An Image/Link below is provided (as is) to download presentation
Download Policy: Content on the Website is provided to you AS IS for your information and personal use and may not be sold / licensed / shared on other websites without getting consent from its author.
Content is provided to you AS IS for your information and personal use only.
Download presentation by click this link.
While downloading, if for some reason you are not able to download a presentation, the publisher may have deleted the file from their server.
During download, if you can't get a presentation, the file might be deleted by the publisher.
E N D
Presentation Transcript
-
KSOM Sitecore TrainingQuick Reference Guide
Prepared exclusively for Swanson Russell and USC West Monroe Partners - Table of Contents Accessing Sitecore Basic Page Editing Using the Rich Text Editor Uploading and Adding Images Adding Events Adding News Items Searching within Sitecore Appendix A: Workflow Process Details Appendix B: Using the Workbox Appendix C: Image Tools
- Accessing Sitecore
- Accessing Sitecore The Sitecore system can be accessed by visiting the following URLs: Development Site: http://med-sc-dev.usc.edu/sitecore Production Site: http://med-sc-cms1.usc.edu/sitecore/login At the login screen, there are various options that allow access to the two different methods of editing content. The two content editing modes are the Content Editor, and Edit Web Mode. We will be using the Content Editor for our training and encourage you do to the same. 4
- Accessing Sitecore Below is a list of generic usernames to be used for today’s training. They all have KSOM Content Approver access and have the same password (“password”) Testuser1 Testuser2 Testuser3 Testuser4 Testuser5 Testuser6 Testuser7 Testuser8 Testuser9 Testuser10 5
- Basic Page Editing
- Creating a New Page Updating Text Any text that is able to be edited can be made directly to the page. Adding Pages To add a page in Sitecore select the area you would like to add a page to and right click. Select Insert Insert from Template. A menu will appear where you will be able to select the type of page you would like to add. Next, a pop-up will appear asking you to name the new page. Enter the name and click ‘OK’. Adding Metadata All pages will have metadata associated with them. See slides below for details. 7
- Creating a New Page For MAC users: Rather than right-clicking to create a new page, you can add new page from within the ribbon. Click on the section under which you want to create the page, and under the Home tab, you will see page options. You will also see the other menu options in the ribbon that you would see in the right-click menu: 8
- Changing Page Titles The page title that is displayed in the Menus and Navigation throughout the site comes from the name of the item. To change the name of an item, right click the item, and select the ‘Rename’ option. Some items cannot be renamed. 9
- Saving and Checking In Items While you are working, you may Save the work you are doing. You can click the ‘Save’ button or click CTRL+S. When you have completed your changes, you must check the page back in. This will allow other editors to see your changes, but these changes will not appear on the site. To check in the item, from the Home tab select the Edit drop down. From there you can check in the item. 10
- Previewing Changes Changes to content items can be previewed by clicking the Publish tab at the top of the content editor, then clicking the Preview button. A new browser window will be displayed, and changes can be previewed before they are published. Please be sure to close your preview window once you are done viewing your changes as that window will display all items checked in and may appear that items are being published without actually being published. 11
- Publishing Items The workflow process is in place to ensure that content is appropriately reviewed before being published onto the live website There are two workflows in place: KSOM Content Workflow (used for standard site content and pages) KSOM News and Events Workflow (used solely for news and event items, and to publish specifically to the Home Page and Master Calendar) Each workflow process follows a few basic steps (shown below) and begins when a user wants to publish content to be displayed on the site In order to publish an item, it must go through a workflow process. News and Events Workflow Steps Content Workflow Steps 1 1 2 2 3 3 4 5 12
- Publishing Items As a Content Author, you can only submit an item for approval. To do this, select ‘Submit’ from the Edit drop-down menu A Content Approver will be notified via email to review the item After a Content Approver approves the item, then it will be published As a Content Approver, you can submit AND approve your own items, if desired An item is published after it goes through the workflow process and is approved *For more details on the workflow process, please see Workflow Process Overview 13
- Editing Items Editing Items Before you begin, please be sure that you disable your pop-up blockers. Locking and Item Before an item can be edited, it must be locked. Locking prevents changes from being overwritten by another user editing content at the same time. Content locking can be turned off if there are very few content editors. If the item needs to be locked, then the warning will appear beneath the name of the item. To lock the item, click the Edit button OR the ‘Lock and Edit’ link on the page. After clicking the Edit button, the item can be edited. 14
- Rich Text Editor
- Rich Text Editor Toolbar Some fields provide access to a Rich Text Editor 16
- Rich Text Editor Toolbar The toolbar provides many “standard” word processing features 17
- Standard cut / copy / paste Paste from Word Paste from Word Cleaning Fonts and Sizes Paste Plain Text Paste as HTML Rich Text Editor Toolbar Provides both standard clipboard and “clean” pasting operations 18
- Standard Formatting Undo / Redo Rich Text Editor Toolbar Supports undo / redo and common formatting options 19
- Rich Text Editor Toolbar Insert special symbols 20
- Rich Text Editor Toolbar Various toolbar commands assist with managing links and media 21
- Working With Images Right-click to edit image properties (for example, image alignment) 22
- Rich Text Editor Toolbar The editor includes a powerful table management wizard Set Table Properties Right click in a table 23
- Rich Text Editor Toolbar Spell checking and on-line help 24
- Uploading and Adding Images
- Upload an Image There are two methods of uploading images to Sitecore: The following slides will provide a step-by-step guide to uploading images using both methods 1. Upload the image to the Media Library This method is best for adding multiple images to Sitecore at once 2. Upload the image as you are creating or editing a page This method is best for adding images “on the fly” while you are creating/editing a page 26
- Upload an Image – Media Library 1. Upload the image to the Media Library This method is best for adding multiple images to Sitecore at once At the very bottom of the tree structure, you will see Media Library section Clicking on this will take you to the Media Library, where all images and files are stored 27
- Upload an Image – Media Library 1. Upload the image to the Media Library This method is best for adding multiple images to Sitecore at once By clicking into the Images folder, you will see all of the images stored on the site Within the Images folder, you can create new sub-folders to organize your images There are three ways to upload new images: Upload Files Upload Files (Advanced) Drag & Drop Images must be published for them to appear on the site, just like all content. The correct sizes (in pixels) for each image type are as follows: Banner Image – 644 x 218 Feature Image – 274 x 72 More News Image – 65 x 48 For more information regarding image sizes and editing, please reference the Image Tools appendix on slide 66. 28
- Upload an Image – while editing page You can also upload images while creating a new page or editing an existing page You can do this in two ways: When adding a banner image to a page Through the rich text editor Banner Image Select the ‘browse’ button Rich Text Editor Select the ‘insert Sitecore media’ button Whichever way you choose, you can upload a new image from the current screen without having to navigate to the Media Library 2. Upload the image as you are creating or editing a page This method is best for adding images “on the fly” while you are creating/editing a page 29
- Upload an Image – while editing page By selecting either ‘browse’ or ‘insert Sitecore media’, you will see the Media Browser screen display 2. Upload the image as you are creating or editing a page This method is best for adding images “on the fly” while you are creating/editing a page First, navigate to the ‘Images’ folder You will see images organized just as they are in the Media Library. From here, you can select an existing image to add to the page. If you need to upload a new image for the page, you can use either the Upload or Drag & Drop feature 30
- Upload an Image – while editing page Upload File (make sure to Publish after you upload) Drag & Drop (make sure to publish after you upload) 2. Upload the image as you are creating or editing a page This method is best for adding images “on the fly” while you are creating/editing a page Simply upload the file from your computer as you normally would Drag the file from your computer into the folder view that displays 31
- Upload an Image – while editing page After you Upload or Drag & Drop, the image will appear within the tree view as a new image. Select the image and click ‘OK’ to add it to the page. 2. Upload the image as you are creating or editing a page This method is best for adding images “on the fly” while you are creating/editing a page 32
- Calendar Events
- Add an Event At the bottom of the tree structure, you will see the Site Content section Within this section, you will see an Events folder, with all Events within that folder To create a new Event, right-click the Events folder, and select Insert > Event In the pop-up window, enter the name of the new event 34
- Add an Event For MAC users: Rather than right-clicking to create a item, you can add new event in the ribbon. Click on the section under which you want to create the page, and under the Home tab, you will see event options. You will also see the other menu options in the ribbon that you would see in the right-click menu 35
- Add an Event The new event will be created and you can populate its fields Note: Events can be either single day or multi-day. If the event is single day, leave the ‘End Date’ field empty. DO NOT span an event across multiple months. If an event exists across multiple months (i.e. 5/31-6/2), create two separate event items. The Title is the name of the event If you need to create an event that spans over two months, please create multiple events that start and end within the same month Select the start and end dates using the calendar menus Enter the Time of the event When entering time, please use one of the following formats: 3:00pm – 4:00pm PT 3:00pm PT Enter the Location of the event 36
- Add an Event Below the ‘Location’ field, you will see a section to add an Image to the page Select ‘browse’ to select the image The Media Browser will appear, and you can select your image. If the image has not yet been uploaded to the Media Library within Sitecore, you will need to upload it. 37
- Add an Event At the bottom of the page, you will see options to tag the Event This tagging will place the Event on the proper Department and/or Office page You can tag an Event with multiple departments and/or offices *NOTE: You can only tag metadata items to which you have access. For example, if you are only a member of the Department of Medicine, you will only be able to tag events with ‘Department of Medicine’ When you select an item, you can add it using the ‘add’ arrow All departments and offices will be listed here for you to tag You can remove a tag by using the ‘remove’ arrow 38
- Publish an Event When you are ready to publish an event, you must use the workflow to do so Events use the KSOM News and Events Workflow If you simply want to submit the item to be displayed on an event calendar, you only need to Submit the item. To do this, select ‘Submit’ from the Edit drop-down menu: Once the item is submitted, it will be published and displayed on the site. 39
- Publish an Event to the Home Page If you want to submit the item to be displayed on the Home Page, you need to select Request for Home Page for the itemfrom the drop-down menu: A Site Manager will be notified via email that the item is ready for review. If the Site Manager approves the event, it will be published on the Home Page and on the Master Calendar. If the Site Manager rejects the event, it will be placed back in ‘Draft’ state. You will be notified via email. **NOTE: if an event is rejected after it is requested for the Home Page, it may not be displayed anywhere else on the site. To display it on another page, follow the tagging process and use the Submit workflow action. 40
- Publish an Event to the Master Calendar If you want to submit the item to be displayed on the Master Calendar, you need to select Request for Master Calendar for the itemfrom the drop-down menu: A Site Manager will be notified via email that the item is ready for review. If the Site Manager approves the event, it will be published on the Master Calendar. If the Site Manager rejects the event, it will be placed back in ‘Draft’ state. You will be notified via email. **NOTE: if an event is rejected after it is requested for the Master Calendar, it may not be displayed anywhere else on the site. To display it on another page, follow the tagging process and use the Submit workflow action. 41
- Featured Event To determine which Event is featured on the home page, click on the ‘KSOM’ item within the tree structure. On this page, you will see a dropdown list for Featured Event. This is where you select which event displays on the home page. You can select from any existing new item. 42
- Featured Event After you Save and Publish the item through the workflow, it will display on the home page 43
- More Upcoming Events To determine which Event items are displayed on the home page, you can tag them with metadata labeled ‘Home’ Within the Event item itself, you will see the ‘Metadata Tagging’ area From here, you will see the option for ‘Home’. When you select ‘Home’ the Event item will be set to display on the home page 44
- News Items
- Add a News Item At the bottom of the tree structure, you will see the Site Content section Within this section, you will see an NewsResearch folder, with all news items within that folder To create a new News item, right-click the NewsResearch folder, and select Insert > News In the pop-up window, enter the name of the new item 46
- Add a News Item The new item will be created and you can populate its fields The Title is the name of the item Select the date using the drop-down menu Enter the Time of the item Add a description to the item Add body text 47
- Add a News Item Below the ‘Body’ field, you will see sections to add an Image to the page Select ‘browse’ to select the image The Media Browser will appear, and you can select your image. If the image has not yet been uploaded to the Media Library within Sitecore, you will need to upload it. 48
- Add a News Item At the bottom of the page, you will see options to tag the News item This tagging will place the item on the proper Department and/or Office page You can tag a News item with multiple departments and/or offices *NOTE: You can only tag metadata items to which you have access. For example, if you are only a member of the Department of Medicine, you will only be able to tag items with ‘Department of Medicine’ When you select an item, you can add it using the ‘add’ arrow All departments and offices will be listed here for you to tag You can remove a tag by using the ‘remove’ arrow 49
- Publish a News Item When you are ready to publish a news item, you must use the workflow to do so News Items use the KSOM News and Events Workflow If you simply want to submit the item to be displayed on an event calendar, you only need to Submit the item. To do this, select ‘Submit’ from the Edit drop-down menu: Once the item is submitted, it will be published and displayed on the site. 50
- Publish a News Item to the Home Page If you want to submit the item to be displayed on the Home Page, you need to select Request for Home Page for the itemfrom the drop-down menu: A Site Manager will be notified via email that the item is ready for review. If the Site Manager approves the item, it will be published on the Home Page. If the Site Manager rejects the item, it will be placed back in ‘Draft’ state. You will be notified via email. **NOTE: if an item is rejected after it is requested for the Home Page, it may not be displayed anywhere else on the site. To display it on another page, follow the tagging process and use the Submit workflow action. 51
- Featured News To determine which News item is featured on the home page, click on the ‘KSOM’ item within the tree structure. On this page, you will see a dropdown list for Featured News Research. This is where you select which item displays on the home page. You can select from any existing new item. 52
- Featured News After you Save and Publish the page, it will display on the home page 53
- More News To determine which News items are displayed on the home page, you can tag them with metadata labeled ‘Home’ Within the News item itself, you will see the ‘Metadata Tagging’ area From here, you will see the option for ‘Home’. When you select ‘Home’ the News item will be set to display on the home page 54
- Search within Sitecore
- Search Within the content editor, you can search to find the information you need The search bar will appear if you select ‘Search’ within the ‘Navigate’ panel of the toolbar Within the search box, you can search for a specific word or term. This will search any content within Sitecore, such as titles, dates, images, and page text. 56
- Search By selecting a search result, you will be able to view that item within Sitecore, whether a page, event, image, etc. To remove the search bar from your view, simply click the ‘X’ at the top of the search panel 57
- Appendix A: Workflow Process Details
- Appendix A: Workflow Process Details There are four roles that exist within Sitecore that users can have: The roles are listed below in ascending order, in terms of amount of access Content Editor – can add, edit, and delete basic content Content Approver – can add, edit, delete, and approve/reject content Site Manager – manages all site content and has full access to the content tree Admin – manages all site operations and has full access to all Sitecore settings 59
- Appendix A: Workflow Process Details The workflow process is in place to ensure that content is appropriately reviewed before being published onto the live website There are two workflows in place: KSOM Content Workflow (used for standard site content and pages) KSOM News and Events Workflow (used solely for news and event items) Each workflow process follows a few basic steps (shown below) and begins when a user wants to publish content to be displayed on the site News and Events Workflow Steps Content Workflow Steps 1 1 2 2 3 3 4 5 60
- Appendix A: Content Workflow The Content workflow is used for pages, callouts, etc. – anything except for news and events When you are ready to publish an item, use the ‘Edit’ drop down to select Submit Before you select ‘Submit’ the item will be in a ‘Draft’ state You can add a comment if you like: 61
- Appendix A: Content Workflow Next, the item will enter the ‘Awaiting Approval’ stage From here, it can either be Approved or Rejected by a content approver. If you are a Content Approver, you can approve the item immediately from the same screen. This will publish the item on the site. If it is approved, the item will be published and displayed on the site If it is rejected, the item will be placed back in the ‘Draft’ state 62
- Appendix A: News & Events Workflow The News & Events workflow is used strictly for news & events item You have three options to select to begin the workflow process (before you select a workflow step, the item will be in a ‘Draft’ state) Submit (if you want to display the item normally on the site) Request for Home Page (if you want to add the item to the home page AND the master calendar) Request for Master Calendar (if you want to add the item to the home page) 63
- Appendix A: News & Events Workflow Before you select ‘Submit’ the item will be in a ‘Draft’ state After you select Submit, there is no approval in place – the item will be published. You can add a comment if you like: Once the item is submitted, it will be published and displayed on the site. 64
- Appendix A: News & Events Workflow If you want to submit the item to be displayed on the Home Page, you need to select Request for Home Page for the itemfrom the drop-down menu: The item will be sent to a Site Manager for approval. If the Site Manager approves the event, it will be published on the Home Page and on the Master Calendar. If the Site Manager rejects the event, it will be placed back in ‘Draft’ state. You will be notified via email. **NOTE: if an event is rejected after it is requested for the Home Page, it may not be displayed anywhere else on the site. To display it on another page, follow the tagging process and use the Submit workflow action. 65
- Appendix A: News & Events Workflow If you want to submit the item to be displayed on the Master Calendar, you need to select Request for Master Calendar for the itemfrom the drop-down menu: The item will be sent to a Site Manager for approval. If the Site Manager approves the event, it will be published on the Master Calendar. If the Site Manager rejects the event, it will be placed back in ‘Draft’ state. You will be notified via email. **NOTE: if an event is rejected after it is requested for the Master Calendar, it may not be displayed anywhere else on the site. To display it on another page, follow the tagging process and use the Submit workflow action. 66
- Appendix B: Using the Workbox
- Appendix B: Using the Workbox For items to move between workflow states, specific content approvers must review the submissions and either approve or reject them The best way to view and manage items that are within a workflow state is through the Workbox You can access the Workbox through the content editor or desktop views 68
- Appendix B: Using the Workbox From within the workbox, you can view all items within each workflow Within each workflow, you can view which items are within each workflow state You can expand/collapse each category to view the specific items within each workflow state 69
- Appendix B: Using the Workbox At the top of the page, you can select/deselect which workflow items to view You can also determine the number of items per page to be displayed The header will list the workflow state of the items 70
- Appendix B: Using the Workbox Within the workbox, you can preview, open, view differences, approve, or reject specific items You can also Approve or Reject ALL ITEMS within a category, or just the SELECTED ITEMS that you specifically select. This will make the approval or rejection process quicker. 71
- Appendix C: Image Tools
- Appendix C: Image Tools 73
- Appendix C: Image Tools 74
- Appendix C: Image Tools 75
- Appendix C: Image Tools 76


More Related