Download
1 / 2
20 likes | 137 Views
This comprehensive training kit is designed for areas utilizing an AED and a CPR mannequin. It provides step-by-step instructions for properly connecting and using a trainer AED with specific tips for scenarios where the mannequin does not have metal studs. Instructions for using an MRX with a rhythm generator are included as well, helping participants practice the fundamentals of applying pads and recognizing shockable rhythms. Emphasizing hands-on learning, this kit ensures participants build essential life-saving skills effectively.

E N D
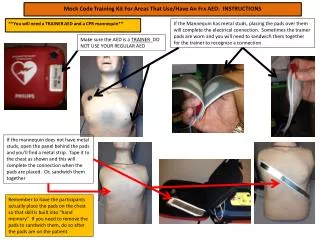
Mock Code Training Kit For Areas That Use/Have An FrxAED: INSTRUCTIONS **You will need a TRAINER AED and a CPR mannequin** If the Mannequin has metal studs, placing the pads over them will complete the electrical connection. Sometimes the trainer pads are worn and you will need to sandwich them together for the trainer to recognize a connection Make sure the AED is a TRAINER DO NOT USE YOUR REGULAR AED If the mannequin does not have metal studs, open the panel behind the pads and you’ll find a metal strip. Tape it to the chest as shown and this will complete the connection when the pads are placed. Or, sandwich them together Remember to have the participants actually place the pads on the chest so that skill is built into “hand memory” If you need to remove the pads to sandwich them, do so after the pads are on the patient
Mock Code Training Kit For Areas That Use/Have An MRX: INSTRUCTIONS Hooking up to the Rhythm Generator, make sure it is on and V-fib is selected **You will need a Rhythm Generatorand a CPR mannequin** **Use your own MRX from your department**(make sure it is available for an actual emergency) MRX-Note it is in AED Mode Allow “students” to apply pads to mannequin and hook up completely to therapy cable Once the pads are attached to the therapy cable, the facilitator needs to disconnect (be sneaky) the therapy cable and connect to the Rhythm Generator so the MRX can “read” a shockable rhythm