Download

1 / 39
400 likes | 640 Views
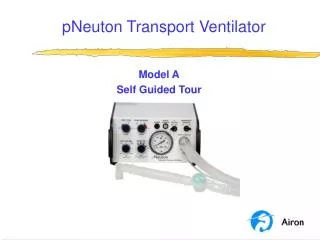
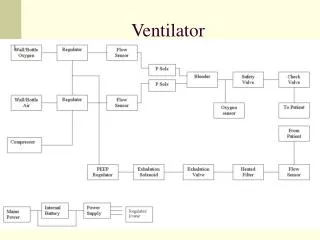
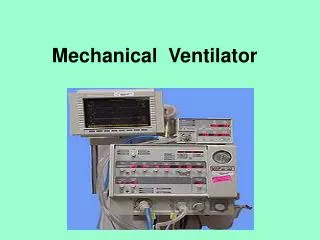
pNeuton Transport Ventilator. mini Ventilator Self Guided Tour. Program Objectives. This program is a self guided tour of the pNeuton mini Ventilator. At the end of this tour you will be able to: Describe the main operating features of the ventilator

E N D
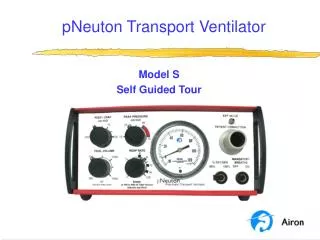
pNeuton Transport Ventilator mini Ventilator Self Guided Tour
Program Objectives This program is a self guided tour of the pNeuton mini Ventilator. At the end of this tour you will be able to: • Describe the main operating features of the ventilator • Identify the controls and connections • Describe the patient circuit • Set-upthe ventilator for patient operation • Define various clinical environments for ventilator application • Clean and maintain the ventilator
Features and Controls – Side Panel Driving Gas Inputs • Connections for high pressure oxygen and medical grade compressed air source gas • Always use a high flow gas source that can provide 55 + 15 psi (3.8 + 1 bar) pressure at a minimum of 20 L/min • Insure that the compressed air is clean and free of water
Features and Controls – Side Panel Remote Alarm Output • Remote Alarm connection • A properly configured Remote Alarm will indicate an active ventilator alarm condition in a remote location
Features and Controls – Side Panel Patient Connection • Connection for the large bore hose of the patient circuit
Features and Controls – Side Panel Prox Pressure • Patient circuit medium hose connection • Connects to the blue tube from the proximal patient pressure port on the patient circuit
Features and Controls – Side Panel Exp Valve • Patient circuit small hose connection • Connects to the clear tube for the expiratory valve on the patient circuit
Features and Controls – Side Panel Audible Alarm • Audible alarm sound generator • Used for patient disconnect, high pressure and low gas supply alarms • Will not turn off during low gas supply alarm • Do NOT put tape over the holes, push sharp objects into the holes or interfere in any way with the alarm • The alarm is for patient protection. If you suspect the alarm is not operating properly have the unit serviced immediately
Features and Controls – Front Panel PEEP / CPAP Control • Adjusts the PEEP / CPAP from 0 to 20 cm H2O • Operates in either mode • Automatic sensitivity • Oxygen concentration is maintained at set % Oxygen control
Features and Controls – Front Panel Peak Pressure Control • Limits peak airway pressure from 15 to 60 cm H2O • Operates only in the IMV + CPAP mode • Used to set the pressure limit during mandatory breath delivery
Features and Controls – Front Panel Continuous Flow Control • Sets baseline continuous flow for 6, 8, 10, 15 or 20 L/min • Operates in either mode • Used to set the flow used for both spontaneous breaths and mandatory breath delivery
Features and Controls – Front Panel Inspiratory Time Control • Sets inspiratory time for mandatory breaths from 0.25 to 2.0 seconds • Operates only in the IMV + CPAP mode • Can be used to preset tidal volume using the tidal volume chart on the top of the ventilator
Features and Controls – Front Panel Expiratory Time Control • Sets expiratory time of mandatory breaths from 0.25 to 20 seconds • Operates only in the IMV + CPAP mode • Use with the respiratory rate chart on the top of the ventilator to determine mandatory breath breath rate
Features and Controls – Front Panel % Oxygen Control • Delivered oxygen choice from 21 to 100% • Operates in either mode • Sets oxygen concentration of the continuous flow
Features and Controls – Front Panel Visual Alarm Indicator • Illuminates for an active alarm condition • Alarm warns of patient disconnect after 10 seconds • Alarms for high pressure and low gas supply • Will turn off when alarm is corrected or Reset / Silence Button is pressed • Will not turn off during low gas supply alarm
Features and Controls – Front Panel Alarm Reset / Silence Button • Press button to silence the alarm system for 25 seconds • Every time the button is pressed the alarm silence period will reset for 25 seconds
Features and Controls – Front Panel Mode Control • Activates IMV + CPAP mode for delivery of ventilator breaths • Mode is the same as CMV + PEEP • CPAP mode provides continuous flow and CPAP for spontaneous breathing patients • No ventilator breaths in the CPAP mode
Features and Controls – Front Panel Pressure Gauge • Represents pressure in patient circuit at the patient wye of the circuit • All patient alarms are sensed at the patient wye
Features and Controls – Front Panel High Pressure Alarm Control • Sets the high pressure alarm from 15 to 70 cm H2O • Independent audible and visual alarm from the Peak Pressure Control
Patient Circuit Patient circuit is a disposable, dual limb system • All hoses attach to the side of the ventilator • Patient end connects for clinical intervention • Directly to an endotracheal tube • Use NIV kit to provide nasal prong or nasal mask application in neonates and infants • Use full face CPAP mask (non-vented)
Patient Circuit Which size circuit - Neonatal or Pediatric? • The neonatal circuit uses 10 mm hoses and is designed for patients up to 3 kg • The pediatric circuit uses 15 mm hoses and is designed for patients above 3 kg • If your patient needs 10 L/min or more continuous flow to meet spontaneous flow demand, you should use the pediatric circuit to minimize expiratory flow resistance
Patient Circuit Use only Airon Corporation patient circuits • Calibration of the PEEP / CPAP and Peak Pressure controls is based on the Airon circuit and exhalation valve • Using other manufacturers circuits / exhalation valve may cause: • errors in pressure delivery • high expiratory flow resistance • interference with CPAP setting
Program Objectives pNeuton mini Ventilator self guided tour, objectives completed so far • Describe the main operating features of the ventilator • Identify the controls and connections • Describe the patient circuit With an understanding of pNeuton’s capabilities, let’s look at patient application.
Patient Application Set Main Controls • PEEP / CPAP can be set to minimum • Determine peak ventilating pressure • Set desired continuous flow to meet patient needs • Set Inspiratory Time • Set Expiratory Time • Choose % Oxygen • Adjust High Pressure Alarm for safety
Patient Application Initial Set-up • Attach Airon patient circuit to ventilator • Attach a test lung to the patient connection on the circuit • Attach high pressure oxygen and air hoses to the side of the ventilator • Attach these hoses to the gas supplies
Patient Application Begin Ventilation • Turn ON gas supplies • Alarm system will immediately activate • Press Alarm Silence button if desired • For IMV or CMV, set Mode control to IMV+CPAP • Ventilator will start to provide breaths at the settings on the controls
Patient Application Set PEEP / CPAP • Adjust the PEEP / CPAP control to the level desired • Adjust continuous flow to meet patient demand – not too high to create expiratory flow resistance – not to low to cause pressure swings and high patient effort • Use 6 – 8 for neonates • Use 8 - 10 for infants • Use 10 – 20 for children
Ventilator Operation Alarm System Functionality • Alarm preset to activate within 10 seconds • Pressing the Alarm Silence button equals 25 second delay • Disconnect Alarm is looking for a specific minimum pressure of at least 3 cm H2O at all times • If there is not at least 3 cm H2O CPAP or mandatory breaths pressure of 3 cm H2O, the alarm will sound • High pressure alarm activates whenever the pressure in the circuit exceeds the alarm control setting. • Input Gas Pressure below 40 psi (2.8 bar) will activate the alarm
Ventilator Operation Peak Pressure Limit • Operates to limit the peak airway pressure during mandatory breaths • For volume ventilation, set the Peak Pressure 10 cm H2O above the pressure needed to deliver the set Tidal Volume • Peak Pressure control is not an alarm. Use the High Pressure Alarm control for this function
Ventilator Operation % Oxygen Control • Set % Oxygen control to the desired oxygen level • Accuracy is plus / minus 3% • The ventilator uses the oxygen gas supply for internal operation so high oxygen concentrations may deplete tanks quicker
Clinical Issues Neonatal Ventilation • Inspiratory time setting 0.25 to 2.0 sec • Use low continuous flow for proper breath delivery and minimize expiratory flow resistance • Inspiratory time, flow and pressure (along with lung compliance / resistance and ET-Tube leak) will determine tidal volume to the patient • Use the respiratory rate chart on top of the ventilator to estimate ventilator rate • Use NIV kit for nCPAP • Monitor closely for patient synchrony
Clinical Issues Non-invasive Ventilation (NIV) • Use Airon NIV kit with nasal prongs or masks • Proximal pressure measured will display on pressure gauge and be used by alarm system • Effective patient interface seal will insure proper alarms • Rotate from nasal masks to prongs every few hours for patient comfort and proper skin care
Clinical Issues Pediatric Volume Ventilation • Set the Peak Pressure to a safe pressure level • Refer to the Tidal volume chart on the top of the ventilator for I-Time / Flow combinations to determine the proper settings for the tidal volume desired • Adjust Inspiratory Time control / flow to increase or decrease tidal volume - more flow or time equals larger tidal volume • Adjust PEEP / CPAP to established baseline pressure
Clinical Issues MRI Operation • pNeuton mini is compatible with MRI scanners up to 3 Tesla in strength • While tests show that pNeuton functions at the bore of the MRI unit, a minimum proximity of 12 inches (0.3 meter) from the bore is recommended • Safe MRI practice calls for all devices used in the proximity of a MRI scanner, including pNeuton mini, be anchored to prevent inadvertent movement
Clinical Issues Altitude Operation • The pNeuton mini may be used for air transports in unpressurized cabins up to 15,000 feet • Inspiratory time will increase and expiratory time will decrease as altitude increases • Pressure settings will not change as altitude changes • Always use external monitors and pulse oximeters to monitor your patient
Patient Safety pNeuton - Patient Safety Features • Audible and Visual Alarms for patient disconnect, high pressure and low supply gas pressure • High Pressure Release – pressure is relieved at the Peak Pressure control setting • Internal Safety Pressure Release – limits circuit pressure to 70 cm H2O, regardless of the setting of the Peak Pressure control • Anti-Suffocation System – in the event of ventilator malfunction an internal valve will allow ambient air to enter the patient circuit
Cleaning and Maintenance • Clean ventilator between patient use applications using a soft cloth and a mild detergent / disinfectant • Do not immerse the ventilator in water • Patient circuit is disposable, single use application and should not be cleaned, disinfected or reused • Ventilator should receive preventative maintenance every 2 years
Program Objectives pNeuton mini Ventilator self guided tour completed; you should now be able to: • Describe the main operating features of the ventilator • Identify the controls and connections • Describe the patient circuit • Set-upthe ventilator for patient operation • Define various clinical environments for ventilator application • Clean and maintain the ventilator Next Step – consider reviewing the pNeuton Case Study and completing the competency evaluation
Contact Information Thank you for you interest in the pNeuton mini Ventilator For more information visit www.AironUSA.com or call Airon Corporation at USA + Canada toll free 888-448-1238 International +1-321-821-9433