Download
1 / 3
0 likes | 20 Views
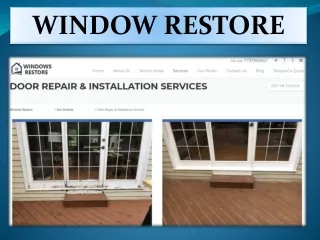
Window Medics Toronto WMT offers Professional Services for Window Restoration, Repair and in Oakville<br>

E N D
DIY Foggy Window Repair: A Step-by-Step Guide Introduction: Foggy windows not only obstruct our view but also detract from the aesthetic appeal of our homes. While professional window repair services are available, many homeowners prefer a hands-on approach to address the issue themselves. In this comprehensive guide, we will walk you through a step-by- step process for DIY foggy window repair, empowering you to restore clarity and functionality to your windows without the need for professional assistance. I. Understanding the Causes of Foggy Windows: Before diving into the repair process, it's crucial to understand why windows become foggy. Typically, this occurs due to a compromised seal that allows moisture to penetrate between the window panes. The moisture then condenses, creating the unsightly fog. By addressing the root cause, you can effectively prevent the recurrence of foggy windows. II. Materials and Tools Needed: Gather the following materials and tools before starting the DIY foggy window repair process: 1.Screwdriver: To remove any screws securing the window frame or access panels. 2.Cleaning Solution: A mild solution of dish soap and water for cleaning the window. 3.Microfiber Cloth: To wipe down and clean the window surface. 4.Vacuum Cleaner: For removing any accumulated dust or debris inside the window unit. 5.Moisture-Absorbing Packets: To help absorb excess moisture. 6.Sealant: A high-quality sealant to repair any damaged window seals. 7.Caulk Gun: For applying sealant precisely. III. Step-by-Step Guide for DIY Foggy Window Repair:
Follow these detailed steps to repair foggy windows on your own: 1.Safety First: Ensure your safety by wearing gloves and safety goggles. If you're working with a ladder, make sure it's stable and positioned on a flat surface. 2.Remove the Window Frame: Using a screwdriver, carefully remove any screws securing the window frame or access panels. Be cautious not to damage the frame during this process. 3.Clean the Window: Prepare a cleaning solution by mixing a few drops of dish soap with water. Use a microfiber cloth to clean both the interior and exterior surfaces of the window. Removing dirt and grime ensures a clear surface for further inspection. 4.Inspect the Seals: Carefully examine the window seals for any signs of damage or degradation. Damaged seals are often the root cause of foggy windows. If you identify any issues, proceed to the next steps for repair. 5.Vacuum Inside the Window Unit: Use a vacuum cleaner to remove any dust or debris inside the window unit. This step is crucial to creating a clean and conducive environment for the repair process. 6.Apply Moisture-Absorbing Packets: Place moisture-absorbing packets inside the window unit. These packets help absorb excess moisture and prevent future fogging. Make sure to replace them periodically for continued effectiveness. 7.Sealant Application: Using a caulk gun, apply a high-quality sealant to any damaged or compromised seals. Ensure even and precise application to create a strong barrier against moisture infiltration. Allow the sealant to cure according to the manufacturer's instructions. 8.Reassemble the Window: Once the sealant has cured, reassemble the window frame or access panels. Tighten any screws securely, ensuring a snug fit. This step completes the DIY foggy window repair process. IV. Tips for Successful DIY Foggy Window Repair: 1.Choose the Right Sealant: Select a sealant specifically designed for window repair. Consider factors such as weather resistance and flexibility to ensure optimal performance.
2.Perform Regular Maintenance: To prevent future fogging issues, incorporate regular window maintenance into your home care routine. Check for seal integrity, clean windows, and monitor humidity levels. 3.Address Window Seal Issues Promptly: If you notice any signs of seal damage, address them promptly. Timely intervention can prevent moisture infiltration and minimize the risk of foggy windows. 4.Monitor Moisture Levels: Keep an eye on indoor humidity levels. Implement measures such as proper ventilation and dehumidifiers to maintain balanced humidity, reducing the likelihood of condensation. V. When to Seek Professional Help: While DIY foggy window repair can be effective for minor issues, certain situations may require professional intervention. Consider seeking professional help if: •The window seal damage is extensive and beyond DIY repair. •Foggy windows persist despite your DIY efforts. •You are considering a complete window replacement for energy efficiency and long-term solutions. VI. Conclusion: DIY foggy window repair offers a cost-effective and empowering solution for homeowners looking to restore clarity to their windows. By understanding the causes of window fogging and following a systematic repair process, you can tackle the issue with confidence. Remember to prioritize safety, choose the right materials, and perform regular maintenance to keep your windows in optimal condition. Whether you're a seasoned DIY enthusiast or a novice, this step-by-step guide equips you with the knowledge and tools to reclaim the transparency and functionality of your windows.