Quick Operation Guide
System Controller WV-CU650. ideas for life. Quick Operation Guide. Main Functions. Camera Setting and Operation Move cursor. Recording/Playback/Search. Login ID input Camera and Monitor Select. CAM(SET).


Quick Operation Guide
E N D
Presentation Transcript
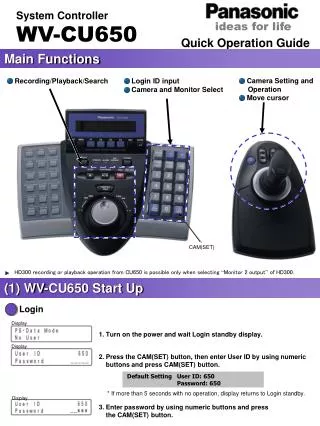
System Controller WV-CU650 ideas for life Quick Operation Guide Main Functions • Camera Setting and • Operation • Move cursor • Recording/Playback/Search • Login ID input • Camera and Monitor Select CAM(SET) • HD300 recording or playback operation from CU650 is possible only when selecting “Monitor 2 output” of HD300. (1) WV-CU650 Start Up Login Display 1. Turn on the power and wait for the Login standby display. Display 2. Press the CAM(SET) button, then enter the User ID by using the numeric buttons and press the CAM(SET) button. Default Setting User ID: 650 Password: 650 * After more than 5 seconds with no operation, display returns to Login standby. Display 3. Enter the password by using the numeric buttons and press the CAM(SET) button.
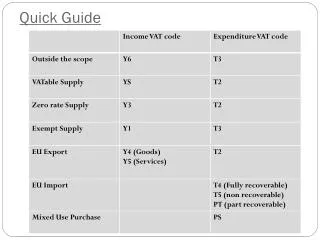
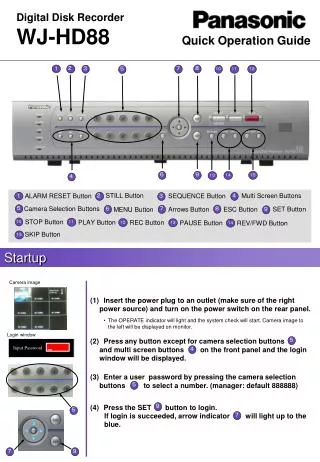
(2) WJ-HD300 Recording and Playback 3 2 1 Search Event Records Recorded Event List display 1. Recorded EventList is displayed when pressing the SEARCH button twice. * If wrong operation, press EXIT to return to normal screen. 2. Select a searching filter by moving the joystick to the left or right. 3. Move the cursor by moving the joystick up and down and rotate the jog dial to select a recorded event to be played. Press the PLAYBACK/SEARCH button to playback the recorded event. <Filtering option> 3. Following filtering option can be selected by pressing the CAM(SET) button after STEP 2 mentioned above. Filtering by time and date Filtering by camera channel Select camera channel numbers with joystick and apply filtering with jog dial. Press CAM(SET) button to determine. Move the cursor by joystick and rotate jog dial to enter time and date. Press CAM(SET) button to determine. SEARCH Jog dial PLAY/PAUSE Filtering by recording event Filtering by text Move the cursor to select the event and rotate jog dial to select ON. Press CAM(SET) button to determine. Rotate jog dial to select OFF, with TEXT or without TEXT. Press CAM(SET) button to determine. CAM(SET) Joystick * Select the UNLOCK FILTER and press the CAM(SET) button to cancel the selected filter. Fast Forward / Fast Reverse Playback • Rotate the Shuttle Ring during playback Rotating the Shuttle Ring clockwise: Fast Forward Rotated degree will change the speed. (1/2x, 1x, 2x, 5x, 10x, 20x, 50x) Rotating the Shuttle Ring counterclockwise: Fast Reverse Rotated degree will change the speed. (1/2x, 1x, 2x, 5x, 10x, 20x, 50x) Shuttle Ring <SHUTTLE HOLD> Press the SHUTTLE HOLD button while holding the rotated shuttle ring to maintain a desired playback speed. To return to the normal playback speed, press the SET button. SHUTTLE HOLD Skip • Rotate the Jog Dial during playback Rotating the Jog Dial clockwise: Skip to the next recorded image Rotating the Jog Dial counterclockwise: Skip to the previous recorded image * If there is no next or previous recorded image, current playback will be continued. Jog Dial
(3) Select Camera and Monitor 1 2 2 1 1 2 <About Display> Numeric Key display and System Unit Number Current Selected Camera Current Selected Monitor Select Monitor 1. Select the monitor number to be displayed by numeric buttons and press the MON(ESC) button to determine. Numeric Keys * If an invalid monitor number is selected, it returns to the previously selected monitor. MON(ESC) Select Camera 2. Select the camera number to be monitored by numeric buttons and press the CAM(SET) button to determine. Numeric Keys * If an invalid camera number is selected, “Invalid” appears on the display and the previously selected camera is displayed. CAM(SET) (4) Camera Operation Valid only for the Panasonic unitized camera such as WV-NS324/CS564/CS854B/CW864A etc. Pan / Tilt Operation 1. Enter the camera number to be operated by pressing the numeric buttons and press the CAM(SET) button. Numeric Keys Joystick 2. Move the joystick to the desired direction for pan / tilt control. CAM(SET) Zoom Operation 1. Enter the camera number to be operated by pressing the numeric buttons and press the CAM(SET) button. Numeric Keys Zoom wheel 2. Move the zoom wheel to the desired position for telephoto image and wide image. CAM(SET) (5) Camera Adjustment Iris Adjustment Iris Button 1. Enter the camera number to be operated by pressing the numeric buttons and press the CAM(SET) button. Numeric Keys “A” Button 2. The Iris can be adjusted by pressing the Iris Open or Iris Close button. * To reset the Iris press the “A” button Joystick CAM(SET) Focus Adjustment Focus Button 1. Enter the camera number to be operated by pressing the numeric buttons and press the CAM(SET) button. 2. Auto Focus can be set by pressing the “B” or “Top” button. * Manual focus adjustment is also possible by pressing the Focus Far or Focus Near buttons. Numeric Keys “B” Button Top Button CAM(SET)
Other Functions 1 2 Multi Screen Display 1. It is possible to display images in multi-screen format by pressing the MULTI SCREEN buttons. (4, 7, 9, 10, 13 and 16 screen for HD316, 4, 7 and 9 for HD309) * If single screen needs to be displayed, enter desired camera number by numeric keys and press CAM(SET) button. MULTI SCREEN Electronic Zoom 1. Select desired camera and monitor to operate. 2. Pressing EL-ZOOM button displays 2 times or 4 times zooming image. Note: The picture quality of the enlarged image by electronic zoom will be lower than the standard image quality. * Displayed image position can be changed during electronic zoom by operating the joystick. EL-ZOOM Joystick Message in LCD Display Invalid • When entering a wrong User ID or Password • When entering invalid numbers Note: “Invalid” will disappear after a few seconds. Prohibited • When operating functions restricted by user management settings. Note: “Prohibited” will disappear after a few seconds. Unit Error • When selected unit is not connected properly Note: Make sure all connection on the rear panel of WJ-HD300 series. Controller No.1 No Exist Error • When Unit Address 1 is not created Set Rotary Switch to position 1 and create Unit Address 1 Project Big Bang, SSD GSG Version 1.0