Download
1 / 39
390 likes | 565 Views
Introduction to One Point Perspective.

E N D
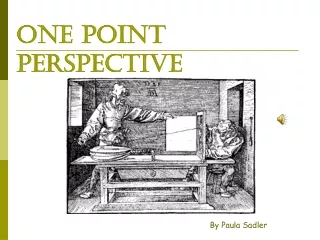
Introduction to One Point Perspective
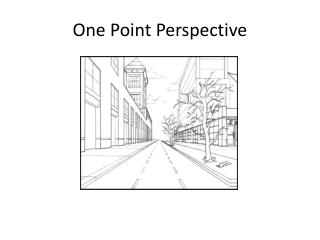
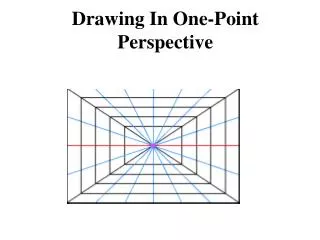
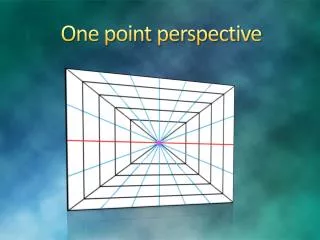
Linear perspective is based on the way the human eye sees the world—objects which are closer appear larger, and more distant objects appear smaller. To create this illusion of space, the artist establishes a vanishing point on the horizon line. Objects are drawn using orthogonal lines which lead to the vanishing point(s). In one-point perspective, the forms are seen face on and are drawn to a single vanishing point. Objects seen at an angle would be drawn with two-point perspective using two vanishing points. In this lesson, we'll focus on one-point perspective.
Vincent's Bedroom in Arles Oil on canvas72.0 x 90.0 cm.Arles: October, 1888F 482, JH 1608
Put a dot in the middle of this line. This is called the vanishing point. All receding lines point to this dot. These receding lines are called orthogonal lines.
Draw a horizontal line with your ruler lengthwise (extremely lightly) Note: All of my whisper lines will be in the form of a dashed line. This is called your horizon line, where the land meets the atmosphere.
On the left side of your paper, draw three squares. One above the horizon line, one below, and one underneath.
Rule #1: You never draw an orthogonal line that goes through an object (unless that object is transparent). So from each corner of the rectangles, you're going to draw a whisper line leading to the vanishing point.
Next, you take your ruler and match it up to one of the sides of your boxes.
Slide it back along the orthogonal lines and make another line.
Repeat with the other squares. Try to make one square really long and the other really short. Notice that you'll only see one side of the square that is on the horizon line.
To find the center of these shapes, you draw an X as shown. You might need to find the center if you were drawing windows or making letters.
To make signs with letters on them, you need to make sure they are in perspective also. The letters should get smaller as they go back.
Make sure all of your vertical lines (like on my R and T) are straight up and down. Your horizontal lines should be in perspective (pointed at your vanishing point). Like the A and top of the T.
Practice making creative boxes, such as cereal boxes, dice, trains, presents, etc. See what overlapping can do. Make 5 boxes above the horizon line, 5 below. and 5 on the horizon line.
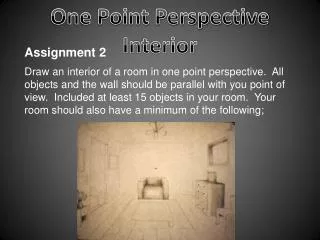
Part 2 Assignment 2: On another piece of paper, after drawing your horizon line and vanishing point, I'd like you to draw each of the following shapes 3 times (one above the horizon line, one on, and one below).
With rounded objects, I always rest one part of my ruler on the vanishing point and then slide the ruler down until it just touches the rounded object. Then you draw your orthogonal line from here.
After you do this with both sides, you then make a parallel shape as shown. The shape should mimic exactly what the original line is doing. I sometimes go over the original line a couple of times with my pencil to get the feel of the shape before doing the second line.
Fill in the whisper lines between the two lines then erase your whisper lines.
Slide it back along the orthogonal so that it's perfectly parallel with your original line.
Connect the whisper lines between the lines and fill in your shape. Finish the other two.
Connect each sharp edge to the vanishing point. Notice that orthogonal lines don't go through your shape (unless it's a transparent shape).
You are to turn in two (2) assignments for this section. One with your creative boxes above, on, and below the horizon line. The other with 2 other shapes above, on, and below the vanishing point (one shape must be geometric, one biomorphic). Make sure you read through all of the criteria carefully before starting your final drafts. I do not want to see your practice sheets as your final drafts.