ONE POINT PERSPECTIVE DRAWING
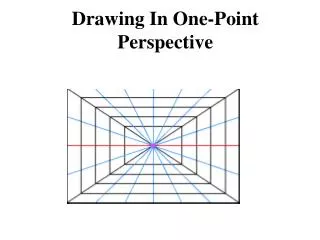
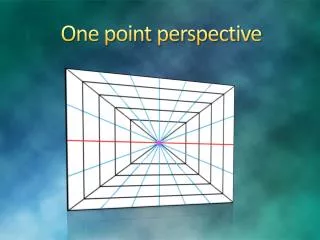
ONE POINT PERSPECTIVE DRAWING. PUT YOUR PAPER IN LANDSCAPE VIEW. DRAW THE HORIZON USING A WHISPER LINE . ADD A VANISHING POINT. DRAW A RECTANGLE, MAKING SURE IT HAS RIGHT ANGLES. THEN USING A RULER EXTEND LINES FROM EACH CORNER TO THE VANISH POINT.

ONE POINT PERSPECTIVE DRAWING
E N D
Presentation Transcript
THEN USING A RULER EXTEND LINES FROM EACH CORNER TO THE VANISH POINT.
ADD THE SIDE, MAKING SURE TO STAY PARALLEL WITH THE OTHER SIDES
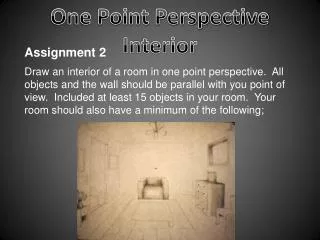
NOW PLAY AROUND ADDING WINDOWS, DOORS, ROOFS AND WHATEVER TOYS-R-US BELKS
Add two points on the ends of the horizon line to use as vanishing points
Lightly draw a small vertical line below your horizon line in the center of your paper.
Using whisper lines, draw a line from the top of your perpendicular line to each vanishing point (2 lines created)
Using whisper lines, draw a line from the bottom of your perpendicular line to each vanishing point (2 lines created)
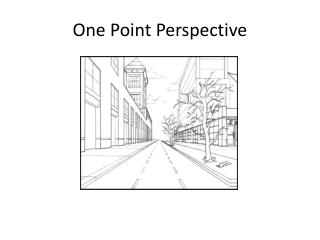
THIS WILL BE A STREET THAT YOU WILL LINE BUILDINGS UP ON. ERASE THE ORIGINAL VERTICAL LINE YOU STARTED WITH.
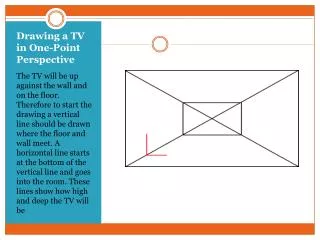
DRAW A LINE PERPENDICULAR PAST YOUR HORIZON. THIS IS THE FRONT CORNER OF YOUR BUILDING. GET RID OF THE HORIZON LINE.
DRAW A LINE FROM THE TOP OF YOUR PERPENDICULAR LINE TO EACH VANISHING POINT . THE STREET ACTS AS THE BOTTOM OF YOUR BUILDING.
DRAW TWO MORE PERPENDICULAR LINES WITHIN THE TRIANGLES. THESE LINES CREATE THE FAR WALLS OF THE BUILDING.
NOW OUTLINE THIS SHAPE AND ERASE THE WHISPER LINES THAT EXTEND PAST YOUR BUILDING.
ADD SOME WINDOWS. MAKE AN EVEN NUMBER OF DOTS DOWN THE FRONT CORNER OF THE BUILDING.
EXTEND THESE IN ONE OR BOTH DIRECTIONS. POINTED TOWARD THEIR RESPECTIVE VANISHING POINTS.
DROP VERTICAL LINES DOWN TO FINISH THE WINDOWS. ERASE YOUR WHISPER LINES.
Next we'll draw a building that is below that horizon line so the viewer will be able to see the top of the building. Draw a line that is below the horizon line keeping in mind that you don't want your building in the road.
EXTEND WHISPER LINES FROM THE TOP AND BOTTOM OF YOUR NEW BUILDING. THE ROAD ACTED AS TWO OF MY VANISHING POINTS IN THIS CASE. WHISPER LINES ARE NOW RED SOLID LINES
NOW DARKEN UP YOUR LINES FOR YOUR NEW BUILDING & ERASE YOUR WHISPER LINES AND . YOU COULD MAKE THE ROAD LINES SOLID. WHISPER LINES ARE NOW RED SOLID LINES
NOW PLAY WITH ADDING MORE WINDOWS, BUILDINGS, DOORS, ROOFS, STOP LIGHTS, TREES, ETC. WHISPER LINES ARE NOW RED SOLID LINES