Download
1 / 54
550 likes | 813 Views
Welcome to First Aid /CPR/AED for School and Community. Explain why it is safe to use training manikins. (pg. viii). Page viii & ix- Take a few minutes to read the pages explaining how using manikins in the classroom can be safe. Why are manikins safe to use when learning First

E N D
Welcome to First Aid /CPR/AED for School and Community
Explain why it is safe to use training manikins. (pg. viii) Page viii & ix- Take a few minutes to read the pages explaining how using manikins in the classroom can be safe. Why are manikins safe to use when learning First Aid Skills?
Review Give 2 reasons explaining why manikins are safe to use when learning First Aid Skills? What do we use in class in place of cleaning the manikins? What are the guidelines and precautions we will take to further protect ourselves and each other from infection?
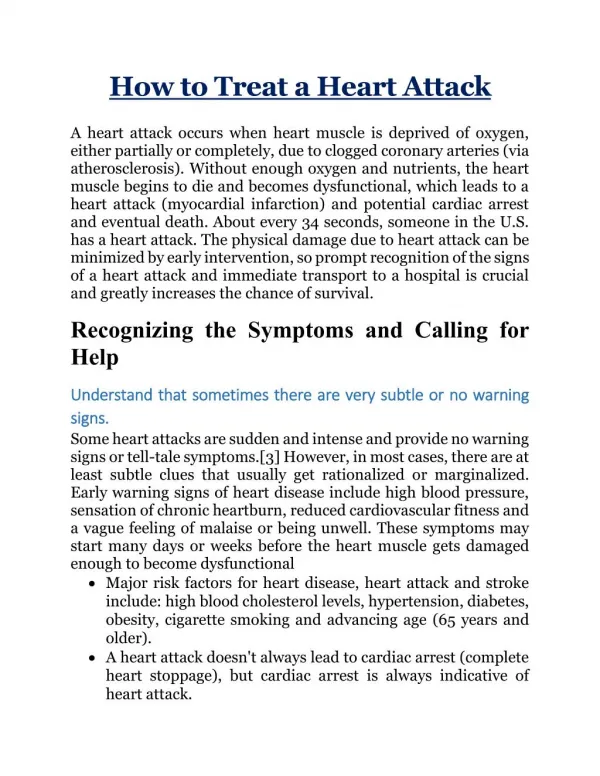
Review the leading cause of death for people ages 1-44 and explain why it is relevant to this course. (pg. 1) • Let’s Brainstorm! What do you think are the leading causes of death in the U.S.? • What do you think are the leading causes of death for your age group? 10 Leading Causes of Death by Age Group • Other than saving a life, explain the need to act quickly in an emergency situation.
Explain your role in the EMS system using the four steps. (pg. 2) Step 1. Recognize that an emergency exists. USE YOUR SENSES to help you recognize an emergency. Explain how our senses help in an emergency?
Step 2: Decide to Act (pg. 3) List the most common factors that keep people from acting in an emergency. • Panic or fear of doing something wrong • Being unsure of the person’s condition • Assuming someone else will take action • The type of injury or illness • Fear of getting a disease * • Fear of being sued * • Not knowing when to call 911 *
What everyone should know about helping in an emergency. Can you be sued? The Good Samaritan Law: A citizen responder cannot be sued if first aid is performed CORRECTLY.
Be able to explain how Standard Precautions are used to help a citizen responder reduce disease transmission. (pg. 5-7) What diseases are of MOST concern when acting as a responder in an emergency? HIV (pg.8) and Hepatitis MRSA and Staph • Let’s read How Disease Spreads. (pg. 5)
What are some examples of Universal Precautions? Barriers Avoid direct contact
Let’s look at How to Remove Gloves Properly (Page 24) This is a way to use Standard Precautions.
Cleaning Up Blood Spills The best solution to use is liquid chlorine bleach. Dispose in a Biohazard can, or bag.
Activity for Universal Precautions • Students will be divided into 3-4 groups. • Each group will be given a color coded set of cards. • Each group must determine if the item on the card reduces the risk, or increases the risk of spreading disease by placing the cards under their appropriate signs. • Each group must be prepared to discuss. • 10 minutes will be given for this activity.
Should I call 9-1-1? • Minor bruise • Chest pain • Cat scratch on cheek • Splinter in finger • Pain in the abdomen • Injury to the head • Bloody nose
Step 3: Activating EMS, or calling 911 What is the MOST important thing to remember when calling 911? Do not hang up until told by the dispatcher to do so.
Step 4: Give Care Until Help Takes Over When would you stop providing care? • Obvious signs of life (breathing) • Another trained responder takes over • Too exhausted to continue • Scene becomes unsafe
List and explain the two types of consent needed to treat victims in an emergency situation. (pg. 5) Expressed consent is: verbal consent given by an adult or the parents of an ill or injured child Implied consent is: obtained when an adult victim is unconscious or the parents of a child are not present.
Explain the emergency action steps of CCC. (pg. 8-14) The First Emergency Action Step is CHECK. What does the responder need to check? The scene and THEN the victim
Know the factors that are important in checking the scene. (pg. 9) • Is it safe? • Is there immediate danger? • What happened? • How many people are involved? • Is anyone else available to help? • What is wrong with the victim?
Important Factors When Checking the Victim (pg. 10) Check for consciousness by tapping and shouting, “Are you OK?” Check to see what is wrong with the victim. Look for signals of life-threatening emergencies, (severe bleeding, choking, etc.) Use you senses of sight, smell and hearing to help determine what happened and the severity of the illness or injury.
Step 2 is CALL • What is the most important thing to remember when calling 9-1-1? • What information do you give the EMS (9-1-1)? • What happens when you call 9-1-1?
If you are alone, do you Call First or Care First? See the next slide for the rules!
If you are alone, CALL firstif • Any adult or child 12 years or older that is unconscious. • A child or infant who you have witnessed suddenly collapses. • An unconscious child or infant known to have heart problems.
If you’re alone, CARE firstfor • An unconscious child, younger than 12 who you did not see collapse. • Any drowning victims. • Any conscious choking victims. • Any severe bleeding victims.
Care is the Third Step • Once you check the scene and the victim/s and make the decision to call 911, you need to give care to the victim/s.
What does “Do No Further Harm” mean? As a rescuer, you will not be covered under the Good Samaritan Law if you do something you shouldn’t do to worsen the injury or illness of a victim. An example may be moving the victim of a head, neck or back injury when you do not need to move them to give care.
Transporting a Person Rules to remember when deciding to transport a victim yourself, don’t transfer if: • The trip may cause additional injury. • The person has or may develop a life- threatening condition. • If you are unsure of the injury or illness.
Explain the rules for moving an ill or injured person. (pg. 11) Generally, an ill or injured person should not be moved. When might it be appropriate to move a person? • When faced with immediate danger. • When you have to get to another person who may have a more serious problem. • When it is necessary to give proper care.
Techniques for moving an Injured Victim • Use your legs, not your back. • Bend at the knees and hips to avoid twisting you body. • Walk forward when possible; take small steps. • Avoid twisting or bending a victim with suspected, head, neck or spine injury. • Do not move a victim that is too large.
Explain the ways to move a victim in an emergency situation (pgs. 23-25) • Walking Assist • Pack-Strap Carry • Two-Person Seat Carry • Clothes Drag • Blanket Drag • Ankle Drag
Group Demonstrations • Each group will be assigned a carry. • Read your specific movement or carry in the book. (pgs. 12-14) • Practice your assigned movement. • Be prepared to demonstrate and explain to the class. • Don’t forget to tell us when this would be appropriate!
Moving a victim in the water • Do not go into the water for an active victim unless you have been trained. • Use reaching assists (extend your reach).
Moving a victim in the water (cont’d) • Use throwing assists • Use wading assists in shallow water when no current is present.
Checking a Conscious VictimObjectives will appear in green • Be able to explain the age perimeters for adult, child and infant in first aid. • EQ. What are the ages for an adult, child and infant ? • An adult is considered 12 and over • A child is 1-12 • An infant is birth to 1
List steps that the citizen responder would take in checking the conscious person. (pages 14-15) Conduct the interview Ask questions Rate pain Check for Physical Problems Adults from head to toe Children toe to head
What might a rescuer find during a check of a ill or injured victim? BloodCuts Pale, Red or Ashen Skin Difficulty breathing Broken Bones Cold Clammy Skin Clear drainage from the ears Lack of movement Unexplained Pain Unusual Behavior
Explain what a medical alert tag is and how it helps the citizen responder (page 15) • This will help the rescuer determine what may be wrong with the victim!
Be able to explain the condition of shock, the signals of shock and how to care for shock. (Pages 34-35) • What is the definition of shock? Shock is a condition in which the circulatory system fails to deliver oxygen-rich blood to the body’s vital organs and tissues.
What are the symptoms of shock? Restlessness and irritability Altered state of consciousness Nausea and vomiting Pale, ashen, cool moist skin Rapid pulse and breathing Excessive thirst
How do you care for shock as a rescuer? Call 911 Have the person lie down, elevate the feet Control external bleeding Help maintain body temperature DO NOT give anything to eat or drink Reassure the victim Monitor the ABC’S
Explain and demonstrate how to check an unconscious victim. (pages 32-34) • How do you open the airway? • How do you check for signs of breathing? • Is there severe bleeding? • How do you check for circulation?
Be able to demonstrate the log roll and the recovery position • This is a safe way to move victims from stomach to back and then into recovery position (Reposition the victim if they have been in recovery position for 30 minutes)
Explain what A,B,C means in First Aid (Pages 17) • Airway—Open by head tilt/chin lift
Breathing-- Look, Listen and Feel for BreathIf Breathing is absent, give 2 rescue breaths
Circulation—Check pulse for no more than 10 seconds • Brachial • Carotid
CPR Barriers • Face shields • Resuscitation masks
Explain how to do rescue breaths in special situations. (Page 20-21) Air in the stomach Vomiting Mouth-to-Nose Stoma Breathing Head, Neck and Back Injuries Drowning Victims
Be able to explain what a rescuer needs in preparation for an emergency (page 10) Turn to someone around you and discuss what a citizen responder might have in preparation for an emergency.(Think/pair/share) Be prepared to share in class (New Pg 6)
Incident stress • Signals • Anxiousness and inability to sleep • Nightmares • Restlessness and other problems • Confusion • Denial • Guilt • Depression • ETC.