Download
1 / 73
730 likes | 889 Views
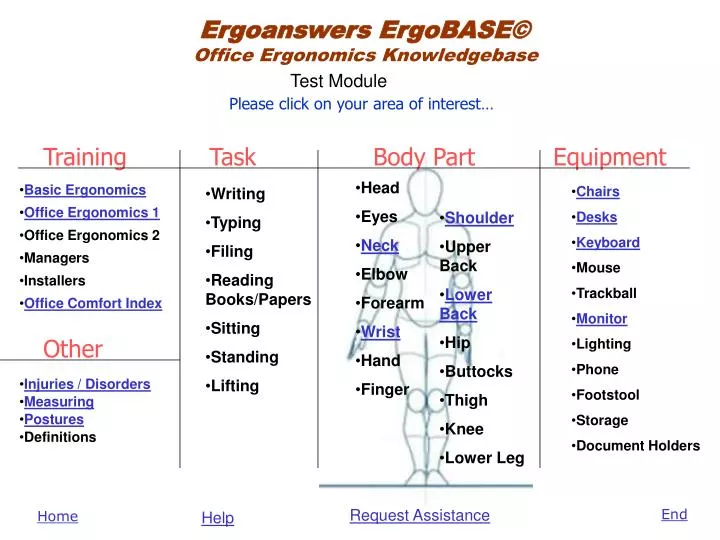
Test Module. Please click on your area of interest…. Training. Task. Body Part. Equipment. Head Eyes Neck Elbow Forearm Wrist Hand Finger. Basic Ergonomics Office Ergonomics 1 Office Ergonomics 2 Managers Installers Office Comfort Index. Writing Typing Filing

E N D
Test Module Please click on your area of interest… Training Task Body Part Equipment • Head • Eyes • Neck • Elbow • Forearm • Wrist • Hand • Finger • Basic Ergonomics • Office Ergonomics 1 • Office Ergonomics 2 • Managers • Installers • Office Comfort Index • Writing • Typing • Filing • Reading Books/Papers • Sitting • Standing • Lifting • Chairs • Desks • Keyboard • Mouse • Trackball • Monitor • Lighting • Phone • Footstool • Storage • Document Holders • Shoulder • Upper Back • Lower Back • Hip • Buttocks • Thigh • Knee • Lower Leg Other • Injuries / Disorders • Measuring • Postures • Definitions Request Assistance Help
Please choose your chair X99 Movie X99 Information
Choose Your Desk Style Desk Style 1 Desk Style 2 Desk Style 3 Desk Style 4
Desk Style 1 CPU Phone Writing area • Place your monitor directly in front of you • Place the top of the monitor just above eye level • Raise you chair • Place items you use most in priority locations. • More about monitor placement.
Keyboard The keyboard should be placed in order to facilitate your neutral posture. It should be directly in front of you and at the proper level to keep your wrists as straight as reasonably possible.
WRONG It is important that the monitor is placed directly in front of the user. This keeps the neck straight. If the neck is twisted either way for most of the day while using a computer, severe pain and injury potentially requiring surgery can result. CORRECT More about monitors
The picture shows the best location for tools with green being best and red the worst. These colors are placed based upon the length of the reach. The further the reach the more stress it places upon the body. Place items you use the most in the green area and the least in the red area. More detail
Click here to see specifics on Places Click here to see best layout
Good Postures The two most popular seated postures Standard “90/90” Reclined Poor Postures
Haworth Boogie Board Keyboard Tray In/Out/Height/Tilt Palm Rest Adjustment Keyboard Postures
Boogie Board Adjustment Choose a picture for more information No Slope Negative Slope Positive Slope
Negative Slope Keyboard The Negative Slope tilted keyboard tray has been very popular with ergonomists in the past several years. The front edge of the keyboard is slanted up to a point that it will properly intersect with the hands, wrists and forearms of the user. It is important that the hands, wrists and forearms are kept in alignment. Improper alignment of the keyboard tray will result in the wrists being bent. Return
No Slope Keyboard Angle With no slope or a horizontal alignment, the useris essentially in the 90/90 posture. This is the most frequently used keyboard tray alignment. It is important to remember that the wrists and hands should be kept essentially aligned (straight) and the y should float over the keyboard while typing. They should only be rested when not typing. Return
Positive Slope The positively sloped keyboard works very well when the user chooses a reclined posture. The front edge of the keyboard tray is angled down to properly align with the hand, wrist and forearm. If the wrist is bent up or down while typing the keyboard angle must be readjusted. Return
Reclined Posture The reclined posture is perfectly acceptable. There are many people who prefer it to the standard “90/90 Posture. If you will notice, the neck, while bent forward in respect to the body, it is still straight up and down or vertical. This keeps the pressure off of the neck. The reclined posture also provides more support for the back than the 90/90. The key to this posture is to keep the wrists in line with the forearm and to move the wrist and forearm as a unit. Do not rest the wrists while typing. This posture requires the desk to be lowered or a keyboard tray in a positive tilt as shown in the graphic. The mouse must also be on the same plane as the keyboard. For more information see Standard 90/90 and Measuring. Return
Standard 90/90 Posture The “90/90 posture is the starting point in ergonomics. In this posture most of your body is in a neutral or relaxed state. The body forms 90 degree angles at the knees and elbows and the forearms and thighs are parallel to the ground. This is a good home posture to work from. If using the 90/90, do not sit all tensed up. Relax. Adjust the back of the chair throughout the day and vary your posture a bit. However, it is a good location to return to throughout the day. The major points are that the wrists and forearms should be relatively straight and should not rest while typing. For more information see Measuring and Reclined Posture. Return
Poor Postures Monitor Offset Lean Forward Neck Look Down
Lean Forward What is wrong with this picture? Here, Christene is leaning forward toward her computer monitor. You can see that she is bending her back forward as illustrated by the green line. She should be sitting back so that the back of her head is touching the red line which will result in her back being straight. This type of posture can result in pain in the lower back, upper back, neck, shoulders and can cause a headache. The horizontal line illustrates viewing distance to the screen. This distance should be around 18" to 24" for up to a 17" computer monitor (this distance is entirely dependent upon your eyes and could be more or less). For larger monitors, this distance can increase to 30", but this distance is very dependant upon the individual. Make sure that the monitor is not too close. From time to time while working, it is a good idea to look away to a distant object and focus your eyes on it. Repeat this several times. This simple exercise will help to relieve tension in your eyes. Return
Monitor Offset What problem can you see here? Christene's computer monitor is placed off to one side and is too low. This location causes Christene to rotate her neck so she must look to the side and down all day long for as many years as she works. If you are in a posture like this, do you ever wonder why your neck hurts at the end of the day? If you are not hurting yet, you will be. The monitor needs to be placed directly in front of the employee and raised up to the proper level. This is also true for customer contact employees who meet with customers at their desk. If the employee spends much of their time looking at the computer (consider the amount of time there is not a customer there as well) try placing the customer's chair off to the side and the monitor in front of the employee. The employee can turn their chair to talk with the employee. It might also be helpful to place a swivel under the monitor so it can be turned for the customer to see. Return
Lookdown In this picture, the monitor is too low. Christene must bend her neck forward to see the monitor. This posture can cause severe pain in her neck and shoulders and can cause headaches as well. Where is the strain you might ask? My neck is not moving! And, that is a big part of the problem as well. Your neck is designed to support your head. The easiest position for this is straight up. As your neck moves forward, the weight of your head is pulled down by gravity. It is much harder for your neck to hold your head up in this position than it is if your head is straight up. As you sit this way over time, you neck muscles and tendons will strain under the tension. Pain will eventually creep into those muscles and tendons. Having a monitor too low and/or angled with the screen up can cause another problem, glare on the screen. This can disrupt your ability to see your work and can cause severe eyestrain and headaches. If glare is a problem, consider the following, get the monitor up to proper height and angle the screen down just a bit, close window shades, add a glare screen for your computer monitor, remove some overhead light bulbs, or turn your desk and monitor perpendicular to any windows. Return
Haworth X99 Arms Lumbar Tilt Height
Haworth X99 Lumbar Adjustment The X-99 lumbar support can be adjusted up and down as well as in and out to provide proper support to your lower back. Move the support until it fits into the depression in your lower back. Return
Haworth X99 Arm Adjustments There are several arm adjustments on the X-99. The 3 dimensional arm caps of the X 99 can be moved on all axes in order to fit your needs. The picture above shows the arm twisting in and out. The picture to the left shows the arm rest moving backward and forward. The arm can also be adjusted up and down to the height that you require. Return
Haworth X99 The tension adjustment is located on the right side frame of the X99. The handle pops out and can be used to loosen or tighten the tension on the tilt of the chair. Return
Haworth X99 Return
Measuring 90/90 Measuring for workstation heights is a very important aspect of the office ergonomics puzzle. If you have an adjustable height desk top (preferred but not essential), follow these steps and associate the colored numbers below with the colored lines on the picture: 1. Place your feet flat on the floor. 2. Adjust your chair to form an approximately 90 degree angle at your knees and at your hips. 3. Bring your arms up to form an approximate 90 degree angle at your elbows. 4. Have a friend measure from the floor to the bottom of your finger tips. This is your optimum keyboard height. Your desk height should be about one inch below this level. The one inch allows room for the keyboard on top of the desk surface. 5. Looking straight ahead, measure from the floor to your eye level. Place the top of your monitor screen approximately 1inche above this level.
Injuries/Disorders Musculoskeletal Disorders (MSDs) are injuries that can occur due to a problem between the physical requirements of the job and the physical capacity of your body. Most things that you do including work, housework, gardening, other hobbies and sports, create micro-tears in your muscles and irritation of the tendons and connective tissues. If you do more work than you are used to doing, or if you do something different, you get sore. An example of this would be that you work in the garden over the weekend and you are sore on Monday. Or, if you begin a new job and you are sore for several days as you get used to it. Both of these types of situations are normal. Your body typically repairs itself over night or in a few days when you rest and sleep. It is important that you understand what your body is telling you and that you listen to it. If you know that you did something new, or you exceeded your limits for a day or two, give yourself about a week to heal. If a week goes by and you do not find yourself getting any better, or you are getting worse, you need to seek help. Signs and Symptoms MSDs Static Injuries Carpal Tunnel Syndrome Surgery Tendonitis
Signs and Symptoms As the body continuously completes awkward tasks over months and years, these micro-tears can be magnified and worsen. The body may not be able to keep up repairing the damage. At first, the body part may be sore. Later, the injury can produce symptoms such as numbness, burning, cramping, painful joints, swelling or inflammation, fingers or toes turning white, neck or back pain, stiffness, and tingling with shooting pain that can awaken you at night. As can be seen by the list, symptoms are effects that you can feel, but others cannot detect. Some obvious signs of a problem are: loss of grip strength, muscle atrophy, deformity, decreased ability to move and loss of function. Signs are effects that others can see or detect. Eventually, muscle strength can be reduced with the possibility of total loss of use of the body part. Workers who experience MSDs may be unable to perform their jobs or even perform simple tasks. If you have any of these signs or symptoms and they do not go away after a week, you must report them to your manager or supervisor immediately to get ergonomics assistance and see a health care professional (HCP). If nothing is done, the problems couldcontinue to get worse until you cannot work anymore. Ergonomics is a team effort between you, your company and your HCP to keep their most valuable resource working - you. Return
Static injuries Static injuries are another form of MSD. They are the opposite of Repetitive Motion Injuries. If you hold the same posture without movement, you can injure yourself as well. When a muscle is held in static posture, it is not able to circulate blood efficiently. As a result of reduced blood flow, adequate quantities of oxygen cannot get into the muscles and waste products cannot be removed. It is important that you move your muscles throughout the day. Make sure that you vary your tasks as much as possible and vary your posture. A good thing to remember is to take a couple of minutes at least once each hour to stretch your muscles. Do not just sit at your work station all day and do the same thing over and over or sit with your hands clenched or held in one position for long periods of time. Try to vary your tasks. Add some filing or other task where you need to get up and move periodically. Return
Tendonitis Tendonitis is an irritation to the tendon. This irritation can be a result of poor posture of the wrist which places an extreme amount of pressure on the wrist. Tendonitis can cause pain in the tendons of the wrist, arm, elbow and shoulder. Tendonitis is seen by many as the first step on the road to carpal tunnel syndrome. Return
Carpal Tunnel Syndrome (CTS) CTS is actually a rare occurrence. Most people with RMIs have other forms of injury. The Carpal Tunnel is formed by the bones of the hand and the transverse carpal ligament in the palm of the hand.A number of tendons, nerves and veins pass through this small area.CTS occurs when swelling from the tendons or pressure from fluid retention or weight gain begins to press against the median nerve in the carpal tunnel of the wrist (it is located in the first inch of the base of the palm). This pressure on the median nerve can be felt in symptoms such as tingling from the fingers (thumb and first two fingers) up to the neck. Or it can be felt as loss of feeling, pain and/or loss of grip strength. CTS can also cause you to awaken at night from tingling and/or pain shooting up your arm. The swelling and irritation can be caused or aggravated by the tasks you complete during your workday. Do not use your palm as a hammer to pound or force something as this force is placed directly upon the carpal tunnel. You should never rest your wrists on the desk or wrist rest when you are typing. Continued Return
Carpal Tunnel Syndrome Continued: Leading researchers have determined that pressure increases inside the carpal tunnel when the wrist is bent or rested on anything like the desk as shown to the right. It has also been shown that increases in inter-carpal tunnel pressure may lead to injuries that may cause CTS. What this means to you is that you should not rest your wrist (or base of the palm where the carpal tunnel is) on anything for extended periods of time. Also, do not ever use the base of the hand to hammer against anything. CTS can be aggravated by any wrist intensive activity. Return
Surgery Unfortunately, many people have lost the functional use of one or both hands to CTS and have required surgery to relieve the pressure on the median nerve. It is very important to understand that if any of the symptoms are present, they may be signaling the beginning stages of CTS. You can see the importance of using good ergonomics to correct any posture problems discussed in this training module when symptoms are first noticed to avoid further complications. If symptoms get very bad, surgery may correct the problem, but it might not. The best thing to do is to try and prevent it from being a problem in the first place with good ergonomics and by taking good care of yourself. Return
MSDs(musculoskeletal disorders)are most often thought of occurring in the upper body. Specifically, people think of MSDs as occurring in the finger, hand, wrist, forearm, elbow, upper arm, shoulder, neck and back. However, MSDs can also impact the lower body in the buttocks, hips, knees, legs, ankles and feet. Some MSDs are caused by doing the same motion repeatedly over a period of time. They are referred to as repetitive motion injuries (RMIs) which are a form of MSD. There are a multitude of different types of injuries that can result from repetitive motions. Back pain, wrist tendonitis and carpal tunnel syndrome are some of the more common MSDs that may all stem from work-related overuse. We will take a closer look at more of these a bit later. Return
Priority Locations – Horizontal Placement 7 Computer 6 3 5 4 2 1 This illustration shows the priority locations on a standard desk. This is a view looking down on the desk from the top. The numbers show the locations of the tools you use in order of frequency of use. The most used items go at 1. This is typically the keyboard. The next priority item goes at number 2 (mouse) and then number 3 (phone). This illustration is for a right-handed person. A left-handed person would switch the two with the four the three with the five and the six with the seven. Click here to see the Vertical Priority Locations. Color Key: Green – Low Risk, Yellow – Minimal Risk, Orange - Moderate Risk, Red – High Risk. The numbers are placed in order of preference of location of items. For example, both locations 3 and 2 are yellow, but 2 is preferential to 3. As the arm moves away from the central location (green) the risk of injury grows. Another issue if that as items move toward the green area, the productivity of the worker will also increase. Back
Priority Locations – Vertical Placement 7 6 Computer 3 1 2 Desk 4 5 The vertical location areas are number and color ranked as to the risk of injury resulting in Placement of items in these areas. The color coding is as follows: Green –Low Risk Yellow – Minimal Risk Orange - Moderate Risk Red – High Risk The numbers are placed in order of preference of location of items. For example, both locations 3 and 2 are yellow, but 2 is preferential to 3. As the arm moves away from the central location (green) the risk of injury grows. Another issue if that as items move toward the green area, the productivity of the worker will also increase. Back
Did the information in the knowledgebase answer your question or provide you with the support that you needed? Yes No Home
Re-enter the knowledgebase Request a phone consultation with an ergonomic specialist. Home
Web-based Assistance Request Form First Name: Last Name: Phone Number: Company: ID Number: Location: Please select your primary concern: Select the date and time for your consultation: Home
Select the available date and time This would be an interactive calendar for each office. Return Home
Basic Ergonomics Training Click here to begin Exit Home
Wrist Example 4 The wrist should be kept straight and not be allowed to rest on anything while typing. Return Home
Wrist Example 2 Do not rest your wrist on anything (even wrist rests) while typing. It is especially problematic on hard edges that will cut into your wrist. This is a leading risk factor for wrist injury. Return Home
Wrist Example 3 There are three horizontal axes in which to place the keyboard. These are neutral, negative and positive keyboard slope angles. You can use any of these placements. The most important issue is to keep the wrists as straight and inline with your forearms as reasonably possible. Notice how the chair is reclined for the positive slope keyboard. This works well but the chair does not need to be reclined. Neutral Negative Positive Return