DECONTAMINATION KITS
DETECTORS AND. DECONTAMINATION KITS. M-8 PAPER. Detects liquid nerve and blister agents. Turns 3 colors. Red for Blister agents. Yellow for G nerve agents. Green for V nerve agents. M-9 PAPER. Detects liquid nerve and blister agents. Sticks to clothing, vehicles and equipment.

DECONTAMINATION KITS
E N D
Presentation Transcript
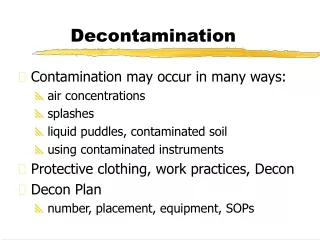
DETECTORS AND DECONTAMINATION KITS
M-8 PAPER • Detects liquid nerve and blister agents. • Turns 3 colors. • Red for Blister agents. • Yellow for G nerve agents. • Green for V nerve agents.
M-9 PAPER • Detects liquid nerve and blister agents. • Sticks to clothing, vehicles and equipment. • Red is the only positive reading. • Contains a known carcinogen, use gloves when handling.
M-256 • Detects nerve, blister and blood agents. • Detects both liquid and vapors. • 12 detectors per kit.
M-256 • Swing out the heater; remove and save two loose pads. • Save pads under hinged heater. • Swing heater back in place (Figure 5).
M-256 • Remove the pull tab marked (1). Pull upward to expose the lewisite detecting tablet (Figure 6)
M-256 • Bend the tab over the lewisiste detecting tablet. • Rub the upper half of the tab until a mark is visible (Figure 7).
M-256 • Hold the sampler - detector with the test spots or arrows pointing up. • Using the heater pads, crush four ampoules in the three center pockets marked (3) (Figure 8).
M-256 • Turn the sampler - detector upside down, and verify wetting of test spots. • Hold the sampler detector with the test spots or arrow pointing down. • Using the heater pads, squeeze the ampoules to force liquid through the formed channels (Figure 9).
M-256 • Put your thumb on the protective strip over the middle of the test spot. • Swing the heater away from the test spot (Figure 10).
M-256 • Activate the first heater ampoule marked #4. • Being sure to use the heater pads, crush one green ampoule, and swing the heater immediately over the test spot (Figure 11).
M-256 • Hold the sampler detector to one side while venting to avoid vapor. • After 2 minutes swing the heater away from the test spot, and swing the protective strip away from test spots. • Expose test spots to air for 10 minutes (Figure 12).
M-256 • After 10 minutes, activate the second heater ampoule marked (4). • Being sure to use the heater pads, crush the second green ampoule. • Swing the heater immediately over the test spot • After 1 minute, swing the heater away from the test spot (Figure 13).
M-256 • Hold the sampler detector with the test spots or arrows pointing down. • Using the heater pads, crush the remaining ampoules marked (5). Be sure to wet test spots by squeezing ampoules to force the liquid onto the test spots (Figure 14).
M-256 • Re-rub the lewisite detecting tablet. • Bend the tab over the lewisite detecting tablet. • Rub the bottom half of the tab until mark is visible (Figure 15).
M-256 • Compare the colors to determine whether conditions are dangerous or safe. • Turn the sampler detector upside down, and compare the colors of the test spots with those shown on the sampler detector. • Look for a change in the color of the rubs on the lewisite detecting tab. • If your kit has a fourth instruction card, use it to compare the colors to determine whether conditions are dangerous or safe
M-88 ALARM • Detects nerve and blister agents in vapor form (M-8A1 detects nerve only. • Consist of: • M-42 Remote alarm. • M-22 Agent detector. • M-28 Power supply. • The M-88 has replaced the M-8A1, but is functionally the same.
M-88 ALARM • Up to 400 Meters between detectors and alarms. • Up to 5 alarms per detector. • Up to 300 Meters between detectors. • Place detectors 150 meters Upwind of the FLOT.
M-88 ALARM M-22 M-22 300M W I N D 150M Place M-42 alarms a max distance of 400 M from the M-22’s.
M-258A1 • Hard plastic olive drab case • Contains six packets, (3) number one packets and (3) number two packets. • Inspect for tears in packets. • Inspect for broken ampoules in number two packets.
M-291 • Has replaced the M-258. • Wallet like pouch with 6 decon packets. • Black reactive and absorbent resin powder. • Attached strap for inserting finger. • Applied by patting not rubbing.
DFU Components Inlet Stack Filter Assembly Lid Latch Filter Casing Air Outlet Warning Labels Power Connection Power Connection Cover Exhaust Hose
Hand Held Assay • Provides Presumptive ID of BW Agents in Suspect Samples • Same Format as Home Pregnancy Test • Simple Operation, Inexpensive, Single Use • Results in 15 Minutes • Reliable • Rigorous QA/QC Testing • Low False Positive Rate • Presumptive ID Component in Currently Fielded and Developmental Joint BW Detection Systems (Portal Shield, JBPDS, DoD Biological Detection System, DFU) • Shelf Life: 2 Years at Refrigerated Temperatures (4°C) • Do Not Freeze Panel of 8 HHAs
SKIN DECONTAMINATION • Chemical contamination - decon within one minute. • Use M-291 or M-258. • Note: Processes are the same for both kits. When using the M-258 use packets in sequence. • Biological contamination - wash down with soap and water.
PERSONAL WIPEDOWN • Process consist of wiping down your mask, gloves and essential gear. • Do not attempt to remove contamination from over-garment. • Most effective within fifteen minutes. • Note: If M258 is used you must reverse the packet sequence.