Download
1 / 20

E N D
BUSY E-Invoice in BUSY Overview ‘E-Invoicing’ or‘Electronic Invoicing’ is a system in which all invoices (i.e. B2B, Credit/Debit Notes, SEZ, Export) except B2C invoices are electronically uploaded and authenticated by the designated portal. After successful authentication, a unique Invoice Reference Number (IRN) is generated for each invoice by Invoice Registration Portal (IRP). Along with IRN, each invoice is digitally signed and added with QR code. This process is collectively called as e-invoicing under GST All invoice information will be transferred from this portal to both the GST portal and e-way bill portal in real-time. Therefore, it will eliminate the need for manual data entry while filing GSTR-1 return as well as generation of part-A of the e-way bills, as the information is passed directly by the IRP to GST portal. Implementation of E-Invoice in BUSY Complete implementation of E-Invoice in BUSY involves following steps: Step 1: Specify Company Address Details It is mandatory to specify company address details to generate E-Invoice. So if you have not specified company address details, specify it by clicking Company Edit Company option, a Modify Company window appears where you can specify company address details. Edit Company. On clicking Step 2: Enable and configure E-Invoice feature To enable E-Invoice feature, click Administration tab. On clicking GST/VAT tab, a GST/VAT window appears. Under GST/VAT window, enable E- Invoice required option. On enabling the E-Invoice required option, a Configure button appears. On clicking Configure button, an E-Invoice Configuration window appears. Given below is the screenshot of GST/VAT and E-Invoice Configuration window. Configuration Features / Options GST/VAT BIPL E-Invoice in BUSY 1
BUSY To generate E-Invoice for local transactions enable this option Under E-Invoice Configuration window following details need to be specified: From Place– Specify location/city from where the goods will be dispatched. PIN Code– Specify PIN Code of location/city from where the goods will be dispatched. E-Invoice GSP User ID– Specify User ID of GSP which is created on E-Invoice Portal while registering for GSP. Also, you can specify User ID of GSP created for Automatic E-Way Bill generation here. So, either of the User ID can be specified here. E-Invoice GSP Password –Specify Password of GSP which is created on E-Invoice Portal while registering for GSP. If you have specified User ID of E-Way Bill in the above data field then specify Password of Automatic E-Way Bill generation here. *It is advised to specify E-Way Bill User ID and Password under E-Invoice GSP User ID and Password data fields. BIPL E-Invoice in BUSY 2
BUSY Process of Generation of GSP User ID and Password on E-Invoice Portal To generate GSP User ID and Password, you need to register for GSP on E-Invoice Portal. To register for GSP on E-Invoice Portal, first of all login to E-Invoice Portal.Given below are the screenshots of E-Invoice Portal showing process of generation of GSP User ID and Password. Click ‘API Registration’option BIPL E-Invoice in BUSY 3
BUSY Click ‘User Credentials’ option Click ‘Create API User’ option BIPL E-Invoice in BUSY 4
BUSY Enter the OTP received on your registered mobile number Select ‘Through GSP’ option BIPL E-Invoice in BUSY 5
BUSY Select ‘Webtel Electrosoft Pvt. Ltd.’ as GSP from the list This User Name and Password needs to be specified in BUSY while configuring for E-Invoice generation xxxxxxxxxx Step 3: Configure Masters Once you have configured E-Invoice, next you need to specify details under Material Centre, Party, Unit, Country and Currency Master. Let us discuss these masters one by one. 1.Material Centre If you have multiple Godowns at different locations (with different Place & PIN Code), you need to specify details in Material Centre also. Given below is the screenshot of Modify Material Centre Master window. BIPL E-Invoice in BUSY 6
BUSY Under Modify Material Centre Master window,following details need to be specified in the below mentioned data fields: Address– Specify Address where Material Centre is located. From Place– Specify location/city of Material Centre. PIN Code – Specify PIN Code of location/city of Material Centre. From State – Specify State of location/city of Material Centre. 2.Party Master Given below is the screenshot of Modify Account Master window. BIPL E-Invoice in BUSY 7
BUSY Under Party Master window, following details need to be specified in the below mentioned data fields: Address– Specify Address where party is situated and goods will be received. Station– Specify Name of Place where goods will be received. PIN Code– Specify PIN Code of Place where goods will be received. 3.Unit Master Under Unit Master, specify UQC (Unit Quantity Code). To specify UQC under Unit Master, click: Administration Masters Unit Add/Modifyoption. Given below is the screenshot of Modify Unit Master window. BIPL E-Invoice in BUSY 8
BUSY Under Unit Master, specify UQC of the Unit under UQC (for E-Invoice) data field. In the similar manner specify UQC for all the Unit Masters. *You can refer to E-Invoice Portal for getting UQC of various units. 4.Country Master Under Country Master, specify Country Code. This is required only in case of Export transactions. To specify Country Code under Country Master, click: Administration Misc. Masters Country Add/Modifyoption. Given below is the screenshot of Country Master - Modify window. Masters Under Country Master, specify Country Code under Country Code data field. *You can refer to E-Invoice Portal for getting Country Code of various countries.. 5.Currency Master Under Currency Master, specify Currency Code. This is required only in case of Export transactions. To specify Currency Code under Currency Master, click: Administration Currency Add/Modifyoption. Given below is the screenshot of Modify Currency Master window. Masters BIPL E-Invoice in BUSY 9
BUSY Under Currency Master, specify Currency Code under Currency Code for E-Invoice data field. *You can refer to E-Invoice Portal for getting Currency Code of various currencies. 6. Bill Sundry Master Under Rounded OffBill Sundry Master, specify Bill Sundry Nature as Round off. Given below is the screenshot of Modify Bill Sundry Master window of Rounded Off (+) Bill Sundry. Select Round Off option from the list BIPL E-Invoice in BUSY 10
BUSY In the similar manner, change Bill Sundry Nature for Rounded Off (-) Bill Sundry. Step 4: Configure Voucher Series Configuration To generate E- Invoice after saving of voucher, enable Generate ‘E- Invoice’ After Saving option under Voucher Series configuration.To enable Generate ‘E- Invoice’ After Saving option, click Administration Configuration Voucher Series Configuration option. Given below is a screenshot of Voucher Series Configuration window. Sales Voucher Configuration Make sure this data field is also enabled as same is required to generate E-Invoice Step 5: Enter Voucher and generate E-Invoice While entering voucher, a ‘Transport Details’ window appears in which you need to specify ‘Y’ under ‘E- Invoice Required’ option. Given below is the screenshot of Transport Details window that appears during voucher entry. BIPL E-Invoice in BUSY 11
BUSY Transaction Type is explained at the end of this document After specifying transport details and enabling ‘E- Invoice Required’option click ‘Ok’ button. On clicking ‘Ok’ button, an E- Invoice message box appears. Given below is the screenshot of E- Invoice message box. Click ‘Yes’ button to generate E-Invoice. On clicking ‘Yes’ button, an Automatic E-Invoice IRN Generation window appears. Given below is the screenshot of Automatic E-Invoice IRN Generation window. BIPL E-Invoice in BUSY 12
BUSY Under Automatic E-Invoice IRN Generation window, specify the following details: Account to be shown by – Select from the list that whether you want Account Name, Alias or Print Name to be displayed on E-Invoice. Item to be shown by – Select from the list that whether you want Item Name, Alias or Print Name to be displayed on E-Invoice. Qty. to be shown in – Select from the list that whether you want Quantity Main Unit or Alternate Unit to be displayed on E-Invoice. Pick Dispatch details from Material Centre– Specify ‘Y’ in this data field, if you want to pick dispatch address details from Material Centre Master. Otherwise, dispatch address details will be pick from company address details. Club Item Details on HSN and Unit– Specify ‘Y’ in this data field, if clubbing of items is to be done on the basis of HSN, Unit and Tax Rate. In this case, Description will be picked from ‘Update HSN/SAC Description’ utility. This is required when there are multiple items with same HSN, Unit and Tax Rate. After entering the required data in data fields, click ‘Ok’ button. On clicking ‘Ok’ button, an AutomaticE- Invoice Generation message box appears. Given below is the screenshot of Automatic E-Invoice IRN Generation window. BIPL E-Invoice in BUSY 13
BUSY Click Check Possible Errors button to check the error in the data if any and rectify them to generate E-Invoice. Once the errors are rectified, click View & Generate E-Invoice button. On clicking View & Generate E-Invoice button, an E-Invoice Details window appears showing all necessary details. Given below is the screenshot of E-Invoice Details window. ‘Dispatch details’ will be shown if dispatch address details are picked from Material Centre ‘Ship To’ Details will be shown if shipping address details are picked from Billing Shipping details window which appears during voucher entry Please Note: In case of Export and SEZ transactions, ‘Ship To’ Details will be picked from Update Port Address Details utility provided under Transactions Address Details option. GST Misc. Utilities Update Port Once all the details are viewed, click Generate E-Invoice button. On clicking Generate E-Invoice button, an E-Invoice Ack. No. Generated message box appears displaying the E-Invoice number. Given below is a screenshot of E-Invoice Ack. No. Generated message box. BIPL E-Invoice in BUSY 14
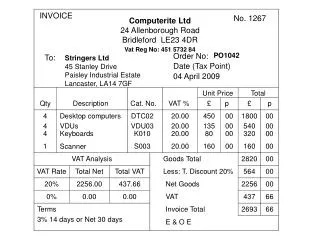
BUSY Once E-Invoice Ack. No. is generated, a Print E-Invoice message box appears. Given below is the screenshot of Print E-Invoice message box. Click ‘Yes’ button to print E-Invoice. On clicking ‘Yes’ button, a PDF page will open. You can print and download the E-Invoice from there. Given below is the screenshot of PDF file of E- Invoice. BIPL E-Invoice in BUSY 15
BUSY Now when you will open the voucher in modify mode, E-Invoice Ack. Number and E-Invoice Ack. Date will be automatically updated under Transport Details window. Given below is the screenshot of voucher in Modify mode. BIPL E-Invoice in BUSY 16
BUSY Step 6: Generate E-Invoice for multiple vouchers You can also generate E-Invoice for multiple vouchers in one go. To generate E-Invoice in bulk, click: Transactions GST Misc. Utilities Generate/Print E-Invoiceoption. On clicking Generate/Print E-Invoice option, a Select Vouchers for E-Invoice window appears. Given below is the screenshot of Select Vouchers for E-Invoice window. BIPL E-Invoice in BUSY 17
BUSY Under Select Vouchers for E-Invoice window, following details need to be specified: Vch Type– Select the required Voucher Type from the list for which you want to view vouchers. Starting Date– Specify Starting Date from which you want to view vouchers. Ending Date– Specify Ending Date till which you want to view vouchers. Filter on MC– Specify ‘Y’, if you want to apply MC wise filter in case you are maintaining more than one MC. Select MC– This data field gets active if you have specified ‘Y’ under Filter on MC data field. Select the required MC for which you want to load vouchers. Exclude Voucher already having E-Invoice Ack. No. – Check the checkbox if you want to exclude those vouchers for which E-Invoice Ack. No. is already generated. Load List– Click Load List button to load the vouchers for specified date range. On clicking Load List button, vouchers for specified date range will appear. At the bottom of Select Vouchers for E-Invoice window, following buttons are appearing: Update Transport Details (F4)– Click this button to update transport details. You can also use F4 shortcut key for the same. On clicking this button, an Update Transport Details window appears. Specify the data to be updated and click Update button. Check E-Invoice Details– Click this button to check for errors in data, if any. Select the vouchers for which you want to check for errors in data and click Check E-Invoice Details button. On clicking this button Check E- Invoice Details window appears showing details of vouchers and errors in Red color if any. Correct the errors if found any. Generate E- Invoice– Click this button to generate E- Invoice Ack. No. On clicking this button, E-Invoice Ack. No. will be generated for the selected vouchers one by one and will be automatically updated in vouchers. Print Invoice(s) – Click this button to print sale invoice from here only. Print E-Invoice– Click this button to print E-Invoice for the selected vouchers. On clicking this button, PDF file for the selected vouchers will be opened one by one which you can print and download. With this we have completed implementation of E-Invoice in BUSY. *Transaction Type in E-Invoice While generating E-Invoice, there can be four types of transaction type which are as follows: BIPL E-Invoice in BUSY 18
BUSY 1.Regular This transaction type will appear in case of a regular or normal transaction, where goods are dispatched from seller's location and shipped to buyer's location. For Example, Seller is situated in Rohini (110085) and Buyer is situated in Dwarka (110075).In this example, 'Bill From' PinCode will be 110085, 'Dispatch From' PinCode will also be 110085, 'Bill To' PinCode will be 110075 and 'Ship To' PinCode will also be 110075 In Regular transaction, 'Bill From' and 'Dispatch From' PinCode will be same 'BillTo' and 'Ship To' PinCode will be same 2.Bill To - Ship To In this type of transaction, goods are dispatched from seller's location and shipped to some another location other than buyer’s location. For Example, Seller is situated in Rohini (110085) and Buyer is situated in Dwarka (110075), but Buyer asked for shipment of goods to Janakpuri (110058). In this example, 'Bill From' PinCode will be 110085, 'Dispatch From' PinCode will also be 110085, 'Bill To' PinCode will be 110075 and 'Ship To' PinCode will be 110058 In Bill To - Ship To transaction, 'Bill From' and 'Dispatch From' PinCode will be same. Please Note: ‘Bill To –Ship To’ transaction will take place only when: ‘Separate Billing Shipping Details’ feature is enabled from Administration Configuration Voucher Configuration and GST Report Basis is selected as ‘As per Billing/Shipping Details’. 3.Bill From - Dispatch From In this type of transaction, goods are dispatched from a location other than seller's location and will be shipped to buyer's location. For Example, Seller is situated in Rohini (110085) and Buyer is situated in Dwarka (110075), but seller dispatch the goods from Ashok Vihar (110052). In this example, 'Bill From' PinCode will be 110085, 'Dispatch From' PinCode will be 110052, 'Bill To' PinCode will be 110075 and BIPL E-Invoice in BUSY 19
BUSY 'Ship To' PinCode will also be 110075 In Bill From - Dispatch From transaction, 'Bill To' and 'Ship To' PinCode will be same. Please Note:‘Bill From –Dispatch From’will take place only when: 'Pick Address' Details from Material Centre option is specified as ‘Y’ which appears at the time of generating E-Invoice. 4.Combination of 2 & 3 This is the combination of above two transactions i.e. goods are dispatched from a location other than seller's location and shipped to some another location other than buyer's location. For Example, Seller is situated in Rohini (110085) and Buyer is situated in Dwarka (110075), but seller dispatch the goods from Ashok Vihar (110052) to Janakpuri (110058). In this example, 'Bill From' PinCode will be 110085, 'Dispatch From' PinCode will be 110052, 'Bill To' PinCode will be 110075 and 'Ship To' PinCode will also be 110058 Please Note:‘Combination of 2 & 3’ will take place only when: Separate Billing Shipping Details’ feature is enabled and GST Report Basis is selected as ‘As per Billing/Shipping Details’. 'Pick Address' Details from Material Centre option is specified as ‘Y’ which appears at the time of generating E-Invoice. Treatment in BUSY ‘Bill From’PinCode i.e. Seller PinCode will be picked from E-Invoice Configuration window. ‘Dispatch From’PinCode will be picked from Material Centre. ‘Bill To’ PinCode will be picked from Party Master. ‘Ship To’ PinCode will be picked from Transport Details window. <<< Thank You >>> BIPL E-Invoice in BUSY 20