Download
1 / 15
150 likes | 172 Views
Learn why it is important to backup your computer files to a CD and how to do it step by step. Don't risk losing your data due to power surges, manufacturing defects, or natural disasters.

E N D
BACKING UP YOUR COMPUTER TO A CD
WHY SHOULD YOU BACKUP? • DATA CAN BE LOST DUE TO • POWER SURGES • MANUFACTURING DEFECTS • HURRICANES/LIGHTENING STRIKES
What files should you back up? BACKUP UP THE FOLLOWING FILES: • DESKTOP – Contains your icons, shortcuts, and files • MY DOCUMENTS – All your created files are usually stored here • FAVORITES – Bookmarked locations from your browser • MAILBOX – Outlook Personal Folders • COOKIES – Information saved by websites
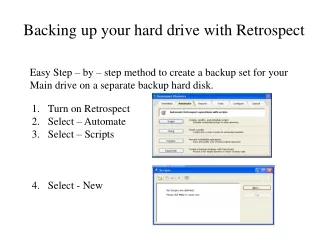
Step 1: Double-click the My Computer icon located on your desktop Step-by-Step Instructions
Step 4: Open the folder containing your personal files • This folder has the same name as your login to your computer • last name, first initial(s) • example: smithm
Step 5: Select Multiple Files • Press and hold the Ctrl button on your keyboard and click on the following folders: • Cookies • Desktop • Favorites • Mailbox • My Documents
Step 6: Copy the Files • Release the Ctrl key. • Point to one of the selected folders and rightclick on it. • Scroll down to Copy and left click on it to select it.
Step 6: Insert CD • Release the Ctrl key. Insert your CD into your DVD/CD drive. If a window opens asking if you would like burn a CD, click Cancel.
Step 7: Send Files to CD • Point to one of the selected folders and right click on it. • Scroll down to Send To, then over to DVD/CD-RW Drive (D:) which you select with a left click.
Step 8: Copy Process • You will see the copy window open and files being copied. Then the CD drive window will open with the message Files Ready to Be Written to the CD.
Step 9: Write Files to CD • Right click on the Ready message and select Write these files to CD
Step 10: Completion • The Writing Wizard will prompt you for a CD name, we recommend putting in the date of the backup. The CD will now be written to. It will notify you when complete. Click Finish and you are done.
Congratulations!!!!!! You have successfully backed up the important files from your computer. • If you have any questions about backing up your computer files, please contact the Help Desk at 433-7600