Metallographic Etchants
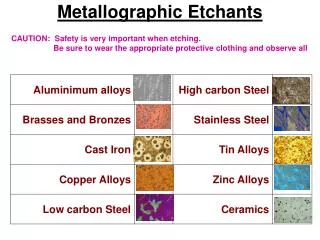
Metallographic Etchants. CAUTION: Safety is very important when etching. Be sure to wear the appropriate protective clothing and observe all. The most commonly used etchants. Guide to Acid Concentrations. Specimen and Mount Holders.

Metallographic Etchants
E N D
Presentation Transcript
Metallographic Etchants CAUTION: Safety is very important when etching. Be sure to wear the appropriate protective clothing and observe all
Specimen and Mount Holders Adapter A: Overall measurement: 28mm long x 3.1mm diameter (step-up portion is 6.25mm L x 4.8mm diameter), Adapter B: Overall measurement: 28mm long x 6mm diameter, Adapter C: Overall measurement: 34.5mm long x 16mm diameter All adapters have a threaded portion 5mm in length. • Specially Designed Specimen Holders For SEM: • The specimen holders are designed to improve productivity and allow one to view more than one sample at a time. This saves pump down time, keep chamber cleaner and get more work done. All mounts are machined from solid aluminum and come with spring clips/or setscrews to hold specimens securely. All mounts are made to fit onto the stage and are designed to fit through all standard specimen exchange ports, and have a center-threaded port to accept the Adapter Pins that fits SEM instrument. Three different types of pin adapters, which are threaded and ready to screw on to the base of the holders are available.
Universal SEM Sample Holder To hold almost any sample from 3mm to 29mm in diameter plus various odd shaped samples, with the dimensions not greater than 29mm. The samples are easily inserted or removed from the holder. The holder is made from aluminum and is with four removable sample arms so that it can hold very small samples as well, and it provides good electrical contact to the stage. The standard base measures: 48mm x 42mm x 12mm Thick. . Vertical Mount for Thin Samples; Flat Base This is designed to hold thin samples vertically in the SEM or any microscope. It is 25mm in diameter and 10mm thick. Each of the two loader jaws can hold up to 3mm thick samples. The spring loader keeps thin samples vertical so that cross sections can be studied. This holder is very useful for cross sections of silicon wafers or multilayer capicators. .
Multi Pin Holder The Multi Pin Holder is designed to save time. It accommodates 3 or 5 of ½" dia.(12.5mm) surface, 1/8" dia. (3.1 75910 Specimen Holders For SEM 10-14 mm) pin. ISI DS 130 and 150 First Stage Sample Mounts It is 10mm in diameter, 5mm high, copper sample holder to fit in the first stage of the ISI DS 130 and 150 SEM's. The inner cylinder is height adjustable so that one can adjust the sample to the correct working distance.
Pin Mount Stub Adapters Made from aluminum, used to adapt 1/8" (3.1mm) pin diameter SEM stubs. Available in 10, 15, 16mm diameter as well. SEM Sample Holder Set For convenience a SEM Sample Holder Set to fill all needs is available. The set consists of one universal holder, one vertical mount holder for thin samples, one 3-pin and one 5-pin configuration holder with a key for the set screw all in a finely finished wood box.
Four-Pin Stub Holder It accommodates four pin type, up to 12.5 (1/2") surface specimen stubs, with 1/8" (3.1mm) diameter pin. Cross Sectional Holder Made from non-magnetic stainless steel with 3.1mm (1/8") diameter pin and adjustable angle turn-screw. Just insert specimens edge-on and observe the cross section directly
Five 10mm Stub Holder Accommodates five 10mm diameter specimen stubs, with 1/8" (3.1mm) diameter pin Thin Sample Holder Ideal for examination cross section of thin samples, such as wafers, multi-layer of capacitors, plastics, metals, etc. ½" diameter (12.7mm), 1/8" (3.1mm)dia. pin (3.1mm) with split openings up to ¼" (6.4mm). Available with either 8mm (5/16") pin height or 15mm (9/16") pin height. For ISI, JEOL, TOPCON: Double set screw for a secure holding of the specimen during observation. 15mm(9/16")(dia). x 10mm(3/8")(H), 6.4mm(1/4") split.
METALLURGICAL LABORATORY TESTING Metallurgical labs stocked with state-of-the-art of equipment that allows to help in materials selection, characterization, component and process design, qualification, failure analysis, and many other services. • Specimen Preparation • Automatic grinding and polishing equipment • Abrasive cut-off wheels • Epoxy and cold mount • Large section specimen (up to 9 in.) metallographic preparation • Acid and electrolytic polishing/etching techniques • Specialized sectioning capability • Etching techniques for most common materials • Removal of rust and scale prior to failure analysis • Microstructural Analysis • Optical microscopes: magnification up to 2000x with oil immersion • Scanning Electron Microscope • Cambridge Stereoscan 360 • Windowless EDS capability for microstructural chemical analysis
Image Analysis • Micro- and macro-digital photographic capability • Quantitative image analysis for: • Area fraction • Feature measurement • Modularity • Grain size • Size distribution • Inclusion rating • Crack length • Software-based weld profile measurement Conventional & digital macrophotograph capability • Materials Testing • Hardness testing (Rockwell A, B, C) • Microhardness testing (Vickers, Knoop) • Magne-gage for ferrite measurement
Weldability Testing • Gleeble 1000 Thermal/Mechanical Simulator • Universal Varestraint • Oberlikon-Yanaco Hydrogen Analyzer with high-temperature measurement capability • Heat Treatment • 3-cubic ft. convection furnace • 12-cubic ft. convection furnace • 9-cubic ft. oven • Nondestructive Evaluation (NDE) • Ultrasonic immersion testing • Ultrasonic contact testing • Eddy current testing • Meandering Winding Magnetometer (MWM) • Surface cleanliness monitor (Optical Stimulated Electron Emission [OSEE]) • Magnetic particle testing • Penetrant testing • Baroscope and visual inspection • Radiography
Thermography • STANDARD TESTING SERVICES • Tensile Bend Fatigue • Charpy impact Fracture toughness (CTOD, J&K) • Heat treatment services (stress relief, normalizing ageing) • Weld cracking sensitivity tests (WIC, Y-groove, CTS, GBOP) • Diffusible hydrogen measurement (Mercury and gas chromatography) • Gleeble Thermo-mechanical simulator • Weld simulation CCT curves • Process simulation • Thermal/mechanical simulation • Weldability (Varestraint, Sigamajig) • Microstructural characterization • Optical Hardness Feature quantification • Weld procedure qualification • Residual stress measurements (blind-whole method) • Digital image analysis SEM with • EDS capability • Experimental stress analysis (strain gauging services) • High temperature testing up to 1200°C • Expert failure analysis • Welding services (PQR, test plate fabrication, etc.)


