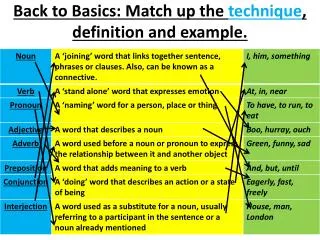
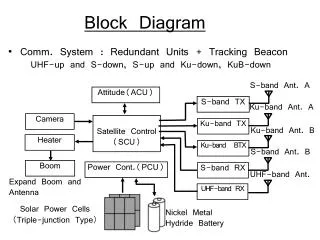
Download

1 / 19
190 likes | 212 Views
Use GarageBand software to create a song and convince your old band members to start playing again. Learn to record instruments, arrange projects, and add loops in this tutorial. Develop a demo track to persuade your friends. Start by creating a podcast project, remove extra tracks, and add loops for each instrument. Drag beat loops from the browser and customize tracks for a nostalgic reminder of your band's sound.

E N D
GarageBand Basics:“Getting the Band Back Together” Nick Gogno Technology Applications for the Classroom Enter
I wonder if there’s anything on your laptop that you can use to record your wicked chops. Go ahead. Pick it up! One day as you are sitting in your office, you decide to start playing the guitar again. But how can you show off your musical talents to your friends…and convince them to start playing again? That sounds pretty good… You still got it! Maybe if you’re old friends heard this you could get your band back together!
Looks like you’re in luck! You have GarageBand installed on your laptop. This program can help you create a song that will convince your old band members to start jamming again! To get started learning the software, click on the guitar icon.
timeline Track Info pane loopbrowser This screen is the GarageBand window—including the timeline, the loop browser, and the Track Info pane. Click on any part of the GarageBand window to see what each panel does. With this software, you must create a basic podcasting project that you can send out to your friends. But first, you have to learn the basics of the program… Find and preview loops in the loop browser… After listening to your music, they surely won’t be able to resist getting the band back together. You record Real and Software Instruments and arrange and mix your projects in the timeline… Change track instrument, effects, and input settings in the Track Info pane.
You can click the name to type a new track name. Click the Record Enable button to turn on the track for recording. Click the Mute button to silence the track. Click the Solo button to hear the track by itself. Click the Lock Track button to lock the track. Track headers: The instrument icon and name are shown at the left of each track’s header. Track mixer: Drag the pan dial to adjust the pan position of the track. Drag the volume slider to adjust the track’s volume. Click the Guitar icon to return to the full GarageBand window or click here to return to your office.
Click the Guitar icon to return to the full GarageBand window or click here to return to your office. Also includes the beat ruler, which you use to move the playhead and align items in the timeline with beats and measures. Zoom slider: Drag the zoom slider to zoom in for a closer view of part of the timeline, or to zoom out to see more of the timeline. Timeline: Contains the tracks where you record Real and Software Instruments, add loops, and arrange regions.
Click the Guitar icon to return to the full GarageBand window or click here to return to your office. Loop Browser and Editor buttons: Click to open the loop browser or the editor. Master volume slider and level meters: Drag the volume slider to adjust the project’s master output volume level. Add Track button: Click to add a track below the existing tracks in the timeline. Track Info and Media Browser buttons: Click to open the Track Info pane or the Media Browser Keyword buttons: Click a keyword button to display matching loops in the results list. Click multiple keyword buttons to narrow your results. You can preview loops in the loop browser before you add them to a project… The loop browser lets you quickly find loops to add to your projects using keywords for instrument, musical genre, or mood. and add more loops to GarageBand by dragging them onto the timeline. It shows the tempo, key, and number of beats for each loop.
Since you’ll want to add a voice over on the track, you’ll need to create a podcast. Complete the following tutorial on your own computer. Back to the laptop again! Now that you know the basics, you must make the perfect demo track to persuade your friends to get the band back together.
When you open a new project in GarageBand, this window should appear. Click on New Podcast Episode.
When the new podcast project opens, go to File > Save As, and save it with a new file name such as “getting the band back together”
Now you will need to remove the extra voice track. Highlight the track you do not want in the track info pane, and go to Track > Delete Track. Repeat this process for the Jingles and Radio Sounds tracks.
First, start with the drummer by dragging a beat loop from the loop browser and dropping it into the timeline panel. Repeat this process for your bass player and your guitarist, or any other instruments you might want. To add loops, first make sure that the loop browser is showing by clicking the eye button on the left side of the screen. Also, remember that you can browse the loops in different views by clicking the buttons in the bottom lefthand corner of the loop browser. You must add loops for each instrument in your band that will remind your old band members of how your group used to sound.
Next, click on the top right hand corner of each track in the timeline and drag each out to 20 seconds. Then, rename each instrument track after your old band members in the track info pane by clicking on the track name once.
To experiment with track volume settings, select a track and then click the down arrow button to show the track mixer. This mixer allows you to set volume levels. Also, don’t forget about the record enable, mute, solo, and lock buttons. To hear how your song sounds, make sure the playhead is at the beginning of the timeline and click play.
Select the voice track and when ready click the record button. Speaking into your computer’s mic, say “Remember when we used to sound like this. We gotta get the band back together!” To record voice over your song, make sure all the other tracks are muted or you are using headphones and the playhead is at the beginning of the timeline.
Click on the media browser button and drag a photo from your library and drop it into the podcast track in the timeline. You may have to add new photos to your iPhoto library. Finally, you must add a picture to your podcast that will remind your friends of how the band used to look.
Click on your iPod to find out how to share your GarageBand music. Now that you know the basics of GarageBand, you can create any kind of music you want. Since your masterpiece is completed, you’ll want to share it with friends. But how??
To send a project to an iTunes playlist: Choose Share > Send to iTunes. The entire project, from the beginning (measure 1) to the end of the last region, is exported. You can send a project to an iTunes playlist, then play your exported projects in iTunes, download them to an iPod, or burn the playlist to a CD. Files are exported to iTunes in AIFF format. You can convert the exported file to another format, such as AAC or MP3, from within iTunes.
Additional Help • Make sure that you listen to your project in iTunes before sharing it with anyone. • Consult the GarageBand help file for further information • Useful Links: • Apple's GarageBand Support • The GarageDoor • iCompositions • MacJams