Download
1 / 35
350 likes | 471 Views
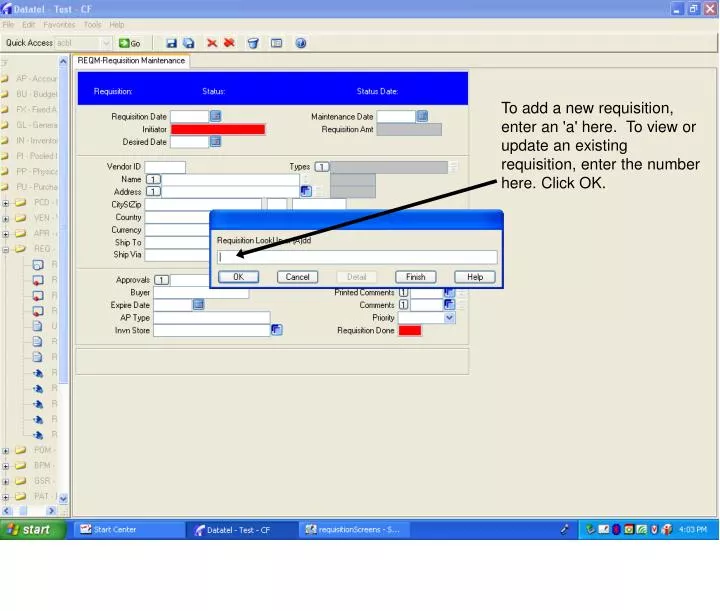
To add a new requisition, enter an 'a' here. To view or update an existing requisition, enter the number here. Click OK. You can enter a capital A or a lowercase a. Leave the text box blank and click OK or ENTER to automatically assign a requisition number.

E N D
To add a new requisition, enter an 'a' here. To view or update an existing requisition, enter the number here. Click OK.
Leave the text box blank and click OK or ENTER to automatically assign a requisition number.
This Alert message will be displayed to let you know that the requisition number will be assigned when completed.
To display your name, type in your Colleague ID or your Colleague number, leave the cursor in the text box and hit ENTER. See next slide.
You can enter the name of a recommended vendor. This is not a required field. Enter the address if you have one available. This is not required.
After entering Vendor name, an Alert box will be displayed asking if vendor is a (C)orporation or a (P)erson. Click on C or P. If you try to save the requisition at this point, you will receive the following Alert message. See next slide.
You MUST add a line item to the requisition before you can save the requisition. Click OK.
To enter a Line Item, select the drill down box next to Line Items.
To add a Line Item, click the drill down box at the RQIL (Requistion Item List) screen.
To add a description longer than 25 characters, click the drill down box next to the description. A screen will be displayed that will allow you to type your description in paragraph format. Number 2 under description DOES NOT refer to a second item description. This is a continuation of a description that exceeds 25 characters.
This screen will be displayed if you select the drill down box next to description in the previous screen.
WARNING - DO NOT select this drill down box. This will bring you to an error page that could result in the loss of your data!
If you do select the drill down box in the previous screen, this screen will be displayed. To get out of this without losing your data, enter an 'A' and press ENTER. The following screen will be displayed.
Enter 'q' and press ENTER. You will be returned to the RQIM (Requistion Item Maintenance) screen.
Select Update to add the description.
The description will be displayed in the numbered lines. To see the additional text, select the down arrow next to line 2. See next screen for entering price and quantity.
Enter estimated price, quantity and unit of issue (example: EA, BX). For unit of issue lookup, enter ... and hit ENTER.
To select a unit of issue, check the corresponding box and click the Save Selection icon.
The unit of issue selected in the previous screen will be entered into unit of issue. The next step is to enter a GL Account number.
After entering a price and quantity, you can then search for a GL Account No. by entering ...your 5-digit cost center number followed by ...
This will list the General Ledger Account numbers that match the selection you entered and that you have access to. You can select an account number by checking the box next to it or entering the number in the text box at the bottom. Then click Save Selection icon.
To charge the full amount to this account number, click in the Percent text box. This will automatically calculate to 100% of the amount of the line item. Click Save.
Once you have saved your first line item, this blank screen will appear. This is where you enter your next line item description by following the previous steps. If you have no additional line items, click Cancel to cancel the current form.
Select Save to save this screen. If you entered more than one line item, they will all be displayed here.
Once you return to the main requisition screen, there are four items that must be completed before the requisition process can continue: 1. There must be an Initiator. 2. There must be at least one line item. 3. Approvals must be entered (see adding Approvals to a requisition.) 4. Requisition Done field must be flagged as “yes”. Click Save.
The requisition number will be automatically assigned. Select OK.
You will be returned to the Requisition LookUp/Add screen. To return to the previous requisition, enter @. This will bring up the last requisition you were working on.
If you change the "Requisition Done" field from No to Yes before entering all required fields, the above Alert will be displayed. Click OK.