Download
1 / 19
230 likes | 781 Views
Laying Out Studs for a Wall. Safety Notice.

E N D
Safety Notice The viewer is expressly advised to consider and use all safety precautions described in this presentation or that might also be indicated by undertaking the activities described herein. In addition, common sense should be exercised to help avoid all potential hazards. Publisher assumes no responsibility for the activities of the viewer or for the subject matter experts who prepared this presentation. Publisher makes no representation or warranties of any kind, including but not limited to, the warranties of fitness for particular purpose or merchantability, nor for any implied warranties related thereto, or otherwise. Publisher will not be liable for damages of any type, including any consequential, special or exemplary damages resulting, in whole or in part, from viewer's use or reliance upon the information, instructions, warnings or other matter contained in this presentation.
Laying Out Studs for a Wall • Observe safety rules. • Make sure tools and equipment are available. • Check materials. • Follow the steps described here.
Safety • Wear safety glasses at all times. • Follow the safety rules for the portable circular saw.
Tools and Equipment • Tape measure • Square • Pencil • Saw horses • Portable circular saw • Extension cord • Hammer
Materials • 2x4 or 2x6 boards used for the top and bottom plates of the wall
Procedure The steps that follow describe how to lay out this wall.
Step 1 Determine which walls will be by-walls and butt-walls. Cut the top and bottom plates to length.
Step 2 Tack the top and bottom plates together. Place them on the subfloor and align them with the chalk lines.
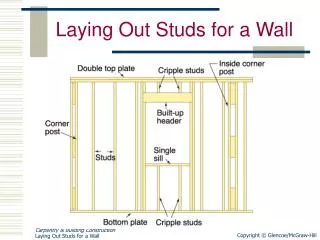
Step 3 Mark the plates. Suggested markings for the various components of a typical framed wall are shown above. (The B indicates a block of wood between the two inside corner studs.)
Step 4 Refer to the plans to find the distance from the corner of the building to the center of the first window or door opening. Measure the distance and square a line across both plates. Mark the line with a centerline symbol.
Step 5 • Measure from each side of the centerline a distance equal to one-half the rough opening size. These lines represent the inside faces of the trimmer studs. • Mark the plate to locate the position of each king stud. The inside face of the king stud is 1 ½" from the inside face of the trimmer stud. • Repeat Steps 4 and 5 for each wall opening.
Step 6 • Starting from a corner of the building, indicate the centerlines of all intersecting partition walls with a P. • On each side of the centerline, measure off 1 3/4". • Add the other lines to show the partition corner post.
Step 7 • To mark the location of wall studs and cripple studs, start from a corner of the by-wall. • Make a mark 15 ¼" from the end of the plate to locate the first stud. • Make an X on the side of the line where the stud will be nailed.
Step 8 Starting at the first stud, make a mark every 16" to indicate the positions of the remaining studs on the first wall, including cripples. Note the outside corner post has been marked.
Step 9 Double-check the layout to be sure there is a stud every 4' for sheathing joints.
Step 10 Before laying out studs on a butt-wall, check the plans to determine the thickness of the wall sheathing.
Step 10 Measure 15 1/4" in from the outside edge of the sheathing.
Step 11 On interior walls, if drywall or other panel wall covering is used on the adjoining wall, measure 15 1/4" plus the thickness of the covering to the first stud.