Download
1 / 17
170 likes | 322 Views
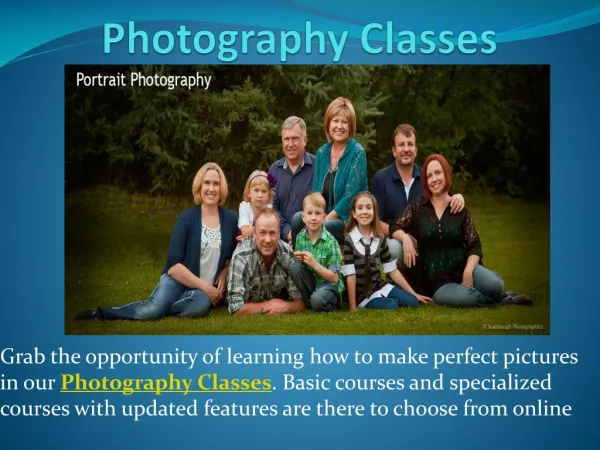
Photography. What makes a good Photograph?. Which photo do you like best? Why? What draws your attention?. Lesson 1: Using the camera To Take good photos, We need to be familiar with our cameras.

E N D
Photography What makes a good Photograph?
Which photo do you like best? Why? What draws your attention?
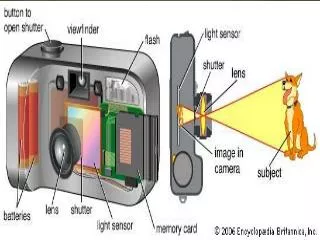
Lesson 1: Using the camera To Take good photos, We need to be familiar with our cameras. Starting out with your first camera. Pass out the cameras so there is a camera for every 2 or 3 students. These are the Olympus stylus tough 300, 310 or 320 series. Students should be using the wrist strap whenever they are handling the camera. Step 1: Practice taking out the battery and putting it back in. If the battery is dead, the camera needs to be plugged into the charger.
Step 2: SHOW the students were the SD card is, but DO NOT LET THEM REMOVE THE CARD! The card has to be put in the right way, or it will break the spring mechanism – which would cause the camera to be non-functional . This is a costly error so please DO NOT ALLOW THE STUDENTS TO REMOVE or REPLACE THE SD CARD. ONLY THE TEACHER MAY DO THIS FUNCTION. Step 3: Turn it on by hitting the on button. Step 4: Point it at your neighbor, and push down the button on the top lightly; this should focus the lens. Push down hard to snap your first picture. Note: If you want to you can turn the LCD screen on and let that act as your viewfinder. You will save battery life if you just look through the little viewfinder.
Step 5: Review your shot. Push the play button to turn the LCD screen on, and you will see the picture you took. Have students pass the cameras around so that each student gets to practice taking a picture and reviewing it in the view mode. Please make sure the students are using the wrist strap when handling the cameras.
Step 6: Download to your computer. This camera comes with a USB cable that will connect to current Macs and PCs. Plug the cable into your USB port on your computer and the camera disk icon should appear. Open it up, and you will see a list of your picture files. The camera just gives them a number. You can rename them later. You can open them up to view, but you haven't transferred them into your computer yet, so you can't work with them yet. To do this drag the images you want to save into your personal image folder. Once you have copied the images to your computer, delete them and any others you don't need from the SmartMedia card, so you have space for more.
Lesson 2: Your goal as a photographer is usually to grab the attention of the viewer, and communicate an idea, or share an experience. What photos do this best? Usually the strongest photos are those that are simple and present the subject in a clear, uncluttered way. Photographers work with line, shape, texture, color and pattern. Let's take a look at a few pictures and see if we can identify the visual elements that make them work, or not work. Assignment: Here are three pictures of the same subject. Write a paragraph or two explaining which one you like best. What patterns are present? What are the lines? What are the textures? Colors? Why did you make this choice?
Lesson 3: Unclutter! Get Close! Take a look at the following pictures. Which ones grab your attention? Which ones do you just glance at and move on? Three beach pictures. Which one is the best? Why?
Two shots of kids. One is striking, one dull. Why? The shot on the left shows a boy lit up by a flash in a fairly dark room at the Exploratorium. All you see is him, and his smile, and the wheel he is holding. He FILLS THE FRAME. The other photo is typical of pictures taken at school. Kids in a crowd. Nobody stands out, because they are standing against a cluttered background. This would be improved by having the subjects stand against a plain wall and by moving in closer. If they are dark, as in this picture, put them against a light-colored wall. If they are light, then try to put them against a dark background. Avoid backlighting unless you want a silhouette. Assignmnet: Take 5 photos that are clear and uncluttered and load them onto your picture folder on your computer .
Lesson 3: The Rule of Thirds Look at these two pictures. Both show a seaplane in a harbor on the island of St. Croix. Which do you prefer? Do you know why?
Here are the same two photos with lines across them dividing them into thirds vertically and horizontally. Where is the seaplane in the photo you liked better? The ancient Greeks discovered the pleasing effect of objects with a rectangular shape. When a picture is divided into thirds, it is often most powerful if the focus of attention is in the intersection of two of the perpendicular lines. The photo on the left above has the plane almost in the center, and it kind of floats there. The plane in the picture on the right is at the intersection of two of the lines, making it a bit stronger. It is also anchored a bit by the building and flag in the righthand third, which balance the plane on the left.
Adjust By Cropping Cropping means cutting the picture down, but not necessarily in size. It is possible to take a picture like the one on the left above and cut off some of the "dead space" on the left. The result is a picture that obeys the rule of thirds and has a stronger feel. Assignment Print out a few of your favorite pictures (or gather some from your clipped picture file) Use a ruler to divide the picture into thirds. Where is the action in the picture occurring? Can you find photos that follow this rule? Can you find exceptions?
Lesson 4: Framing Your View We have looked at the value of filling the frame with your subject, making your subject stand out, and placing your subject according to the rule of thirds. But you can try a variety of things that break these rules or shake things up.
How many symmetrical elements can you find in the pictures above? Assignment: Take your camera and try to shoot some framed views. Windows are one possibility, but you can also use the branches of a tree or any other object you can place in the foreground.
Lesson 5: Macro 1. Get an interesting three dimensional object, such as a vase of flowers, to practice on. 2. Set your camera to Macro. If you are using an Olympus Brio, then you will find the macro setting can be chosen by selecting an image of a flower. According to the owner's manual, this allows you to get the front of the camera 8 inches away from the subject. 3. Shoot your subject from a range of distances. Look at your photos on the computer screen. How much of the object is in focus? You may find that you can't keep the entire object in focus when using Macro. This can be used to help make the most important part of the picture jump out at the viewer. Lesson 6: Getting Up Close
Lesson 7: Photography Projects using what you have learned so far. See the site below for project ideas or consult the pamphlet included with your camera kit. Have Fun! Photography Projects