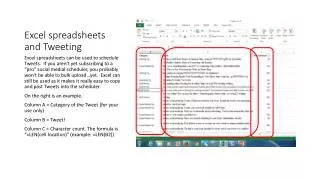
Creating and Using Excel Spreadsheets
Creating and Using Excel Spreadsheets. Prepared by Pete Davidson and Sheila Porter. A Spreadsheet is a computer program that allows you to enter and work with data in a table made up of rows and columns. To Open up The Microsoft Excel Spreadsheet.


Creating and Using Excel Spreadsheets
E N D
Presentation Transcript
Creating and Using Excel Spreadsheets Prepared by Pete Davidson and Sheila Porter
A Spreadsheet is a computer program that allows you to enter and work with data in a table made up of rows and columns.
To Open up The Microsoft Excel Spreadsheet • Double click the Excel icon on your desktop if one is there. or • Click Start, place your cursor on “Programs”, and left click on “Microsoft Excel”.
The rectangular boxes are called cells and they are arranged in rowsand columns.
The columns are named by lettersand The rows are named by numbers
Cells are named with a letter followed by a number.This is cell D5
When a cell has a dark border, that shows that it is the active cell. When you left click on a cell, it becomes active and is identified in this field.
You can left click and drag your cursor to select groups of cells. This is a selected Group of cells.
To enter data into a cell, make it active and start typing. The data you are entering will appear in this field and in the active cell. You can enter numbers or text into a cell.
When you press “Enter”, the data you have typed is fixed in the cell. Pressing “Enter” also makes the next cell in the column become the active cell. You can also fix the data by left clicking on a different cell.
When setting up a spreadsheet, it is important to use clear and meaningful labels for your columns and rows.
You can enter formulas to do mathematical calculations with spreadsheet data.There are 2 parts to entering a formula:>Enter the name of the formula>Enter the range of cells to use
After you select the cell in which you want the results of the formula to appear, press the= key.This tells the spreadsheet that what you will be typing is a formula.
Now you are ready to type the name of the formula followed bya (the name of the 1st cell, a :the name of the last cell,and finally a )
Here is an example of a formula to add a column of 5 numbers that has been typed into cell B6.
Notice that after you press enter, the results of the formula are now shown in cell B6.
Here are the formulas that we will be using for the M&M’s project.To find the mean type =enter the formula name AVERAGEand then enter the range of cells(B3:B?)The resulting formula looks like=AVERAGE(B3:B?)
To find the median type = enter the formula name MEDIANand then enter the range of cells(B3:B?)The resulting formula looks like=MEDIAN(B3:B?)
To find the mode type = enter the formula name MODEand then enter the range of cells(B3:B?)The resulting formula looks like=Mode(B3:B?)
The formula to find the range is a bit more complicated. Type =(MAX(B3:B?)and then type-MIN(B3:B?))The resulting formula looks like=(MAX(B3:B?)-MIN(B3:B?))Don’t forget the double ))at the end.
You don’t need to type the same formula in for each column of data.You can extend the formula to other cells without retyping it each time.
Click on the cell with the formula and then click on and drag the little square on the bottom right corner. Drag Click
Once you have placed your data and formulas into the spreadsheet, you can now have Excel graph your data.By the way, for some reason, Excel calls a graph a chart.
To make a chart (graph) of your data, you first need to highlight the data to be used. Then click on this button.
This window will open up. A large number of chart options are offered.
There are many adjustments that you can make to a chart.For a simple bar graph, you can click on next and move on.
For a simple bar graph, all you need to do is type in a title and label your x and y axes. Click on Finish.
Your graph will appear in your spreadsheet. Cut and paste your graph into a Word document and you can adjust the size and print it out.