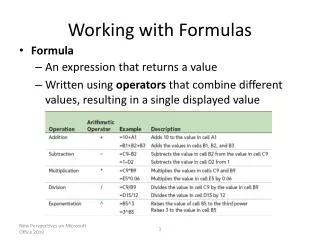
Excel Tutorial 3 Working with Formulas and Functions
Excel Tutorial 3 Working with Formulas and Functions. Objectives. Copy formulas Build formulas containing relative, absolute, and mixed references Review function syntax Insert a function with the Insert Function dialog box Search for a function Type a function directly in a cell.

Excel Tutorial 3 Working with Formulas and Functions
E N D
Presentation Transcript
Objectives • Copy formulas • Build formulas containing relative, absolute, and mixed references • Review function syntax • Insert a function with the Insert Function dialog box • Search for a function • Type a function directly in a cell New Perspectives on Microsoft Office 2007: Windows XP Edition
Objectives • Use AutoFill to fill in a formula and complete a series • Enter the IF logical function • Insert the date with the TODAY function • Calculate monthly mortgage payments with the PMT financial function New Perspectives on Microsoft Office 2007: Windows XP Edition
Using Relative References New Perspectives on Microsoft Office 2007: Windows XP Edition
Using Absolute References New Perspectives on Microsoft Office 2007: Windows XP Edition
Using Mixed References New Perspectives on Microsoft Office 2007: Windows XP Edition
Entering Relative, Absolute, and Mixed References • To enter a relative reference, type the cell reference as it appears in the worksheet. For example, enter B2 for cell B2 • To enter an absolute reference, type $ (a dollar sign) before both the row and column references. For example, enter $B$2 • To enter a mixed reference, type $ before either the row or column reference. For example, enter $B2 or B$2 or • Select the cell reference you want to change • Press the F4 key to cycle the reference from relative to absolute to mixed and then back to relative New Perspectives on Microsoft Office 2007: Windows XP Edition
Understanding Function Syntax • Every function has to follow a set of rules, or syntax, which specifies how the function should be written • Arguments New Perspectives on Microsoft Office 2007: Windows XP Edition
Understanding Function Syntax New Perspectives on Microsoft Office 2007: Windows XP Edition
Inserting a Function • Click the Formulas tab on the Ribbon • To insert a function from a specific category, click the appropriate category button in the Function Library group. To search for a function, click the Insert Function button in the Function Library group, enter a description of the function, and then click the Go button • Select the appropriate function from the list of functions • Enter the argument values in the Function Arguments dialog box, and then click the OK button New Perspectives on Microsoft Office 2007: Windows XP Edition
Inserting a Function New Perspectives on Microsoft Office 2007: Windows XP Edition
Typing a Function • As you begin to type a function name within a formula, a list of functions that begin with the letters you typed appears New Perspectives on Microsoft Office 2007: Windows XP Edition
Working with AutoFill • AutoFill copies content and formats from a cell or range into an adjacent cell or range • Select the cell or range that contains the formula or formulas you want to copy • Drag the fill handle in the direction you want to copy the formula(s) and then release the mouse button • To copy only the formats or only the formulas, click the AutoFill Options button and select the appropriate option New Perspectives on Microsoft Office 2007: Windows XP Edition
Working with AutoFill or • Select the cell or range that contains the formula or formulas you want to copy • In the Editing group on the Home tab, click the Fill button • Select the appropriate fill direction and fill type (or click Series, enter the desired fill series options, and then click the OK button) New Perspectives on Microsoft Office 2007: Windows XP Edition
Using the AutoFill Options Button • By default, AutoFill copies both the formulas and the formats of the original range to the selected range • You can specify what is copied by using the AutoFill Options button that appears after you release the mouse button New Perspectives on Microsoft Office 2007: Windows XP Edition
Filling a Series • AutoFill can also be used to create a series of numbers, dates, or text based on a pattern New Perspectives on Microsoft Office 2007: Windows XP Edition
Filling a Series New Perspectives on Microsoft Office 2007: Windows XP Edition
Creating a Series with AutoFill • Enter the first few values of the series into a range • Select the range, and then drag the fill handle of the selected range over the cells you want to fill or • Enter the first few values of the series into a range • Select the entire range into which you want to extend the series • In the Editing group on the Home tab, click the Fill button, and then click Down, Right, Up, Left, Series, or Justify to set the direction you want to extend the series New Perspectives on Microsoft Office 2007: Windows XP Edition
Working with Logical Functions • A logical function is a function that works with values that are either true or false • The IF function is a logical function that returns one value if the statement is true and returns a different value if the statement is false • IF(logical_test, value_if_true, [value_if_false]) New Perspectives on Microsoft Office 2007: Windows XP Edition
Working with Logical Functions • A comparison operator is a symbol that indicates the relationship between two values New Perspectives on Microsoft Office 2007: Windows XP Edition
Working with Logical Functions • =IF(A1="YES", "DONE", "RESTART") • =IF(A1="MAXIMUM", MAX(B1:B10), MIN(B1:B10)) • =IF(D33>0, $K$10, 0) New Perspectives on Microsoft Office 2007: Windows XP Edition
Working with Date Functions New Perspectives on Microsoft Office 2007: Windows XP Edition
Working with Financial Functions New Perspectives on Microsoft Office 2007: Windows XP Edition
Using the PMT Function to Determine a Monthly Loan Payment • For loan or investment calculations, you need to know the following information: • The annual interest rate • The payment period, or how often payments are due and interest is compounded • The length of the loan in terms of the number of payment periods • The amount being borrowed or invested • PMT(rate, nper, pv, [fv=0] [type=0]) New Perspectives on Microsoft Office 2007: Windows XP Edition
Using the PMT Function to Determine a Monthly Loan Payment New Perspectives on Microsoft Office 2007: Windows XP Edition