Download

1 / 30
0 likes | 10 Views
JMP homework help by the experts at Tutor Help Desk offers a systematic evaluation of instructions, data, statistical methods to prepare comprehensive solutions and reports to help students improve their course performance.

E N D
A Step-by-Step Assignment Help Guide to Navigating JMP for Beginners
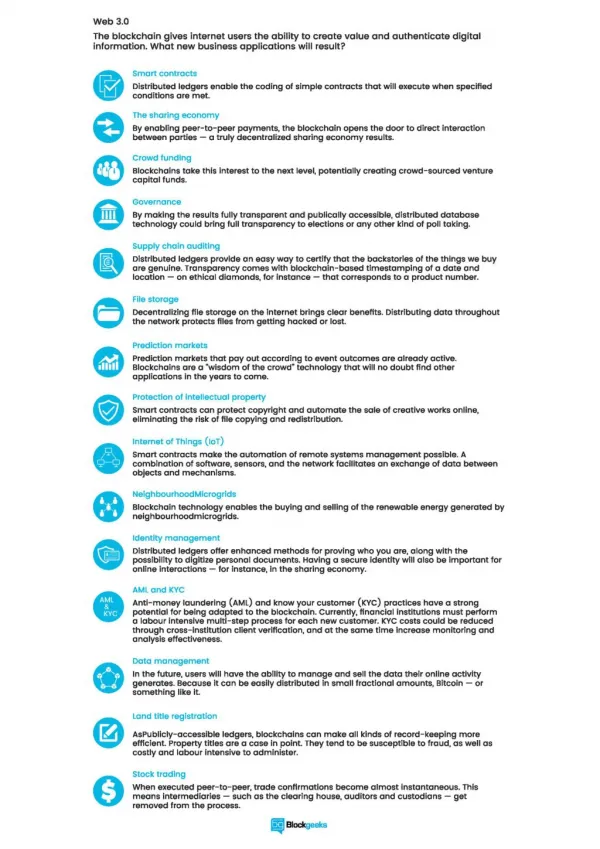
Introduction In today’s world, where the availability and importance of data is increasing, the use of statistics and data analysis is prominent in almost all areas such as education, economy, health, and engineering. Sometimes basic software tools are inadequate when handling large data sets, containing diverse attributes and information. Computer software such as JMP from SAS Institute has become a popular choice among students, professors and working professionals in handling complex data analysis. JMP is a popular choice due to its user-friendly, interactive features that make sophisticated data analysis accessible to users of all skill levels.
The Emergence and Development of Modern Data Analysis Software
The process of analyzing data has significantly improved in the last few decades. Traditionally, the process was carried out manually using calculations and basic tools. The onset of high density complex data called for the use of enhanced software tools. Companies such as IBM’s SPSS, R programming, and SAS emerged as the advanced tools for dealing with large data sets and having capabilities of conducting complicated statistical analyses. However, learning these software were difficult for beginners as they demand hours of learning and practice. To overcome these challenges JMP introduced by SAS Institute in 1989, is an interactive and user friendly tool which incorporates complex statistics with simple user interface. JMP has evolved over time into a sophisticated tool for statistical computing, predictive modeling and data visualization in industries as well as academics.
Step-by-Step Guide to Navigating JMP for Beginners
Getting Started with JMP 01
Installation and Setup JMP, like most other software, must be downloaded and installed on a computer before it can be used efficiently. JMP for Windows and MAC are available. Here’s how to get started: Download the Software: Go to the JMP Website and get the version of JMP that is compatible with your operating system. If you are a student you may ask your university to get a student license. Installation: To install JMP, merely follow the on-screen instructions that are indicated on the software. After the installation is complete, open the JMP and you will be met with the JMP start window. Licensing: Use the unique license code provided by your university to register yourself or if the license is not available, you may visit the official website of JMP to buy one.
Navigating the Interface The JMP interface has been carefully developed to make it friendly for the end users. Here are the key components: Home Window: The Home window gives access to recent files, templates and the JMP Starter which is a quick launch menu for processing various analyses. Data Tables: This is where your data is displayed. It is also important to note that multiple data tables can be opened at the same time and each operates in a separate tab. Toolbars: The main window contains toolbars at the top of the window to perform functions such as data import, analysis, and visualization tools. Output Window: The results of each of these analyses are displayed in the output window. This is where you will find tables, charts and other forms of graphic visualizations that are generated by JMP.
02 Importing Data
Importing Data from Excel One of the most common tasks in JMP is importing data from external sources, such as Excel spreadsheets. Here’s how to do it: Open JMP: Start by opening JMP and creating a new data table or selecting an existing one. Import Data: Go to File > Open and select your Excel file. JMP will automatically import the data into a new data table. Review Data: Once the data is imported, review it in the data table to ensure that all columns and rows are correctly aligned. You can also rename columns and adjust data types if necessary.
Importing Data from CSV To import data from a CSV file: 1. Open JMP: As before, open JMP and create or select a data table. 2. Import CSV: Go to File > Open, select your CSV file, and JMP will import the data. 3. Check Data: Verify that the data is correctly formatted in the data table.
Data Exploration and Visualization 03
Basic Descriptive Statistics Before diving into complex analyses, it’s often useful to explore your data using basic descriptive statistics. Here’s how to perform these in JMP: Select Columns: Highlight the columns you want to analyze by clicking on their headers in the data table. Analyze: Go to Analyze > Distribution. This will open a window where you can specify which variables to include in your analysis. Run Analysis: Click OK, and JMP will generate histograms, box plots, and summary statistics for each variable.
Creating Visualizations JMP excels at creating visualizations. Here’s how to create some common ones: 1. Scatter Plot: ● Go to Graph > Scatterplot Matrix. ● Select the variables you want to plot and click OK. JMP will generate a matrix of scatter plots, showing the relationships between variables. 2. Bar Chart: ● Go to Graph > Bar Chart. ● Select the categorical variable for the x-axis and the response variable for the y-axis. Click OK to generate the chart. 3. Box Plot: ● Go to Graph > Box Plot. ● Select the variable you want to analyze and click OK to generate the box plot. These visualizations allow you to explore the data, identify patterns, and detect outliers.
Performing Statistical Analyses 04
T-Test A t-test is a common statistical test used to compare the means of two groups. Here’s how to perform a t-test in JMP: 1. Select Columns: Highlight the columns containing the data for the two groups you want to compare. 2. Analyze: Go to Analyze > Fit Y by X. In the Y role, select the dependent variable. • In the X role, select the independent variable. • 3. Run Analysis: Click OK, and JMP will perform the t-test, displaying the results in the output window.
ANOVA ANOVA (Analysis of Variance) is used to compare the means of three or more groups. To perform ANOVA in JMP: Select Columns: Highlight the relevant columns. 1. Analyze: Go to Analyze > Fit Model. 2. In the Y role, select the dependent variable. ● In the Construct Model Effects box, add the independent variables. ● 3. Run Analysis: Click Run, and JMP will perform the ANOVA, displaying the results.
Saving and Exporting Results 05
Saving Your Work To save your JMP session, including all data tables, scripts, and outputs: 1. Save Data Table: Go to File > Save As and save your data table. 2. Save Session: To save the entire session, go to File > Save Session Script. This will save all your work, including data and analyses.
Exporting Results To export your results to other formats: Export Data: Go to File > Export and select the format you want (e.g., CSV, Excel). 1. Export Graphics: Right-click on any graph or chart, select Save As, and choose the desired format 2. (e.g., PNG, JPEG).
Troubleshooting and Common Issues 06
Even with the best tools, you may encounter challenges while using JMP. Here are some common issues students face and how to address them: Data Import Errors Problem: Data doesn’t import correctly from Excel or CSV files. ● Solution: Ensure that the data is clean, with no merged cells, and that columns are correctly formatted ● before importing. You can also use the Import Wizard in JMP for more control over the import process.
Incorrect Analyses Problem: The results of an analysis don’t make sense. Solution: Double-check your input variables, ensuring that they are correctly assigned to the roles (e.g., dependent vs. independent variables). Also, review the assumptions of the statistical test you are using to ensure they are met by your data. Visualization Problems Problem: Charts and graphs don’t display as expected. Solution: Verify that the correct data columns are selected for the visualization. Adjust the chart settings or try different visualization options to better represent your data.
How Our JMP Homework Help Can Assist You
Despite JMP’s flexibility and ease of use, at times the user gets confused on where to go or what to do especially in dealing with large data sets and complex analysis. Our JMP Homework Help service offers a systematic evaluation of instructions, data, statistical methods to prepare comprehensive solutions and reports to help students improve their course performance. Whether you have problems with importing your data or want to conduct a specific statistical analysis or simply to create insightful visualization of your data, we are here to help.
We Offer Step-by-Step Guidance: We offer comprehensive guidance to help you learn every step of the data analysis process performed in JMP. Data Analysis Support: We help with conducting complex statistical analyses and writing meaningful interpretations. Visualization Assistance: Assist in producing accurate and insightful graphs and charts that adds depth and clarity to the analysis. Assignment Review: We also provide assignment review services wherein we review your work and provide feedback for correction and improvement.
The advantage of JMP is that it is easy to use for all users at different levels in an organization. By following the step-by-step guide provided in this presentation, you can navigate JMP with confidence, perform various statistical analyses, and create insightful visualizations. Whether you are a student, researcher, or professional, mastering JMP will significantly enhance your data analysis capabilities.
Helpful Resources and Textbooks To further your understanding of JMP and data analysis, consider the following resources: "JMP Start Statistics: A Guide to Statistics and Data Analysis Using JMP" by John Sall, Ann Lehman, Mia Stephens, and Sheila Loring "Practical Data Analysis with JMP, Second Edition" by Robert Carver JMP's Official Documentation and Tutorials: Available on the JMP website, these resources offer step-by-step tutorials and extensive documentation to help you get the most out of the software.
Thank You hw@tutorhelpdesk.com +1-6178070926


![[PDF] Beginners Guide to Sculpting: Step-by-Step Guide Ipad](https://cdn7.slideserve.com/12466012/slide1-dt.jpg)