Interfacing DHT22 Sensor with Arduino Nano
0 likes | 13 Views
In this tutorial, you will learn how to interface DHT22 Sensor with Arduino Nano.

Interfacing DHT22 Sensor with Arduino Nano
E N D
Presentation Transcript
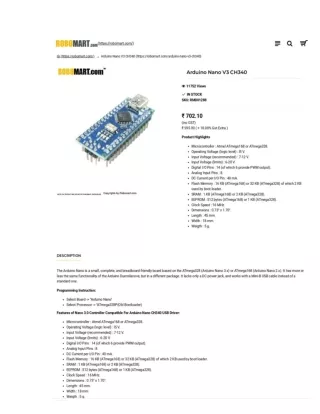
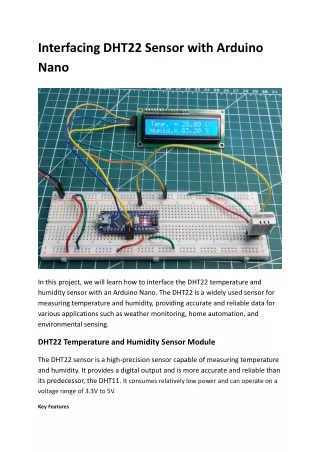
Interfacing DHT22 Sensor with Arduino Nano In this project, we will learn how to interface the DHT22 temperature and humidity sensor with an Arduino Nano. The DHT22 is a widely used sensor for measuring temperature and humidity, providing accurate and reliable data for various applications such as weather monitoring, home automation, and environmental sensing. DHT22 Temperature and Humidity Sensor Module The DHT22 sensor is a high-precision sensor capable of measuring temperature and humidity. It provides a digital output and is more accurate and reliable than its predecessor, the DHT11. It consumes relatively low power and can operate on a voltage range of 3.3V to 5V. Key Features
● High Precision: The DHT22 offers high accuracy in both temperature and humidity measurements. ○ Temperature range: -40°C to 80°C with an accuracy of ±0.5°C. ○ Humidity range: 0% to 100% with an accuracy of ±2-5%. ● Digital Output: Unlike some sensors that provide analog signals, the DHT22 outputs a digital signal, making it easier to interface with microcontrollers like the Arduino. ● Low Cost: It is relatively inexpensive, making it an affordable option for hobbyists and professionals alike. DHT22 Sensor Pinout The DHT22 sensor typically has four pins: 1. VCC: Power supply pin 2. Data: Serial data output 3. NC (Not Connected): No connection (can be left unconnected) 4. GND: Ground pin For connecting to the Arduino Nano, we use only the VCC, Data, and GND pins. The NC pin can be ignored. How Does the DHT22 Work? The DHT22 sensor uses a capacitive humidity sensor and a thermistor to measure the surrounding air and outputs a digital signal on the data pin. The
sensor periodically measures the temperature and humidity and sends the data to the microcontroller. The sensor's working process involves: 1. Humidity Measurement: The capacitive humidity sensor consists of a dielectric material between two electrodes. The capacitance changes with the humidity levels, and this change is converted to a digital signal. 2. Temperature Measurement: The thermistor, a resistor whose resistance changes with temperature, is used to measure temperature. The resistance change is converted into a digital signal. 3. Data Transmission: The sensor sends a digital signal to the Arduino Nano, which processes the data and can be used for various applications. Interfacing DHT22 with Arduino Nano Components Required ● Arduino Nano ● DHT22 sensor module ● 10kΩ resistor ● Breadboard ● Jumper wires Circuit Diagram for Interfacing DHT22 Sensor with Arduino
Pin Connections: 1. DHT22 Sensor: ○ The VCC pin of the DHT22 is connected to the 5V pin on the Arduino Nano, providing the necessary power supply for the sensor. ○ The GND pin of the DHT22 is connected to the GND pin on the Arduino Nano, completing the power circuit. ○ The Data pin of the DHT22 is connected to the digital pin D2 on the Arduino Nano. This pin is used to read the sensor's digital output. 2. 16x2 I2C LCD: ○ The GND pin of the LCD is connected to the GND pin on the Arduino Nano, ensuring a common ground for the entire circuit. ○ The VCC pin of the LCD is connected to the 5V pin on the Arduino Nano, providing power to the LCD. ○ The SDA (Serial Data) pin of the LCD is connected to the A4 pin on the Arduino Nano. This pin is used for transmitting data between the Arduino and the LCD. ○ The SCL (Serial Clock) pin of the LCD is connected to the A5 pin on the Arduino Nano. This pin is used for the clock signal in I2C communication. Working: ● The DHT22 sensor measures the temperature and humidity of the environment and sends the data to the Arduino Nano through the digital pin D2. ● The Arduino Nano processes this data and communicates it to the I2C LCD using the I2C protocol via the SDA and SCL pins. ● The LCD then displays the temperature and humidity readings in a human-readable format. The first row of the LCD displays the temperature, while the second row displays the humidity. Arduino Code for Interfacing the Sensor Module
#include <DHT.h> #include <LiquidCrystal_I2C.h> // Library to Run I2C LCD LiquidCrystal I2C Library by Frank de Barbander 1.1.2 // We are using I2C 16x2 alphanumeric LCD with HD44780 controller LiquidCrystal_I2C lcd(0x27, 16, 2); // Format -> (Address,Columns,Rows ) #define DHTPIN 2 // Define the digital pin where the DHT sensor is connected #define DHTTYPE DHT22 // DHT11 or DHT22, change this according to your sensor type DHT dht(DHTPIN, DHTTYPE); void setup() { dht.begin(); // Initialize the DHT sensor // initialize the lcd lcd.init(); // Turn on the Backlight lcd.backlight(); // Clear the display buffer lcd.clear(); // write column, row lcd.setCursor(0, 0); // Print a message to the LCD. lcd.print("Temp. = "); // write column, row lcd.setCursor(0, 1); lcd.print("Humid.= "); }
void loop() { // Read temperature and humidity from the DHT sensor // In the parameter pass true if temperature is required in fahrenheit, pass false if tempearture is required in celcius float temperature = dht.readTemperature(false); float humidity = dht.readHumidity(); // Check if the sensor reading is valid (non-NaN) if (!isnan(temperature) && !isnan(humidity)) { // write column, row lcd.setCursor(8, 0); // Print a Tempearture to the LCD. lcd.print(temperature); lcd.print(" C "); // write column, row lcd.setCursor(8, 1); // Print a Humidity to the LCD. lcd.print(humidity); lcd.print(" % "); } delay(1000); // Delay for 1 seconds before the next reading } Related Project: Interfacing DHT22 Sensor with Arduino Uno