1 / 2

ITCHELP DESK362-4540

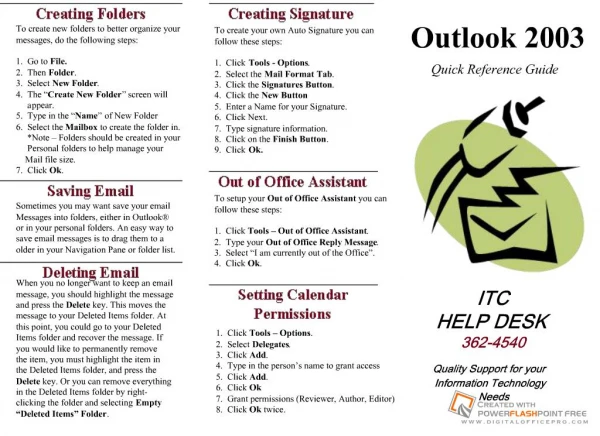
To create your own Auto Signature you can. follow these steps: 1. Click Tools - Options. ... 1. Click Tools Out of Office Assistant. 2. Type your Out of Office Reply Message. 3. ...

Philip
Download Presentation

ITCHELP DESK362-4540

An Image/Link below is provided (as is) to download presentation Download Policy: Content on the Website is provided to you AS IS for your information and personal use and may not be sold / licensed / shared on other websites without getting consent from its author. Content is provided to you AS IS for your information and personal use only. Download presentation by click this link. While downloading, if for some reason you are not able to download a presentation, the publisher may have deleted the file from their server. During download, if you can't get a presentation, the file might be deleted by the publisher.

E N D

Presentation Transcript


    ITC HELP DESK 362-4540 Quality Support for your Information Technology Needs To create your own Auto Signature you can follow these steps: 1. Click Tools - Options. 2. Select the Mail Format Tab. 3. Click the Signatures Button. 4. Click the New Button 5. Enter a Name for your Signature. 6. Click Next. 7. Type signature information. 8. Click on the Finish Button. 9. Click Ok. Outlook 2003 Sometimes you may want save your email Messages into folders, either in Outlook® or in your personal folders. An easy way to save email messages is to drag them to a older in your Navigation Pane or folder list. 1. Click Tools – Options. 2. Select Delegates. 3. Click Add. 4. Type in the person’s name to grant access 5. Click Add. 6. Click Ok 7. Grant permissions (Reviewer, Author, Editor) 8. Click Ok twice. To setup your Out of Office Assistant you can follow these steps: 1. Click Tools – Out of Office Assistant. 2. Type your Out of Office Reply Message. 3. Select “I am currently out of the Office”. 4. Click Ok. To create new folders to better organize your messages, do the following steps: 1. Go to File. 2. Then Folder. 3. Select New Folder. 4. The “Create New Folder” screen will appear. 5. Type in the “Name” of New Folder 6. Select the Mailbox to create the folder in. *Note – Folders should be created in your Personal folders to help manage your Mail file size. 7. Click Ok. Quick Reference Guide When you no longer want to keep an email message, you should highlight the message and press the Delete key. This moves the message to your Deleted Items folder. At this point, you could go to your Deleted Items folder and recover the message. If you would like to permanently remove the item, you must highlight the item in the Deleted Items folder, and press the Delete key. Or you can remove everything in the Deleted Items folder by right- clicking the folder and selecting Empty “Deleted Items” Folder. If you experience problems using Outlook®, you can obtain help from several sources: Office Assistant within Outlook Help Contents and Index Microsoft® Web Site (microsoft.com) ITC Helpdesk Server Folders will be used to view new email and will be accessible via the web at: https://owa.wudosis.wustl.edu/exchange Personal Folders will be used to store already read email and old mail Attachments should be saved to a network share (H: or X: drive) to keep your mail file small. S E R V E R Folders P E R S O N A L Folders In Outlook®, your incoming email is stored in your Inbox. To access your email, click the Inbox folder in the Navigation Pane. Your email is displayed to the right in the Inbox section of the Reader Pane. Then double-click the header of the email message you would like to read. The email text will open in a separate window. Outlook will show a Pop Up Alert, down by your system time, when new email arrive. If your email header includes a paper clip symbol, double-click the message header to open the email. The attached message appears below the subject line. Double-click the file; it will prompt you to Open or Save. Please save ALL attachments out of Outlook to your network drives (X: or H: drives) To create a new message: 1. Click the Inbox folder. 2. Click the New Mail Message button. A blank message appears 3. Type in recipients email address or select the TO button to use an address book. 4. Type in a description within Subject Line 5. Type in the text for the email message 6. Attach a file (if Applicable) Click the Insert File button Find and select the file to attach Click Insert 7. Click the Send button to deliver the message When you receive email messages, you may need to send a response (reply) or send the message to someone else (forward). You can do this by selecting or opening a message and using the toolbar to direct your response. Forward a Message: 1. Select or Open the message to forward. 2. Click the Forward button. 3. Address the message, and click Send. Reply to a Message: (Author Only) 1. Select or Open the message to reply to. 2. Click the Reply button. 3. Address the message, and click Send. Reply to a Message: (Author and Recipients) 1. Select or Open the message to reply to. 2. Click the Reply to All button. 3. Address the message, and click Send.
More Related