Download

1 / 3
0 likes | 7 Views
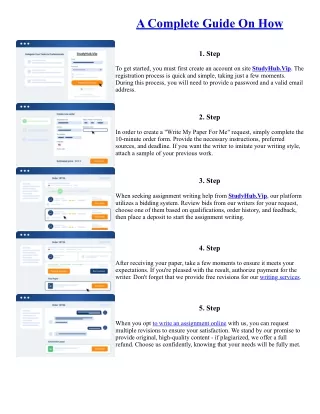
This guide will provide a comprehensive overview of the installation process, highlighting key<br>considerations, necessary tools, and tips to ensure a seamless experience.

E N D
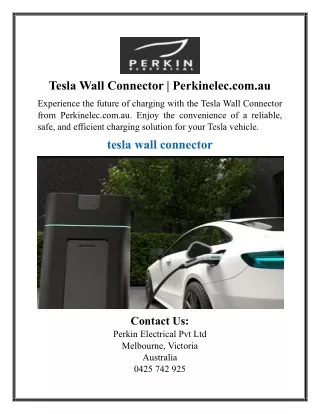
How to Install Your Tesla Wall Connector: A Complete Guide Installing a Tesla Wall Connector is an essential step for Tesla owners who want to ensure that their electric vehicle (EV) is charged efficiently and conveniently at home. The Tesla Wall Connector is not just a charging device; it represents a commitment to a greener future and a lifestyle that embraces innovation. This guide will provide a comprehensive overview of the installation process, highlighting key considerations, necessary tools, and tips to ensure a seamless experience. Understanding the Tesla Wall Connector The Tesla Wall Connector stands out in the realm of EV charging solutions. Designed specifically for Tesla vehicles, it offers fast charging capabilities that significantly reduce the time spent waiting for a full battery. With its sleek design and customizable features, the Wall Connector can be installed in various locations, making it a versatile option for homeowners. One of the remarkable aspects of the Tesla Wall Connector is its ability to deliver up to 44 miles of range per hour of charging, depending on the model of the vehicle and the electrical service available. This means that users can charge their vehicles overnight and wake up to a fully charged battery, ready for the day ahead. Moreover, the device is equipped with Wi-Fi connectivity, allowing users to monitor charging status and receive software updates, enhancing the overall user experience. Preparing for Installation Before diving into the installation process, it is crucial to take a few preparatory steps. First and foremost, assessing the location where the Wall Connector will be installed is vital. Ideally, this should be a place that is both accessible and close to your vehicle's parking space. Many choose to install the charger in their garage, while others prefer an outdoor setting. When selecting a location, consider the following factors: proximity to the electrical panel, ease of access, and any potential obstructions. It is also essential to check local regulations and codes regarding electrical installations, as these can vary significantly by region. Ensuring compliance with these regulations not only guarantees safety but can also prevent potential issues down the line. 1/3
Next, gather the necessary tools and materials for the installation. A standard installation typically requires a drill, screwdrivers, a level, wire cutters, and electrical wire. Depending on the specific requirements of your home, you may also need additional equipment such as conduit and junction boxes. Having everything prepared in advance will facilitate a smoother installation process. Electrical Considerations Installing a Tesla Wall Connector involves working with electrical systems, which can be complicated and potentially hazardous. It is highly recommended to consult with or hire a licensed electrician for the installation. An electrician can ensure that the installation meets all safety standards and local codes, providing peace of mind for the homeowner. The electrician will assess the existing electrical panel and determine whether it can support the additional load of the Wall Connector. In some cases, it may be necessary to upgrade the electrical panel or install a dedicated circuit. This step is crucial, as attempting to charge a Tesla without sufficient electrical capacity can lead to overheating and other safety hazards. Once the electrical assessment is complete, the electrician will run the appropriate wiring from the panel to the installation site. The Wall Connector requires a dedicated circuit, and the electrician will determine the correct gauge of wire needed based on the distance from the panel and the amperage of the circuit. This careful planning ensures that the charger operates efficiently and safely. Installation Steps Once the electrical preparations are in place, the actual installation of the Tesla Wall Connector can begin. The first step involves mounting the Wall Connector to the chosen surface. Using a level, the installer should mark the drilling points on the wall and drill holes accordingly. It is essential to ensure that the Wall Connector is mounted securely; this will prevent any movement or damage during use. Next, the electrical connections must be made. Following the manufacturer’s instructions, the installer will connect the wiring from the electrical panel to the Wall Connector. This step involves stripping the wire ends and connecting them to the corresponding terminals on the device. It is crucial to follow the color- coding of the wires accurately to avoid any electrical mishaps. After making the connections, the Wall Connector’s faceplate can be installed. This component not only protects the electrical connections but also provides a sleek finish to the installation. Finally, the installer should double-check all connections and ensure that everything is secure before turning the power back on. Testing the Installation Once the installation is complete, it is time to test the Tesla Wall Connector to ensure it operates correctly. This step is critical, as it serves as a confirmation that everything has been installed safely and effectively. The user should plug in their Tesla vehicle and monitor the charging process. The Wall Connector features LED indicators that provide real-time feedback on the charging status. If the charging process begins without issues, it indicates that the installation was successful. In the event of 2/3
any problems or error messages, consulting the troubleshooting section of the installation manual or reaching out to Tesla support can provide solutions and guidance. Conclusion Installing a Tesla Wall Connector is a significant investment in time and resources, but the rewards are immense. Homeowners not only gain the convenience of charging their vehicles at home but also contribute to a more sustainable future. By following the steps outlined in this guide and ensuring compliance with electrical safety standards, anyone can successfully install their Tesla Wall Connector. In conclusion, embracing electric vehicle technology has never been easier, and the Tesla Wall Connector stands as a testament to that innovation. For those looking to enhance their EV ownership experience, Forward offers additional resources and support to ensure that the transition to electric driving is as smooth as possible. With the right preparation, tools, and professional guidance, charging your Tesla at home can become a seamless and efficient part of your daily routine. 3/3