Download
1 / 7
150 likes | 286 Views
In these Marvelous Designer 6 review, you’ll learn all about all the new features in Marvelous Designer 6 and we’ll go through a detailed review of all feature updates in the new Marvelous Designer 6 software. Visit here for more info - https://cgelves.com/free-marvelous-designer-6-video-tutorials-review-of-all-new-md6-features/

E N D
Marvelous Designer Beginners Course & Advanced Workshops for CG & 3D artists. Free Marvelous Designer 6 Video Tutorials & Review of ALL New MD6 Features! In these Marvelous Designer 6 review, you’ll learn all about all thenew features in Marvelous Designer 6and we’ll go through a detailed review of all feature updates in the new Marvelous Designer 6 software. From these free Marvelous Designer 6 tutorials, you will learn the best creative and most effective ways how to use the new features in Marvelous Designer software version 6 when creating dynamic 3d clothes for your projects. https://cgelves.com/free-marvelous-designer-6-video-tutorials-review-of-all-new-md6-features/ #1 – Marvelous Designer Buttons & Buttonholes In Marvelous Designer 6 we can now easily create buttons of various shapes as well as button-holes. You can customize the buttons; control the size and weight of buttons, change the colors, textures, angle, and sewing position. Buttonholes can also be customized to some extent. MD6 provides several buttonhole and button presets which suffice for most needs. Super cool new feature! It’s easy to create buttons and buttonholes at an exact same distance from each other. You’ll learn in this 38 minuteMarvelous Designer 6 buttons video tutorial all about buttons & buttonholes, the best way to make them and best practices of how to customize them. #2 – New Way to Create Symmetric Patterns in Marvelous Designer
In Marvelous Designer 6 we no longer have to copy a pattern and then symmetric paste it, we can save ourselves the copying step and simply right-click on the pattern and select “Clone as Symmetric Pattern (with sewing)”. #3 – Symmetrization in Marvelous Designer 6 Another cool Marvelous Designer 6 new feature is we can now apply Symmetry automatically to multiple patterns! #4 – Offset Pattern Outline New Feature in MD6 In this free Marvelous Designer 6 tutorial you’ll learn all about the new “Offset Pattern Outline Feature”, which is is another interesting feature in MD6. Discover how to use it for different creative designs. #5 – New Options to Arrange Pattern Pieces, Internal Lines & Segment Points (Align, Distribute) Now there’s no excuse anymore for having a mess in your 2D pattern window! In Marvelous Designer 6 we’ve got some new Align & Distribute options which lets us quickly get our pattern pieces out of any mess they might be in, and nicely aligned.
You can align segment points, internal lines and points of internal lines, as well as patterns. Watch the tutorial below. #6 – Solidify Wrinkles (Keep Certain Folds & Wrinkles the Same during Simulation/ Animation) OK, so you’ve tugged, pulled and arranged your wrinkles to perfection on a specific Marvelous Designer clothing pattern for a certain pose, and wish to keep all the folds and wrinkles perfect during simulation. That used to be a big issue. At times a Battle. Now finally the new Marvelous Designer 6 featurecalled ‘Solidify’ enables you to pretty much “freeze” your great looking wrinkles, so when you animate the clothes or simulate the garment, those wrinkles on that specific pattern don’t ever change! This will save you so much time and nerves and for some of you – sculpting those extra wrinkles in ZBrush. #7 – Marvelous Designer Steam Tool The new Marvelous Designer Steam feature is positioned as a great way to flatten out undesired wrinkles or lumpy areas of your clothes. Well, it’s actually not a magic pill. What it basically does is either shrink or expand parts of your cloth (like a local shrinkage weft/warp operation). So if you have no idea how to sew and your clothes are full of ugly wrinkles, you can smooth them out with the Steam feature BUT it will make the clothes very, very tight (and ugly). (Best learn to sew properly – Learn Marvelous Designer A-Z!) Tight garments can be an issue when you want to fit Marvelous Designer clothes to Avatars in iClone or Marvelous Designer to DAZ or Poser etc. So not ideal to do this… However, IMO there’s a Better Way to use the Steam feature in MD6: You can use it instead of elastic bands to cause any part of the cloth to bunch up
like an elastic gathering effect or thicker waistband. Somewhat like if you took a real-life iron and pressed it on a plastic material like Polyester at high heat… It makes this Steam tool quite useful. It makes this Steam tool quite useful. With the usual method of creating elastic waistbands with an internal line, results in a thinner elastic band effect, while using the steam tool can create a wider gap between the gathers. Watch this tutorial to learn all about the Steam feature in Marvelous Designer 6! #8 More Control over Avatars & Props Another very useful feature in Marvelous Designer 6 (which I requested a while ago) is the ability to delete individual Avatars and Props instead of having to delete ALL Avatars/ Props as in previous MD versions. (Right-click on the desired Prop/ Avatar you wish to delete and select “Delete Avatar” or “Delete Scene/ Prop”.) Marvelous Designer 6 also records in the History actions to do with Avatars and Props, such as moving the Avatars, even just Selecting them, adding/ deleting Avatars/ Props etc. So if you by mistake delete for instance a zipper puller you finally got into the right angle and position, you can always undo that now.
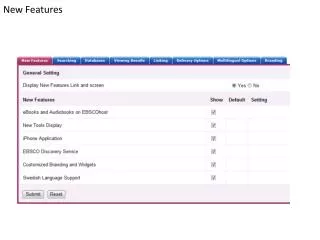
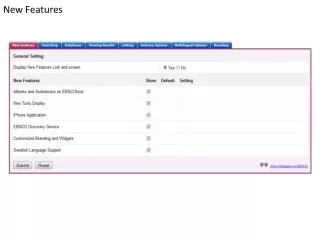
#9: Lock All Graphics on Patterns This new Marvelous Designer 6 feature makes it easier to select patterns which have many 2D graphics overlaid on them (such as stitches, text, decor etc.). Previously, it would be impossible to scale a pattern covered in 2D graphics. In MD5.5 if you scaled it and the graphics went out beyond the pattern edge, Marvelous Designer would block the action. Now you can scale, stretch, distort to your heart’s content. Watch this Marvelous Designer 6 feature review tutorial below. #10: The MD6 New Chalk Tool
With the new Chalk tool you can draw guidelines directly onto your clothes in the 3D Garment Simulation Window. Watch the video tutorial to learn what can be done with the new chalk tool in Marvelous Designer 6 and how to create chalk line, turn chalk lines into internal lines and internal shapes and delete chalk lines. #11: Animation Time Warp In Marvelous Designer 6 you can speed up or slow down the cloth animations you recorded in the Animation tab. Watch this free Marvelous video tutorial on how to use Animation Time Warp feature. Other Important New Features in Marvelous Designer 6 You now have the ability to crop your textures to a specific pixel size when exporting your garment and saving out surface textures. When you edit the UVs of your clothes you can now see the piping lines and change their position on your UV map. Improved: Move Garment to Start Position. When you import an animation (walk, run, whatever) for your Avatar, you need to transition him from T- pose/ A-pose to the start position of the animation. MD previously already had the ability to create a transition animation, and now they’ve improved on it further. Delete ALL Curve Points on a pattern (previously you had to delete one by one – agony!!). To delete all curve points, right click with your edit curve point tool on one curve point and select “Delete All Curve Points”. Ta da!
I hope these Marvelous Designer 6 tutorials help you! =) Leave a comment here below if you have any questions or remarks about the new features in MD6 and let us know how you use these features and tools, or if you have any suggestions to share or insights to add to this Marvelous Designer review of new features. Subscribe for more Marvelous Designer videos and like our Facebook page for contests and updates. If you need to learn to make dynamic 3D clothes consider our Marvelous workshops or full Mastering Marvelous Designer training program. We also provide Marvelous Designer clothing templates to significantly speed up production time as well as a gorgeous seamless fabric texture library for 3D cloth. If you enjoyed reading this article, then please tell your friends about it. This helps us Elves get the word out, so more fellow artists can benefit! All goes hand in hand - Blessings to you the Elves shall send! :) Website:-https://cgelves.com/free-marvelous-designer-6-video-tutorials-review- of-all-new-md6-features/