Download
1 / 4
0 likes | 6 Views
Installing Metal Pipe Joints is a crucial step in ensuring a secure and durable piping system. Kyoto Automation Systems Sdn Bhd provides a detailed step-by-step guide to effectively install these components. Metal Pipe Joints are essential for connecting and securing pipes in various industrial applications. Our guide covers everything from selecting the right joints to proper sealing techniques, ensuring a leak-proof installation. With expert tips and clear instructions, youu2019ll achieve reliable and long-lasting results. Trust Kyoto Automation Systems Sdn Bhd for all your Metal Pipe Joints.

E N D
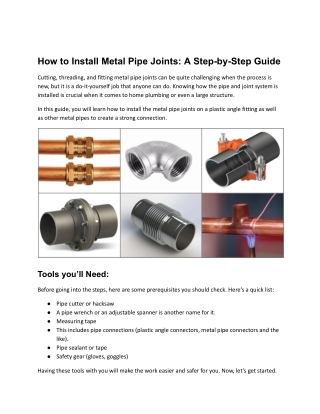
How to Install Metal Pipe Joints: A Step-by-Step Guide Cutting, threading, and fitting metal pipe joints can be quite challenging when the process is new, but it is a do-it-yourself job that anyone can do. Knowing how the pipe and joint system is installed is crucial when it comes to home plumbing or even a large structure. In this guide, you will learn how to install the metal pipe joints on a plastic angle fitting as well as other metal pipes to create a strong connection. Tools you’ll Need: Before going into the steps, here are some prerequisites you should check. Here’s a quick list: ● Pipe cutter or hacksaw ● A pipe wrench or an adjustable spanner is another name for it. ● Measuring tape ● This includes pipe connections (plastic angle connectors, metal pipe connectors and the like). ● Pipe sealant or tape ● Safety gear (gloves, goggles) Having these tools with you will make the work easier and safer for you. Now, let’s get started.
Step 1: Measure and Cut the Pipes Measuring and cutting the metal pipes are the first steps to installing a pipe and joint system. This means you must ensure that each piece fits neatly into its joint. Measure the length you need using measuring tape very close to the actual length for your project. When you’ve identified the pipes, cut through as needed with a pipe cutter and hacksaw, when cutting with a hacksaw, make sure to go slow so you do not have uneven edges. When the pipes have been cut, use a file to smooth out any rough edges if the cuts do not allow the joints to fit correctly. Step 2: Attach Plastic Angle Fittings At key junctions where corners are formed or bends made in the setup, plastic angle fittings are often used in many pipe systems. Lightweight, easy to install, and durable fittings. Then, simply align it with the end of the pipe so that before you let it sit tight. The vast majority of modern plastic angle fittings have threading, which simply has to be tightened. Once the system is under pressure, you want to make sure its fitting is properly aligned; otherwise, this can create leaks or misalignment. Step 3: Build the Pipe and Joint System After you cut your pipes and have your plastic angle fittings in place, it’s time to marshal your pipe & joint system. Connect the first pipe to the right joint. The joints may be threaded or push-fit on your system. In your case, with threaded joints, it is a good idea to put a bit of pipe sealant or tape around the threads to make sure this isn't a leaky seal. Start by tightening the joints, some by hand and some with a wrench, to make sure they are secure. It’s important not to overtighten, as that may damage the threads or pipe itself. Step 4: Ensure Proper Alignment Remember to line up each pipe and joint as you continue assembling the system. Stress on the system stemming from misalignment can result in leaks or, worst case, pipe failure. If you’re doing a large or complex structure, try using a level or measuring tool to check that the pipes are put where they should be.
If you're working with a pipe and joint system that involves multiple angles, using plastic angle fittings can make the process much smoother. These fittings can help you create precise bends without having to manipulate the pipe directly, saving you time and effort. Step 5: Test for Leaks After the pipes and joints are all fully put in, you have to test the system for leaks. However, without turning on the water or pressurizing the system, look at each joint very carefully. If any signs of dripping or moisture are found, look for them. If you’ve got a leak, just turn the joint up a teenie bit more or squeeze in some more sealant to the threads. If you do, it’s a good idea to test the system for several hours to make sure that everything can handle pressure. With a setup that’s too large, break down the system into stages and test the entire system section by section to be sure that each section is leak-free before moving to the next. Step 6: Final Adjustments Then, after you confirm that everything is sealed properly, you can put the last touches on the system. This may well involve clamping pipes in place, adjusting angles, or ensuring everything is level. Last of all, check the plastic angle fittings and the metal pipe connections and don’t forget to complete the idea once they look good. Adjusting them at this stage will prolong the life of your pipe system and prevent future problems. Troubleshooting Common Issues: No doubt, a pipe and joint system is a fairly easy one to install, but there are a few common problems that are apt to crop up during the process. Here are some tips for troubleshooting: ● Leaking joints: If you notice a small leak, just make sure that the joint is tight and that the pipe sealant or tape is installed properly. This leaking connection might also be because the thread on the fitting is damaged, and you would need to replace it. ● Misalignment: If pipes aren't lining up properly, check for the correct installation of the plastic angle fittings. Pull and push the pipes or fittings until they meet perfectly. ● Loose fittings: Pressure changes can eventually loosen joints. In larger systems, check all joints periodically and retighten them if necessary.
Why Choose a Pipe and Joint System? Flexible and easy to install are some of the main advantages of using a pipe and joint system. A pipe and joint system goes up fast and easily, unlike the labor-intensive process of traditional piping methods, which usually call for welding or complicated fittings. In addition, plastic angle fittings allow us to use a lightweight and efficient method of creating corners and bends without a lot of cut and fit. It is a perfect system for smoking pipes, small plumbing repairs, toilet and tapware repairs, and similar jobs or even larger construction projects. It’s modular, so it can be easily modified and extended as needed in the future. Conclusion Installing metal pipe joints doesn’t have to be a difficult undertaking. Thankfully, you can easily set up a pipe and joint system with the right tools and fittings by following this step-by-step guide. When you have assembled it, remember to first check it for any leaks before attaching the plastic angle fittings and cutting and matching your pipes carefully. Once you get used to it, with some patience and attention to detail, you will end up with a sound, leak-free piping system. Contact Us: Kyoto Automation Systems Sdn Bhd Tel :(+6) 03 8061 2555 Email:sales@kyoto.com.my