Drivers and Insurance
Drivers and Insurance<br><br><br>DOWNLOAD HERE: https://theacademicessays.com/downloads/exploring-access-capstone-drivers-insurance/<br><br>Project Description: <br>In this project, you will add fields to a table and set data validation rules. You will also import a text file into a database, design advanced queries, and create a navigation form. Additionally, you will use SQL to modify a record source and create an embedded macro to automate opening a report.<br> <br>Instructions: <br>For the purpose of grading the project you are required to perform the following tasks: <br>Step Instructions Points Possible<br>1 Start Access. Open the file named exploring_a_capstone_grader.accdb. Save the database as exploring_a_capstone_grader_LastFirst. 0<br>2 Create a table in the database by importing the downloaded delimited text file named Insurance_Text.txt. Use the first row of the file as field names, use InsuranceID as the primary key, and then name the table InsuranceCos_Text. Accept all other default options. Do not save the import steps. 6<br>3 Create a new field in the Agency Info table after InsPhone named Web site with the Hyperlink data type. Save the table. In Datasheet view, add the Web site http://William_Smith.com to the <br>William Smith record (1). 6<br>4 Create a new field in the Agency Info table after Web site named AgentPhoto with the Attachment data type. Save the table. In Datasheet view for Record 1 (William Smith), add the downloaded picture file named a00c2WmSmith.jpg to the AgentPhoto field. 6<br>5 Set the validation rule of the InsuranceCo field to accept the values AS, NAT, or SF only. Set the validation text to read Please enter AS, NAT, or SF. (include the period). 7<br>6 Make InsuranceCo a lookup field in the Agency Info table. Set the lookup to get values from the InsuranceID field in the InsuranceCos_Text table. Accept all other defaults and save the table. In Datasheet view, click in any InsuranceCo cell and click the arrow to view the options. Close the table. 6<br>7 Create a new query using Design view. From the Insurance table, add the DriverID, AutoType, TagID, and TagExpiration fields (in that order). Save the query as Missing Tag Dates. 5<br>8 Set the criteria in the TagExpiration field to find null values. Run the query (two records will display). Save and close the query. 5<br>9 Create a new query using Design view. From the Drivers table, add the Class field. Change the query type to Update and set the criteria to update drivers whose class is Minor to Junior. Run the query (eight records will update). Save the query as Driver Class_Update and close the query. View the updates in the Drivers table and close the table. 9<br>10 Create a new query using Design view. From the Drivers table, add the Class field. Save the query as Driver Class_Delete. 4<br>11 Change the query type to Delete and set the criteria to delete drivers whose class is Special. Run the query (one record will delete). Save and close the query. View the changes in the Drivers table and close the table. 6<br>12 Create a new query using Design view. From the Insurance table, add the DriverID, AutoType, AutoYear, and TagID fields (in that order). Save the query as Auto Year_Parameter. 5<br>13 Set the criteria in the Auto Year field to display the prompt as Enter the auto year: and run the query. In the prompt, enter 2007 and click OK to view the results (two records). Save and close the query. 5<br>14 Use the Performance Analyzer to analyze the Drivers table. Note the idea to change the data type of the Weight field from Short Text to Long Integer. In the Drivers table, set the data type of the Weight field to Number (Long Integer) and save and close the table. 5<br>15 Create a Navigation form based on the Vertical Tabs, Left template. Drag and drop the Drivers form onto the first tab of the form. Drop the Insurance form onto the second tab. 7<br>16 Drag and drop the Drivers report onto the third tab of the Navigation form. View the form in Form view, click each of the tabs, and then save the form as Navigator. Close the form. 4<br>17 Open the Drivers report in Design view. Modify the record source of the report using a SQL statement to select all Drivers records with a Class of Adult. Print Preview the report (eight records will display). Save and close the report. 5<br>18 Open the Drivers form in Design view, click to add a command button at the intersection of the six-inch mark on the horizontal ruler and the three-inch mark on the vertical ruler. 3<br>19 Set the command button to open the report named Drivers. Use the default picture as the button. Set the name and the caption of the button to Open Drivers Report. Save the form. View the form in Form view and click the command button. 6<br>20 Close all database objects, close the database, and then exit Access. Submit the database as directed. 0<br> Total Points 100<br><br> <br>

Drivers and Insurance
E N D
Presentation Transcript
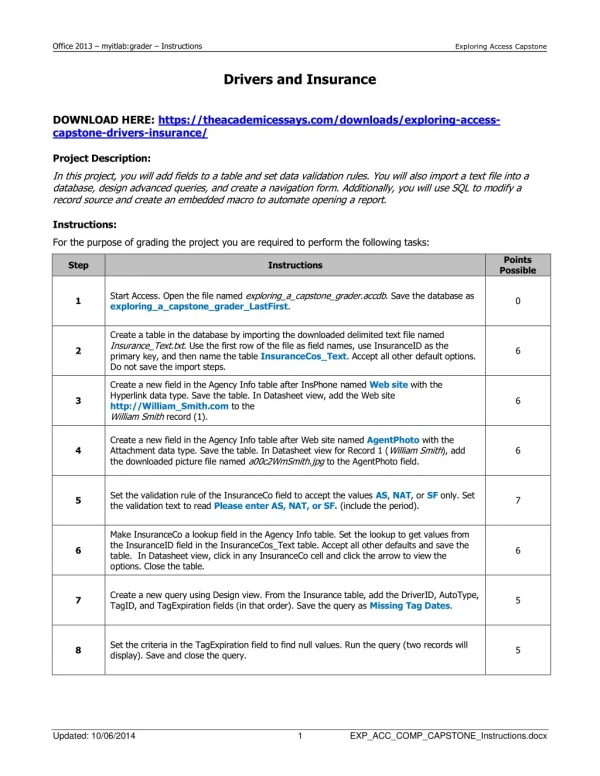
Office 2013 – myitlab:grader – Instructions Exploring Access Capstone Drivers and Insurance DOWNLOAD HERE: https://theacademicessays.com/downloads/exploring-access- capstone-drivers-insurance/ Project Description: In this project, you will add fields to a table and set data validation rules. You will also import a text file into a database, design advanced queries, and create a navigation form. Additionally, you will use SQL to modify a record source and create an embedded macro to automate opening a report. Instructions: For the purpose of grading the project you are required to perform the following tasks: Points Possible Step Instructions Start Access. Open the file named exploring_a_capstone_grader.accdb. Save the database as exploring_a_capstone_grader_LastFirst. 1 0 Create a table in the database by importing the downloaded delimited text file named Insurance_Text.txt. Use the first row of the file as field names, use InsuranceID as the primary key, and then name the table InsuranceCos_Text. Accept all other default options. Do not save the import steps. 2 6 Create a new field in the Agency Info table after InsPhone named Web site with the Hyperlink data type. Save the table. In Datasheet view, add the Web site http://William_Smith.com to the William Smith record (1). 3 6 Create a new field in the Agency Info table after Web site named AgentPhoto with the Attachment data type. Save the table. In Datasheet view for Record 1 (William Smith), add the downloaded picture file named a00c2WmSmith.jpg to the AgentPhoto field. 4 6 Set the validation rule of the InsuranceCo field to accept the values AS, NAT, or SF only. Set the validation text to read Please enter AS, NAT, or SF. (include the period). 5 7 Make InsuranceCo a lookup field in the Agency Info table. Set the lookup to get values from the InsuranceID field in the InsuranceCos_Text table. Accept all other defaults and save the table. In Datasheet view, click in any InsuranceCo cell and click the arrow to view the options. Close the table. 6 6 Create a new query using Design view. From the Insurance table, add the DriverID, AutoType, TagID, and TagExpiration fields (in that order). Save the query as Missing Tag Dates. 7 5 Set the criteria in the TagExpiration field to find null values. Run the query (two records will display). Save and close the query. 8 5 Updated: 10/06/2014 1 EXP_ACC_COMP_CAPSTONE_Instructions.docx
Office 2013 – myitlab:grader – Instructions Exploring Access Capstone Points Possible Step Instructions Create a new query using Design view. From the Drivers table, add the Class field. Change the query type to Update and set the criteria to update drivers whose class is Minor to Junior. Run the query (eight records will update). Save the query as Driver Class_Update and close the query. View the updates in the Drivers table and close the table. 9 9 Create a new query using Design view. From the Drivers table, add the Class field. Save the query as Driver Class_Delete. 10 4 Change the query type to Delete and set the criteria to delete drivers whose class is Special. Run the query (one record will delete). Save and close the query. View the changes in the Drivers table and close the table. 11 6 Create a new query using Design view. From the Insurance table, add the DriverID, AutoType, AutoYear, and TagID fields (in that order). Save the query as Auto Year_Parameter. 12 5 Set the criteria in the Auto Year field to display the prompt as Enter the auto year: and run the query. In the prompt, enter 2007 and click OK to view the results (two records). Save and close the query. 13 5 Use the Performance Analyzer to analyze the Drivers table. Note the idea to change the data type of the Weight field from Short Text to Long Integer. In the Drivers table, set the data type of the Weight field to Number (Long Integer) and save and close the table. 14 5 Create a Navigation form based on the Vertical Tabs, Left template. Drag and drop the Drivers form onto the first tab of the form. Drop the Insurance form onto the second tab. 15 7 Drag and drop the Drivers report onto the third tab of the Navigation form. View the form in Form view, click each of the tabs, and then save the form as Navigator. Close the form. 16 4 Open the Drivers report in Design view. Modify the record source of the report using a SQL statement to select all Drivers records with a Class of Adult. Print Preview the report (eight records will display). Save and close the report. 17 5 Open the Drivers form in Design view, click to add a command button at the intersection of the six-inch mark on the horizontal ruler and the three-inch mark on the vertical ruler. 18 3 Set the command button to open the report named Drivers. Use the default picture as the button. Set the name and the caption of the button to Open Drivers Report. Save the form. View the form in Form view and click the command button. 19 6 Close all database objects, close the database, and then exit Access. Submit the database as directed. 20 0 Updated: 10/06/2014 2 EXP_ACC_COMP_CAPSTONE_Instructions.docx
Office 2013 – myitlab:grader – Instructions Exploring Access Capstone Points Possible 100 Step Instructions Total Points Updated: 10/06/2014 3 EXP_ACC_COMP_CAPSTONE_Instructions.docx