Download

1 / 4
0 likes | 3 Views
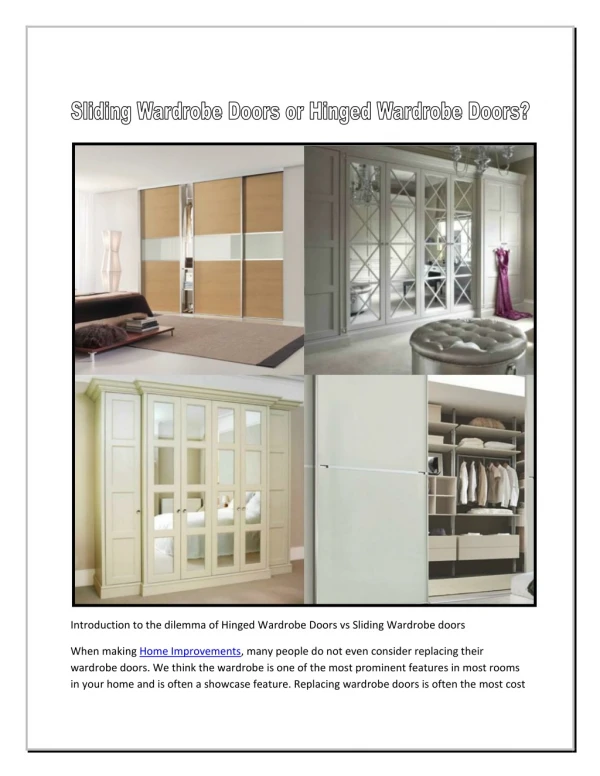
Discover sliding wardrobe door styles, benefits, and a step-by-step guide to fitting them. Ideal for small UK spaces and modern bedrooms.

E N D
How to Fit Sliding Mirror Wardrobe Doors Step by Step Guide? Sitting by the window pane and staring across the wall to install sliding mirror wardrobe doors? Perhaps you have eyed those glossy panels in a friend’s Oxford townhouse or admired the way they bounce light around, don’t they? They can make even the smallest space feel bright and spacious. Fitting mirror sliding door wardrobe is a brilliant way to add a touch of elegance and light to any dimly lit bedroom. Let’s bring a touch of magic into your own home. Dreamztime has brought a step-by-step guide on how to fit sliding wardrobe doors. No need to call in the cavalry, you have a free afternoon, make a sturdy cuppa and let your DIY spirit flow! Step 1. Let’s Begin With Instructions! Got your cuppa? Till vapours are still wafting in the air, gather your tools! Now, roll up your sleeves and give yourself a clear stretch of space. Let the transformation begin! Take out your measuring tape and observe everything with your keen eye in detail. We promise you, you will soon have those sliding mirror doors gliding as smoothly as a London cabbie on a quiet Sunday morning. Now, follow this list of tools you will need! Tool Purpose
Tape Measure For accurate measurement of your wardrobe opening and tracks Spirit Level Ensures tracks and doors are perfectly aligned and level Screwdriver For fixing tracks and fittings Drill To make holes and to speed things up Pencil and Masking Tape To mark positions without damaging surfaces Screws and Wall Plugs To securely fix tracks and components supplied with the kit Hacksaw To trim tracks to the correct length if needed Sliding Mirror Wardrobe Doors & Track Set Check all the fittings are present A Blanket or Towel To lay mirror doors down to prevent scratches while assembling Now, once you have gathered everything, you must double-check whether you have every bracket, screw, and fitting before starting or not. Read More: 10 Best Small Kids Wardrobes with Drawers for Storage Step 2. Measure Up Every Inch No time to indulge in the pragmatics of sliding mirror wardrobe doors! Take your tape measure and measure the width and height of your wardrobe opening at three points, left, centre, and right; top, middle, and bottom. Take heed, always use the smallest measurement as it is a necessary step. Now, let’s mark out where your tracks will sit on the floor and ceiling (or pelmet) with a pencil or a strip of masking tape. Clear away any old fittings or rusty screws, and give the area a proper tidy. Dust and debris will be the hindrances and mirrored sliding wardrobe doors installation will not be any smoother. Step 3. Cut and Fix the Tracks Observe carefully, and if your tracks aren’t already the perfect length, use a hacksaw to trim them to size. Always start with the top track, hold it in place, check for perfect alignment with a spirit level, and mark your fixing points. All
done? Time to drill pilot holes and screw the track securely to the ceiling or wardrobe frame. Don’t let it shake too much. Have a steady hand, love! Now repeat with the bottom track and ensure it’s perfectly aligned with the top for the mirror sliding door wardrobe. If you have a carpeted floor, press the track firmly into the pile. If you have wooden or concrete floors, use the appropriate screws or plugs. No mess up here as it will leave you with wonky doors, so take your time here. Step 4. Need to Assemble the Doors Already have assembled sliding mirror wardrobe doors? You can skip this step. However, if your sliding mirror doors arrive flat-packed, it’s time to assemble the frames as per the manufacturer’s instructions. For mirrored panels, avoid screwing directly into the glass. You must use the supplied brackets or a dab of silicone to secure them safely in their frames. Now, fit the wheels to the bottom of each door and the guides to the top, using the pre-drilled holes. Remember, you should not make them overtighten or leave them too loose. Mirrors might be sturdy, but not invincible. Innit, Love? Read More: How Much Do Fitted Wardrobes Cost? Size, Style & Materials Step 5. Now, Glide & Click, Slot the Doors onto the Tracks This is the most satisfying part of our ‘How to Fit Sliding Wardrobe Doors guide!’ You must start with the rear-most door if you have two or more. Now, tilt the door slightly and lift it into the top track. Lower the bottom wheels into the bottom track. Did you hear any sound? You should feel it settle into place with a gentle click. Yes? Let’s proceed further because it’s time to repeat with the front doors, alternating tracks if you’ve got three or four doors. Take care not to scratch the tracks or the mirror surface as you go. Step 6. Fine-tune it for a Perfect Glide Still doesn’t glide as it should? It needs adjustments. You should use the adjustment screws on the bottom wheels to tweak the height and angle of each door. Now, a few turns clockwise or anti-clockwise will raise or lower the door. This step will help you achieve a smooth overlap and smooth sliding function for mirror sliding wardrobe doors. Let’s check the doors are plumb with a spirit level and that they don’t rub or stick. If your doors include anti-jump clips, you should add them now. These clever little things will stop the doors from going off the tracks if nudged too enthusiastically by children or pets.
Step 7. Let’s Give it Finishing Touches The moment is here to give it a premium finish! Let’s apply bumper tape to the door edges for a soft, cushioned close. If your kit includes a soft-close mechanism, you can fit it according to the instructions. It will provide your mirrored sliding wardrobe doors with a gentle glide. Let’s give the mirrors a once-over with a lint-free cloth and glass cleaner. Let it sparkle as there’s nothing like the sparkle of a freshly installed mirrored door to make your craftsmanship shine. Read More: How Can You Design and Decorate a Loft Bedroom for Any Space? Dreamztime’s Pro Tips for You! ● Always check for hidden pipes or wiring before drilling. ● If your opening is too tall, you must use height reducers or spacer blocks for a perfect fit. ● For angled ceilings, choose specialist brackets to ensure a perfect finish. You have done quite a remarkable job, innit? Let’s step back and admire all the hard work you have done today! Slide your new doors back and forth with pride, Love! Now, you know exactly ‘how to fit sliding wardrobe doors’ and you have finally installed it all by yourself. Let the light bounce around the room, and your space will feel airy and brighter than ever! Source Url: https://dreamztime.com/blogs/how-to-fit-sliding-mirror-wardrobe-doors-step-by -step-guide/