Download

1 / 7
0 likes | 8 Views
Discover expert tips for installing and maintaining bathroom sink taps with our comprehensive presentation by Bathroom Hive. Learn step-by-step installation processes, essential pre-installation preparation, and effective maintenance strategies to keep your taps functioning perfectly. Whether you're a DIY enthusiast or a homeowner, this guide offers valuable insights to ensure a professional finish and long-lasting performance for your bathroom sink taps.<br>

E N D
INSTALLATION AND MAINTENANCE TIPS FOR BATHROOM SINK TAPS By Bathroom Hive Read More
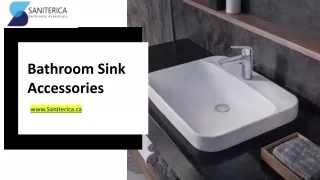
INTRODUCTION Welcome to our guide on installing and maintaining bathroom sink taps! This presentation by Bathroom Hive will walk you through the essential steps for a hassle-free installation and tips to keep your taps in top condition. Whether you’re a DIY enthusiast or a homeowner looking to save on plumbing costs, these practical insights will help you achieve a professional finish.
PRE-INSTALLATION PREPARATION Before you begin installing taps for bathroom sink, gather all necessary tools: an adjustable wrench, plumber’s tape, and a basin wrench. Ensure you have the correct tap for your sink type. Turn off the water supply and prepare the area by cleaning the sink surface. This preparation step is crucial for a smooth and efficient installation process.
INSTALLING THE TAP Start by positioning the tap into the mounting hole on the sink. Secure it with the provided nuts and washers underneath. Connect the water supply lines to the corresponding hot and cold inlets, ensuring they are tight but not over- tightened. Use plumber’s tape on the threads to prevent leaks. Double-check all connections before turning on the water supply.
MAINTENANCE TIPS Regular maintenance of your bathroom sink taps includes cleaning the aerator to remove mineral buildup, checking for leaks, and tightening any loose parts. Use a mild cleaning solution to avoid damaging the tap’s finish. Periodically inspect the supply lines for signs of wear and replace them if necessary. Proper maintenance ensures the longevity and performance of your taps.
TROUBLESHOOTING COMMON ISSUES If you encounter issues such as low water pressure or leaks, start by checking the aerator for clogs. For persistent leaks, inspect the O-rings and seals, replacing them if worn out. Address any corrosion or buildup around the connections. If problems persist, consult the manufacturer’s guide or seek professional plumbing assistance. Keeping your taps in good shape avoids costly repairs and replacements.