Download
1 / 9
90 likes | 259 Views
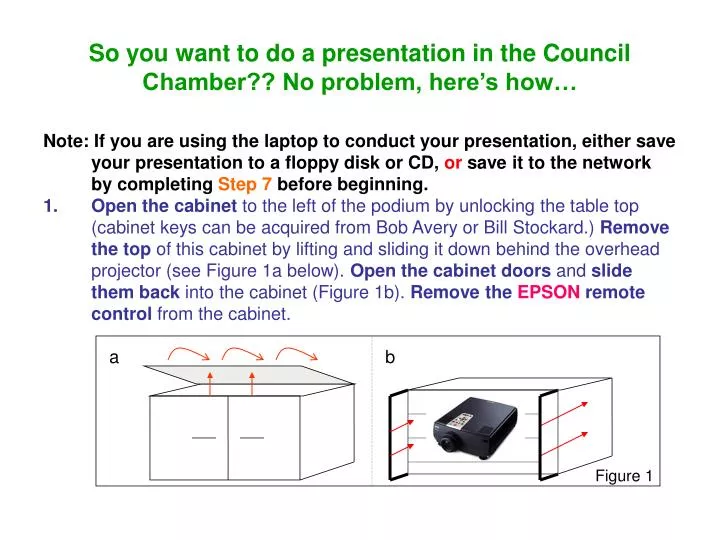
So you want to do a presentation in the Council Chamber?? No problem, here’s how…. Note: If you are using the laptop to conduct your presentation, either save your presentation to a floppy disk or CD, or save it to the network by completing Step 7 before beginning.

E N D
So you want to do a presentation in the Council Chamber?? No problem, here’s how… Note: If you are using the laptop to conduct your presentation, either save your presentation to a floppy disk or CD, or save it to the network by completing Step 7 before beginning. • Open the cabinet to the left of the podium by unlocking the table top (cabinet keys can be acquired from Bob Avery or Bill Stockard.) Remove the top of this cabinet by lifting and sliding it down behind the overhead projector (see Figure 1a below). Open the cabinet doors and slide them back into the cabinet (Figure 1b). Remove the EPSON remote control from the cabinet. a b Figure 1
Basic Setup • Unlock and open the slim cabinet to the left of the projector cabinet. Turn on the power strip located on the floor inside. On the left side of this cabinet, there are two silver switches. Push the bottom switchupwards until the bottom of the overhead projector is level with the tabletop. Push the top switch up to lock the shelf into place. • Turn on the remote control by moving the RC (remote control) On/Off switch to the On position. • You will need to lower the projector screen. If you are facing the wall opposite the projector, the switch used to lower and raise the screen is located on the back left side of this wall. Press it all the way down to lower the screen. • Open the front cover of the remote control. If your presentation requires a video cassette or the overhead projector, press “Video” and go to Step 6. For presentations using the laptop, press “Comp 1” and proceed to Steps7-12.
Overhead Projector Setup • Lift the head of the overheard projector (Elmo) while pressing the gray “Unlock” button until it’s in an upright position. Next, lift Elmo’s tube lights into an upright position. Activate Elmoby pressing one of the “LAMP” buttons; “BASE On/Off” for viewing overhead transparencies or “Upper On/Off” for paper displays (see Figure 2 below). • To play video cassette tapes, press Elmo’s AV1 button and insert video cassette into VCR. Operate VCR using it’s own remote control. Elmo Control Panel LAMP INPUT BASE UPPER AV1 ON/OFF ON/OFF ON/OFF Paper Displays Transparencies Video Figure 2
Preparing to Use the Laptop • If you chose not to save your presentation on a floppy or CD, you will need to use your own personal computer to save your presentation to a special folder on the network. This will allow you to access your presentation from the laptop in the Council Chambers. • From within your presentation, click on the “File Menu” and “Save As.” • Click on the pull down menu labeled “Save In.” • Browse down the following folders: • My Network Places • (see picture this page) • Entire Network • Microsoft Windows Network • Ch • Chfs • Users • Cclaptop • Title your document with a name that you will remember and click “Save.” !!WARNING: In this folder, all users have access to open, modify, and delete all files. Back-upyour presentation on your own computer!!
Using the Laptop in the Council Chamber, 1 • In the Council Chamber, open up the cabinetdirectly under the podium and remove the laptop, mouse, and speakers (if your presentation requires sound). Place these items on top of the podium. • Find the projector’s video cable and power chord inside the cabinet (the chords are labeledwith masking tape as “Laptop Elmo Cable” and “Laptop Power Chord”). Shift the cables up through the opening in the top of the podium. The connections for these cables are located in the far right corner of the laptop if you are looking at it from the back, (see Figure 3 below).Connect the power chord to the laptop. Plug the video cable into the laptop’s video (monitor) port and tighten the screws. Laptop Power Chord Laptop Elmo Cable Figure 3
Using the Laptop, 2 • Connect the mouse and speakers (if you require sound) into the laptop. The mouse connection is at the back of the laptop. The speaker port is on the right side of the laptop with a picture of headphones over it. Also plug the speakersinto the power strip inside the cabinet. • Open the laptop by pressing the latch on the front. • If you require sound, turn on the speakers using the volume dial on the speakers. Using the projector remote control from Step 5,turn the projector on by pressing the Power button. Secondly, turn on the laptop by pressing the power button located at the very top of the keyboard (see Figure 4 below). Power Figure 4
Open the front cover of the remote control and press “Comp 1.” You should now see the log-on screen of the laptop being projected to the wall. If not, press and hold the “Fn” key and hit the “F8” key until you see the log-on screen appear on both the laptop and projector screen. Note : Be sure that the lens cap of the projector has been removed. Log-in to the laptop: User name : cclaptop Password: cc Log on to: TOWN If you have saved your presentation to floppy or CD, proceed toStep 16. If you have saved your presentation to the network folder “cclaptop,” proceed toStep 17. Using the Laptop, 3
Using the Laptop, 4 • Insert your CDor floppy disk into the appropriate drive on the laptop (see Figure 5 below). Double click on “My Computer” and open the floppy or CD icon. Open up your presentation and you should be ready to go! After presenting, see Step 18. • To access the presentation which you saved to the network, open the My Computer icon on the laptop’s desktop. Double click on the icon labeled “cclaptop on ‘\chfs\users’ (U:).” Double click on your file. Figure 5
Closing up • Please clean up work area. • Shut down laptop and close the lid. • Unplug all chords from laptop. • Put items (mouse, speakers, laptop) into the podium cabinet. • Power off projector using EPSON remote. • Turn off EPSON remote and place inside projector cabinet. • Push down Elmo’s tube lights, and then the head using the gray “Unlock” button. • Replace the lens cap on the projector. • Lower the projector shelf all the way down. • Close the projector cabinet doors and pull the cabinet top closed. • Turn off the power strip in the slim cabinet. • Lock all cabinets and table top. Thanks! If you have questions or comments, contact Mona Nazir at mnazir@townofchapelhill.org, 968-2888 ext. 338