How to configure Hotmail in outlook
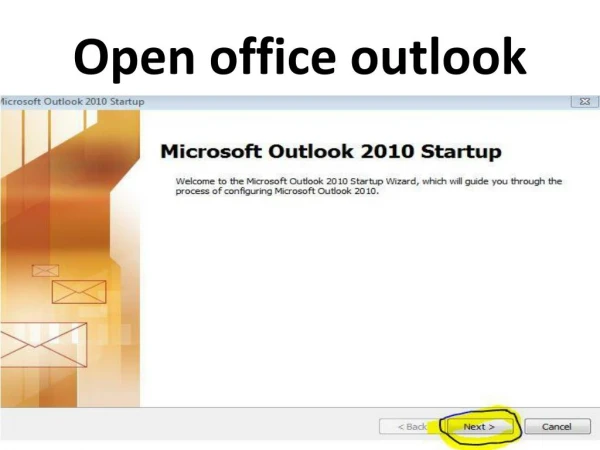
How to Configure Hotmail to Outlook Connecting your Hotmail messages to your Outlook e-mail client is easy way to configure with the Outlook. It provides an automated way of taking all your Hotmail e-mails and letting you send, receive, and of contact. It also gives you access to your files and documents without having to connect to the Internet. If you want to connect your Outlook to Hotmail, follow these steps. Contact US : 1-855-762-3888 Click on Start. Type in "office Outlook” in the search bar. Click on Microsoft Outlook click to launch it. Setting Outlook Configure Click on Start the start-up wizard. When launching Microsoft office Outlook, the start-up wizard should start. Click on the “Next” button at the lower right of the start-up window. Select the circle beside “Yes” on the next screen. Do this when Outlook asks you if you want to configure automatically or manually an e-mail account. Then click “Next” again. Select on “Manually configure server settings” check box at the lower left of the next screen. Then click “Next.” Click on “Other.” Then select “Microsoft Office Outlook Configure” and click “Next.” This should let you configure the e-mail account you want; in your case, it is Hotmail, outlook, live.com or msn.com. Setting Up Your Hotmail Account Enter your Hotmail e-mail address in the first email id type. Type in your password for Hotmail. Type in the name you want to assign for the Hotmail email account. For example, “sales,” “Account,” etc. Make sure “Remember your password” is checked because it will make logging in again later automatic.4 Click “Okay” button. Then click “OK” again when Outlook informs you that it will only apply when Outlook is restarted. At this point, the setup will have been configured. Upgrade the Outlook. Outlook will then inform you if the Connector needs to be upgraded. Having an upgraded connector ensures that you have the most recent features available on the Outlook connector. You can select “Remember me later” if you want to use Outlook right away. If you choose to upgrade later, Outlook will then remind you. You can still read, send, and receive e-mails on your Hotmail account through Outlook without upgrading, but you will be missing out on new features if your connector isn’t up-to-date. If you choose to upgrade, an installation wizard will appear, and it will guide you through the setup process. Click “OK” when Outlook prompts you that it will close outlook to begin the upgrade process. Click on “I accept” select the box. This will activate the “Install” button below it. Click “Install” to begin the upgrade new future. Press “Next” on the following screens as these are all default configurations that you shouldn’t worry about. During the installation, you will see a progress bar; just wait for the installation to finish. Press “Finish” to wrap up the installation. Restarting Outlook and Setting Up the Calendar. Repeat steps in launching Microsoft Outlook to restart the program or restart your system. At this time, the Hotmail account name you set earlier should appear in the Outlook inbox, which is under “All Mail” items at the left panel. Click on “Mail” at the left panel. The Outlook Calendar and contact should appear. On the left panel, a tick box should be under Outlook Calendar with the name of the Hotmail account you set and its calendar. Tick the box, and your Hotmail calendar should appear beside the Outlook calendar tab. You're helping people by reading ittechnicalhelpnumbers.
131 views • 12 slides